Let's Make & Crack a PRNG in Go!
Intro
Hi everyone! Oftentimes, when programming things that are supposed to be secure, we hear stuff about only using Cryptographically Secure PRNGs (CSPRNGs), and not just any old random-number generating function such as Python’s random module or PHP’s mt_rand. Today, we’re going to open the black box, understand how a PRNG (Pseudo-Random Number Generator) works, and find out whether this is truly something to be concerned about (spoiler: as you can guess from the title, it is). Why am I doing this in Go? I wanted to use Go for a really long time, and never had the chance to work on a project involving Go, and this is a good opportunity :) Without further ado, let’s get started!
What even is a PRNG?
We all have some notion of what randomness means. For example, rolling dice is considered random, because the outcome is not known in advance: the probability distribution of all outcomes is uniform. But how can we generate random numbers in the digital world? For example to give users a secret token, or to run some simulation? Random Number Generation on the computer can be split into two types:
- Hardware Random Number Generators (HRNGs), which rely on external factors, such as the physical environments, or entropy from the operating system (for example how many mouse clicks happened in the last minute)
- PseudoRandom Number Generators (PRNGs) which rely on an internal state to generate numbers. The numbers they generate still distribute uniformly, but because they rely on an internal state, the sequence of generated numbers is predefined In the next section, we’re going to implement one of the most common PRNGs used today, and after that see how we can crack it.
How Do We Make One?
The PRNG we are going to talk about today is called the Mersenne Twister (MT for short). It was invented in 1997 by Makoto Matsumoto and Takauji Nishimura, and has since become the default PRNG in many programming languages: for example, the
mtis PHP’s mt_rand stands for Mersenne Twister. Python (random module) and JS Math.random() also use it for random number generation. To generate random numbers, the MT maintains an internal state composed of 624 word-sized integers (i.e. if we are generatinguint32s, each element in the internal state is auint32). We represent it in Go using the following structure:
1
2
3
4
5
6
7
8
// Size of the state (i.e. the degree of reccurence)
const n int = 624

// The current state of the Mersenne Twister
type mt_state struct {
    state     [n]uint32
    state_idx uint // We'll use this later
}
This array is initialized using a seeding algorithm, which takes in one word-size integer known the seed (for example the argument to Python’s random.seed() function or PHP’s mt_srand), puts it in the first element of the state, and then generates the remaining numbers according to the following recurrence relation:
F is a constant, defined in implementations of 32-bit MT as 1812433253. The w constant is the word size in bits, in our case 32.
In Go, we implement this initialization function as follows:
1
2
3
4
5
6
7
8
9
10
11
12
13
14
// Initialize the state of the MT according to some seed
func (mt *mt_state) init_state(seed uint32) {
    //  First element of the initial state is the seed
    mt.state[0] = seed

    // All of the next elements are initialized
    // with a reccurence
    for i := 1; i < n; i++ {
        prev := uint(mt.state[i-1])
        mt.state[i] = uint32(f * (prev ^ (prev >> (w - 2)))) + uint32(i)
    }

    mt.state_idx = 0
}
Note that this means that given the same seed, the PRNGs will generate the exact same sequence of outputs. Great! Now, Let’s make a new function that creates a new MT structure from a seed (this is just calling the init_state function and initializing the state_idx):
1
2
3
4
5
6
7
8
// Initialize a new MT
func new_mt(seed uint32) *mt_state {
    var state [n]uint32
    mt := mt_state{state: state, state_idx: 0}
    mt.init_state(seed)

    return &mt
}
To generate new random numbers from the MT, we use two steps:
- Change the oldest element in the state (whose index is in
state_idx) using a recurrence relation - Apply some tempering transformation T to the new value we put in the state, and return the output of this transformation. Note that this transformation is invertible, which will help us later when cracking the MT To change the state, we use the following recurrence:
The constant m is defined as 397 in 32-bit MT, so state[(i + m) % n] means “take the element 397 elements (mod n) after the index of the element we want to generate”. Let’s decompose the righthand expression: state[i]^u is defined as the upper 32-r bits of the current value of state[i] and state[(i + 1) % n]^l is defined as the lower r bits of the next element in the state.
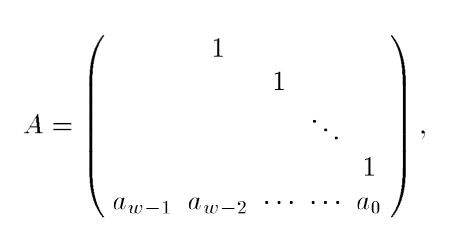
ORing them combines them so that we’ll get a new number whose upper 32-r bits are the same as the current value’s upper 32-r bits, and whose lower r bits are the same as the next element’s lower r bits. In MT, we define r = 31. We then multiply this number by some matrix A, which is defined as follows (the figure is taken from the MT paper: “Mersenne Twister: A 623-dimensionally equidistributed uniform pseudorandom number generator”):
All empty elements are defined as zero. When we multiply a number by this matrix (the number is converted to a 32-dimensional vector which is composed of the bits of the number), if the LSB of the number is 1, the a bits are added to the result. Otherwise, the a bits get multiplied by zero and so they will not appear in the result. a is defined as 0x9908B0DF, so the bottom row of A is the bits of this number. Because of this, multiplying a number (or rather the vector of its bits) x by this matrix yields the following result: x * A = (x >> 1) ^ (LSB of x is 0 ? 0 : a) In our code, we implement this as follows:
1
2
3
4
5
6
7
8
9
10
11
12
13
14
15
16
17
18
19
20
21
22
23
24
25
26
27
28
// Bitmask for taking the upper w-r=1 bits
const upper_mask uint = 0x80000000
// Bitmask for taking the lower r bits (r = 31)
const lower_mask uint = 0x7FFFFFFF
// Offset used in the reccurence
const m uint = 397
// The last row of the matrix A
const a uint = 0x9908B0DF

func (mt *mt_state) gen_next() uint32 {
    // The current state index
    i := int(mt.state_idx)
    // Compute the concatenation between the upper 1 bit of state[i] and lower 31 bits of state[i + 1]
    y := (mt.state[i] & uint32(upper_mask)) | (mt.state[(i+1)%n] & uint32(lower_mask))
    // Compute (part of) the matrix product
    y_lsb := y & 1
    var mat_prod uint
    // If the LSB of y is 0, the last row of A, which is the bits of a, won't be added to the result
    if y_lsb == 0 {
        mat_prod = 0
    } else {
        // Otherwise, we multiply a 1 with every bit of a, which yields a itself
        mat_prod = a
    }
    // Mutate the state by adding the i+m % n th number in the state to the matrix product
    mt.state[i] = mt.state[(i+int(m))%n] ^ (y >> 1) ^ uint32(mat_prod)
    ...
}
Great! We now apply the tempering transformation T, which is defined in 4 invertible steps:
y = state[i] ^ (state[i] >> u)y = y ^ ((y << s) & b)y = y ^ ((y << t) & c)out = y ^ (y >> l)u, s, b, t, c, andlare all constants:u,s,t, andl(the shift amounts) are defined as 11, 7, 15, and 18 respectively.bandc(the bitmasks) are defined as 0x9D2C5680 and 0xEFC60000 respectively. Here is the code for computing the output of the PRNG given the new value of the state that we computed earlier:
1
2
3
4
5
6
7
8
9
10
11
12
13
14
15
16
17
18
19
20
21
22
23
// Constants for the tempering transformation T
const u uint = 11
const s uint = 7
const b uint = 0x9D2C5680
const t uint = 15
const c uint = 0xEFC60000
const l uint = 18

// Generate a random number from the MT and mutate the oldest number in the state
func (mt *mt_state) gen_next() uint32 {
    ...

    // Compute the tempering transformation T of the state value we just mutated
    out := mt.state[i]
    out ^= out >> uint32(u)
    out ^= (out << s) & uint32(b)
    out ^= (out << t) & uint32(c)
    out ^= out >> uint32(l)
    // Update the state index
    mt.state_idx = uint((i + 1) % n)

    return out
}
Awesome! Let’s run a short sanity check by comparing the output with the output of PHP’s mt_rand:
1
2
3
4
5
6
// The Go code for using the PRNG
func main() {
	my_mt = new_mt(1337)

	fmt.Printf("PRNG Output: %d\n", my_mt.gen_next())
}
1
2
3
4
5
// The PHP code
mt_srand(1337);

$mt_out = mt_rand(0, getrandmax());
echo "PRNG Output: $mt_out";
Great! Both output PRNG Output: 1125387415.
Let’s Crack It
Remember how we said that the MT is insecure? Let’s put it to the test now. We crack the MT by restoring its internal state from its outputs. The key to doing this is to remember that the tempering transformation that we apply on elements of the internal state is invertible, so we if we apply the inverse transformation inv(T) on the output of T (which is the output of the PRNG), we will get the original element of the state (since the output is defined as T(state[i])). Remember that T is defined as follows:
1
2
3
4
5
6
// Compute the tempering transformation T of the state value we just mutated
out := mt.state[i]
out ^= out >> uint32(u)
out ^= (out << s) & uint32(b)
out ^= (out << t) & uint32(c)
out ^= out >> uint32(l)
Instead of inverting one large transformation, let’s invert each of the steps, and then apply them in reverse order. I struggled a bit (heh) with inverting the bitwise operations directly, so instead I looked for an alternative way to do that. After some trial and error, I found a good method: matrices. From Linear Algebra, linear transformations, such as the bitwise operations in the tempering transformations, are just matrices. When we multiply a vector by the transformation matrix, we get the output of the transformation. As an example, consider the following matrix:  This matrix is equivalent to the transformation
 f(x, y, z) = (x, 2y, z): when we multiply the vector (x, y, z) by the matrix shown above, we get (x, 2y, z). We say that this matrix is the transformation matrix of the transformation f. A cool thing we can do when we have the transformation matrix of some transformation is finding the inverse of the transformation f, which for more complex transformations (such as the ones in the tempering transformation) may be nontrivial. The inverse of the matrix shown above is
Which corresponds to the transformation g(x, y, z) = (x, 0.5y, z), the inverse of f! Armed with this knowledge, we can invert each of the steps of the tempering transformation as follows:
- Find the transformation matrix
- Find its inverse
- Find a transformation that corresponds to the inverse transformation matrix Let’s start with the last transformation (the first in reverse order):
out ^= out >> l
Or written more explicitly as
y = x ^ (x >> l)
We then write the bits of y explicitly:  According to the definition of the right shift operation, the first
 l bits of the right shift result are zero. XORing with zero returns the input, so we can rewrite this as 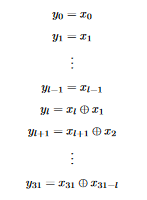 Now that we have an explicit form for each bit of the output, it is much easier to write out a transformation matrix for this. Since we are dealing with binary numbers here, out matrices are over the two-element (i.e. 0 and 1) finite field. To write a transformation matrix, we note the following:
- The first
lbits are the same as in the input, so we want the firstlrows to be the firstlrows of the identity matrix - Afterwards, each bit is XORed with the bit
lbits before it, so for row indexi > lwe want to put a 1 at position(i, i)(to get theith bit of the input) and a 1 at position(i, i-l). It’s easier to see this for smaller matrices. For example if our word size is 8, we can represent the transformationx ^ (x >> 3)with the following 8x8 matrix: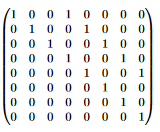 Similarily, our transformation matrix has its main diagonal full of 1’s, and another diagonal of length
 l = 18full of 1’s. All other elements are zeroes. Now that we know the transformation matrix, let’s find its inverse usingnumpy:
1
2
3
4
5
6
7
8
9
10
11
import numpy as np
from np.linalg import inv

# Main diagonal full of ones
x = np.eye(32, dtype=np.int32)
# Fill the offset diagonal with 32-18=14 ones
# The diagonal is at offset 18 from the main diagonal
y = np.diag(np.ones(14), 18)
t4 = x + y

t4_inv = inv(t4)
Now, let’s find the transformation corresponding to this inverse matrix, which is the inverse transformation. Instead of looking at the entire inverse matrix, we will print all diagonals where the sum of the diagonal isn’t 0. This is because the bitwise operations used only appear as diagonals, like in the original matrix. Here’s the code to do that:
1
2
3
4
5
for i in range(-32, 32):
    curr_diag = np.diagonal(t4_inv, i)

    if curr_diag.sum() != 0:
        print("Diagonal @ offset {} from the main diagonal has nonzero sum".format(i))
This code prints
1
2
Diagonal @ offset 0 from the main diagonal has nonzero sum
Diagonal @ offset 18 from the main diagonal has nonzero sum
If so, the inverse transformation of x ^ (x << 18) is x ^ (x << 18) itself! Notice how the first (or last) transformation is also of the form out ^= out >> u, and so we can use the previous code to find its inverse too, except this time the diagonal at offset u=11 from the main diagonal is filled with ones:
1
2
3
4
5
6
7
8
9
10
11
import numpy as np
from np.linalg import inv

# Main diagonal full of ones
x = np.eye(32, dtype=np.int32)
# Fill the offset diagonal with 32-11=21 ones
# The diagonal is at offset 11 from the main diagonal
y = np.diag(np.ones(21), 11)
t1 = x + y

t1_inv = inv(t1)
The diagonal-checking code prints:
1
2
3
Diagonal @ offset 0 from the main diagonal has nonzero sum
Diagonal @ offset 11 from the main diagonal has nonzero sum
Diagonal @ offset 22 from the main diagonal has nonzero sum
Which means that the inverse of y = x ^ (x >> u) is z = y ^ (y >> 11) ^ (y >> 21). Awesome! Now, let’s invert the second and third transformations, which are a bit more complex since they also contain bitwise ANDs:
1
2
out ^= (out << s) & uint32(b)
out ^= (out << t) & uint32(c)
Similar to how we inverted the previous transformations, let’s start by finding the explicit form of each bit in the output of the third transformation, y = x ^ ((x << t) & c). Each of the bits of y are defined as follows: 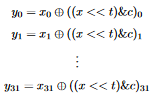 By the definition of left shift, the last
 t bits of x << t are 0. ANDing anything with 0 gives 0, and so the last t bits of ((x << t) & c), which is the righthand side, are zero. XORing anything with 0 gives the input, so the last t bits of y are the same as the last t bits of x. This means we can write the bits as follows:  We can now find out the transformation matrix. This time, the last
 t rows are the same as the identity matrix, since the last t bits of y are the same as the last t bits of x. The remaining bits are each XORed with the bit t bits after their index, ANDed with the corresponding bit in c. If so, we want to put a 1 at position (i, i) to get the original bit, and the corresponding bit of c at position (i, i+t). If the c bit is zero, we’ll end up putting a 0, which will return the original input. If the c bit is 1, we will XOR the ith bit of x with the i+tth bit of x. As before, it’s easier to see all this on a smaller-sized matrix. For example, here is the matrix of the transformation y = x ^ ((x << 3) & 0b10101100) on 8-bit words: 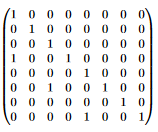 Let’s find the inverse in Python. Instead of just printing the offsets of the diagonals with nonzero sums, this time we also print the diagonals themselves, since there are bitwise masks involved:
1
2
3
4
5
6
7
8
9
10
11
12
13
14
15
16
import numpy as np
from numpy.linalg import inv

c = 0xEFC60000
t = 15

# Get the upper 15 bits of c
c_upper_bits = bin(c)[2:17]
amt_leading_zeroes = 32 - len(bin(c)[2:])
c_upper_bits = amt_leading_zeroes * "0" + c_upper_bits

x = np.eye(32, dtype=np.int32)
# The diagonal at offset -17 from the main diagonal is filled with the upper 15
# bits of C
y = np.diag([ord(x) - ord('0') for x in list(c_upper_bits)], -17)
t3 = x + y
To invert the matrix and print the diagonals, we use the following code:
1
2
3
4
5
6
7
t3_inv = inv(t3)

for i in range(-32, 32):
    curr_diag = np.diagonal(t3_inv, i)

    if curr_diag.sum() != 0:
        print("Diagonal @ offset {} is {}".format(i, curr_diag))
Which prints;
1
2
3
Diagonal @ offset -17 is [-1. -1. -1.  0. -1. -1. -1. -1. -1. -1.  0.  0.  0. -1. -1.]
Diagonal @ offset 0 is [1. 1. 1. 1. 1. 1. 1. 1. 1. 1. 1. 1. 1. 1. 1. 1. 1. 1. 1. 1. 1. 1. 1. 1.
 1. 1. 1. 1. 1. 1. 1. 1.]
What are those negative numbers? Remember that because we’re operating in a finite field with 2 elements, 1 is it’s own inverse, so we just treat those -1s as 1s. Since the diagonal at offset -17 is nonzero, the inverse transformation is of the form y = x ^ ((x << 15) & d). To find out what d is, remember that the contents of the diagonals are the upper bits of the bitmask. If so, d’s first 17 bits are those written in the diagonal, and the lower 15 bits are 0s. This yields us the following number:
1
11101111110001100000000000000000
Or in hex: 0xEFC60000, which is exactly c! This means that the inverse of y = x ^ ((x << t) & c) is itself: y = x ^ ((x << t) & c). Finding the inverse of the second transformation y = x ^ ((x << s) & b) is very similar: we just need to replace the diagonal offset and the bits. We do this using the following code:
1
2
3
4
5
6
7
8
9
10
11
12
13
14
15
16
import numpy as np
from numpy.linalg import inv

b = 0x9D2C5680
s = 7

# Get the upper 25 bits of b
b_upper_bits = bin(b)[2:27]
amt_leading_zeroes = 32 - len(bin(b)[2:])
b_upper_bits = amt_leading_zeroes * "0" + b_upper_bits

x = np.eye(32, dtype=np.int32)
# The diagonal at offset -7  from the main diagonal is filled with the upper 32-7=25
# bits of b
y = np.diag([ord(x) - ord('0') for x in list(b_upper_bits)], -7)
t2 = x + y
And now we invert the matrix:
1
2
3
4
5
6
7
t2_inv = inv(t2)

for i in range(-32, 32):
    curr_diag = np.diagonal(t2_inv, i)

    if curr_diag.sum() != 0:
        print("Diagonal @ offset {} is {}".format(i, curr_diag))
The code prints the following:
1
2
3
4
5
6
7
Diagonal @ offset -28 is [0. 0. 0. 1.]
Diagonal @ offset -21 is [ 0.  0.  0. -1.  0. -1.  0.  0.  0.  0. -1.]
Diagonal @ offset -14 is [1. 0. 0. 1. 0. 1. 0. 0. 0. 0. 1. 0. 1. 0. 0. 0. 0. 1.]
Diagonal @ offset -7 is [-1.  0.  0. -1. -1. -1.  0. -1.  0.  0. -1.  0. -1. -1.  0.  0.  0. -1.
  0. -1.  0. -1. -1.  0. -1.]
Diagonal @ offset 0 is [1. 1. 1. 1. 1. 1. 1. 1. 1. 1. 1. 1. 1. 1. 1. 1. 1. 1. 1. 1. 1. 1. 1. 1.
 1. 1. 1. 1. 1. 1. 1. 1.]
Let’s convert the numbers to hex:
1
2
3
4
Offset -28 (<< 28): 0b00010000000000000000000000000000 => 0x10000000
Offset -21 (<< 21): 0b00010100001000000000000000000000 => 0x14200000
Offset -14 (<< 14): 0b10010100001010000100000000000000 => 0x94284000
Offset -7 (<< 7):   0b10011101001011000101011010000000 => 0x9D2C5680
Which means that the inverse of y = x ^ ((x << s) & b) is:
1
y = x ^ ((x << 28) & 0x10000000) ^ ((x << 21) & 0x14200000) ^ ((x << 14) & 0x94284000) ^ ((x << 7) & 0x9D2C5680)
Awesome! Now we have the inverse of all the transformations, so in order to restore the state, we just have to run the inverse of the transformations in reverse order. This is done with the following code:
1
2
3
4
5
6
7
8
9
10
11
12
13
14
15
16
17
// Given some output from the PRNG, restore the corresponding element in the state
// e.g. given output 5, we can restore element 5 (or 4 if we're using zero-based indexing)
func restore_state(out uint32) uint32 {
// MT generates the output by applying an *invertible* tempering
// transformation to the state element
tempered_state := out
// Inverse of "out ^= out >> uint32(l)"
tempered_state ^= tempered_state >> uint32(l)
// Inverse of "out ^= (out << t) & uint32(c)"
tempered_state ^= (tempered_state << t) & uint32(c)
// Inverse of "out ^= (out << s) & uint32(b)"
tempered_state ^= ((tempered_state << 28) & 0x10000000) ^ ((tempered_state << 21) & 0x14200000) ^ ((tempered_state << 14) & 0x94284000) ^ ((tempered_state << s) & uint32(b))
// Inverse of "out ^= out >> uint32(u)"
original_state := tempered_state ^ (tempered_state >> 11) ^ (tempered_state >> 22)

return original_state
}
With this code and 624 outputs of the PRNG, we can guess all future outputs (and the past outputs). To demonstrate this, let’s make a short number guesser program that seeds the PRNG using the current timestamp, leaks the first 624 outputs of the PRNG, and then asks you to guess a random number from 0 to 1000000 10 times:
1
2
3
4
5
6
7
8
9
10
11
12
13
14
15
16
17
18
19
20
21
22
23
24
25
26
27
28
29
30
31
32
33
34
35
36
37
38
39
40
41
42
43
44
func main() {
	my_mt := mtlib.NewMt(uint32(time.Now().UnixMicro()))
	win_cnt := 0

	fmt.Println("Welcome to the guessing game!")
	fmt.Println("To win, guess a random number 10 times")
	fmt.Println("To help you, I wrote the first 624 numbers generated by the PRNG to a file named leak.txt")

	f, err := os.Create("./leak.txt")

	if err != nil {
		panic(err)
	}

	// Close after we return from main
	defer f.Close()

	for i := 0; i < 624; i++ {
		to_write := fmt.Sprintf("%d\n", my_mt.GenNext())

		f.WriteString(to_write)
	}

	fmt.Printf("Let's start!\n")

	for i := 0; i < 10; i++ {
		my_num := my_mt.GenNext() % 1000000
		var user_num uint32

		fmt.Printf("Guess which number I thought of: ")
		fmt.Scanf("%d\n", &user_num)

		fmt.Println("Correct!")

		if my_num != user_num {
			fmt.Println("Incorrect. Bye!")
			os.Exit(0)
		}

		win_cnt += 1
	}

	fmt.Println("Congratulations!")
}
This code seeds a new instance of the MT with the current Unix timestamp in microseconds. It then generates 624 numbers from the PRNG and writes them to a file named “leak.txt”. Afterwards, it runs a loop 10 times, in which it asks the user to guess a random number mod 1000000. Without cracking the PRNG, our chances of solving this our very slim: we have a 1 / 1000000 chance of getting the guess correctly, and we have to do this 10 times, which gives a probability of 1 over 10 to the power of 60, which is a very small number. However, because of the leak, we can guess the exact sequence of random numbers the PRNG will output using the following program:
1
2
3
4
5
6
7
8
9
10
11
12
13
14
15
16
17
18
19
20
21
22
23
24
25
26
27
28
29
30
31
32
33
34
35
func main() {
	var my_state [624]uint32
	state_idx := 0
	leak_path := os.Args[1]

	fmt.Println("Guessing Game Solver")
	fmt.Println("Specify the path of the leak file as a command line arg")

	f, err := os.Open(leak_path)

	check(err)

	// Initialize a scanner to read the file line-by-line
	fScanner := bufio.NewScanner(f)
	fScanner.Split(bufio.ScanLines)

	my_state[0] = 0

	// Each line in the file is a leak of a number generated by the PRNG
	for fScanner.Scan() {
		// Convert to a number
		leak, err := strconv.Atoi(fScanner.Text())
		check(err)
		// Crack the corresponding state element
		my_state[state_idx] = mtlib.RestoreState(uint32(leak))

		state_idx += 1
	}

	my_mt := mtlib.MtFromState(my_state)

	for i := 0; i < 10; i++ {
		fmt.Printf("Next number: %d\n", my_mt.GenNext()%1000000)
	}
}
This program reads each line of the leak file, converts it to an integer, and then calls the RestoreState function that we wrote earlier to guess the corresponding state element. It then creates a new MT from the state it restored. Then, it prints the next 10 numbers the PRNG will generate, mod 1000000. Let’s test it: 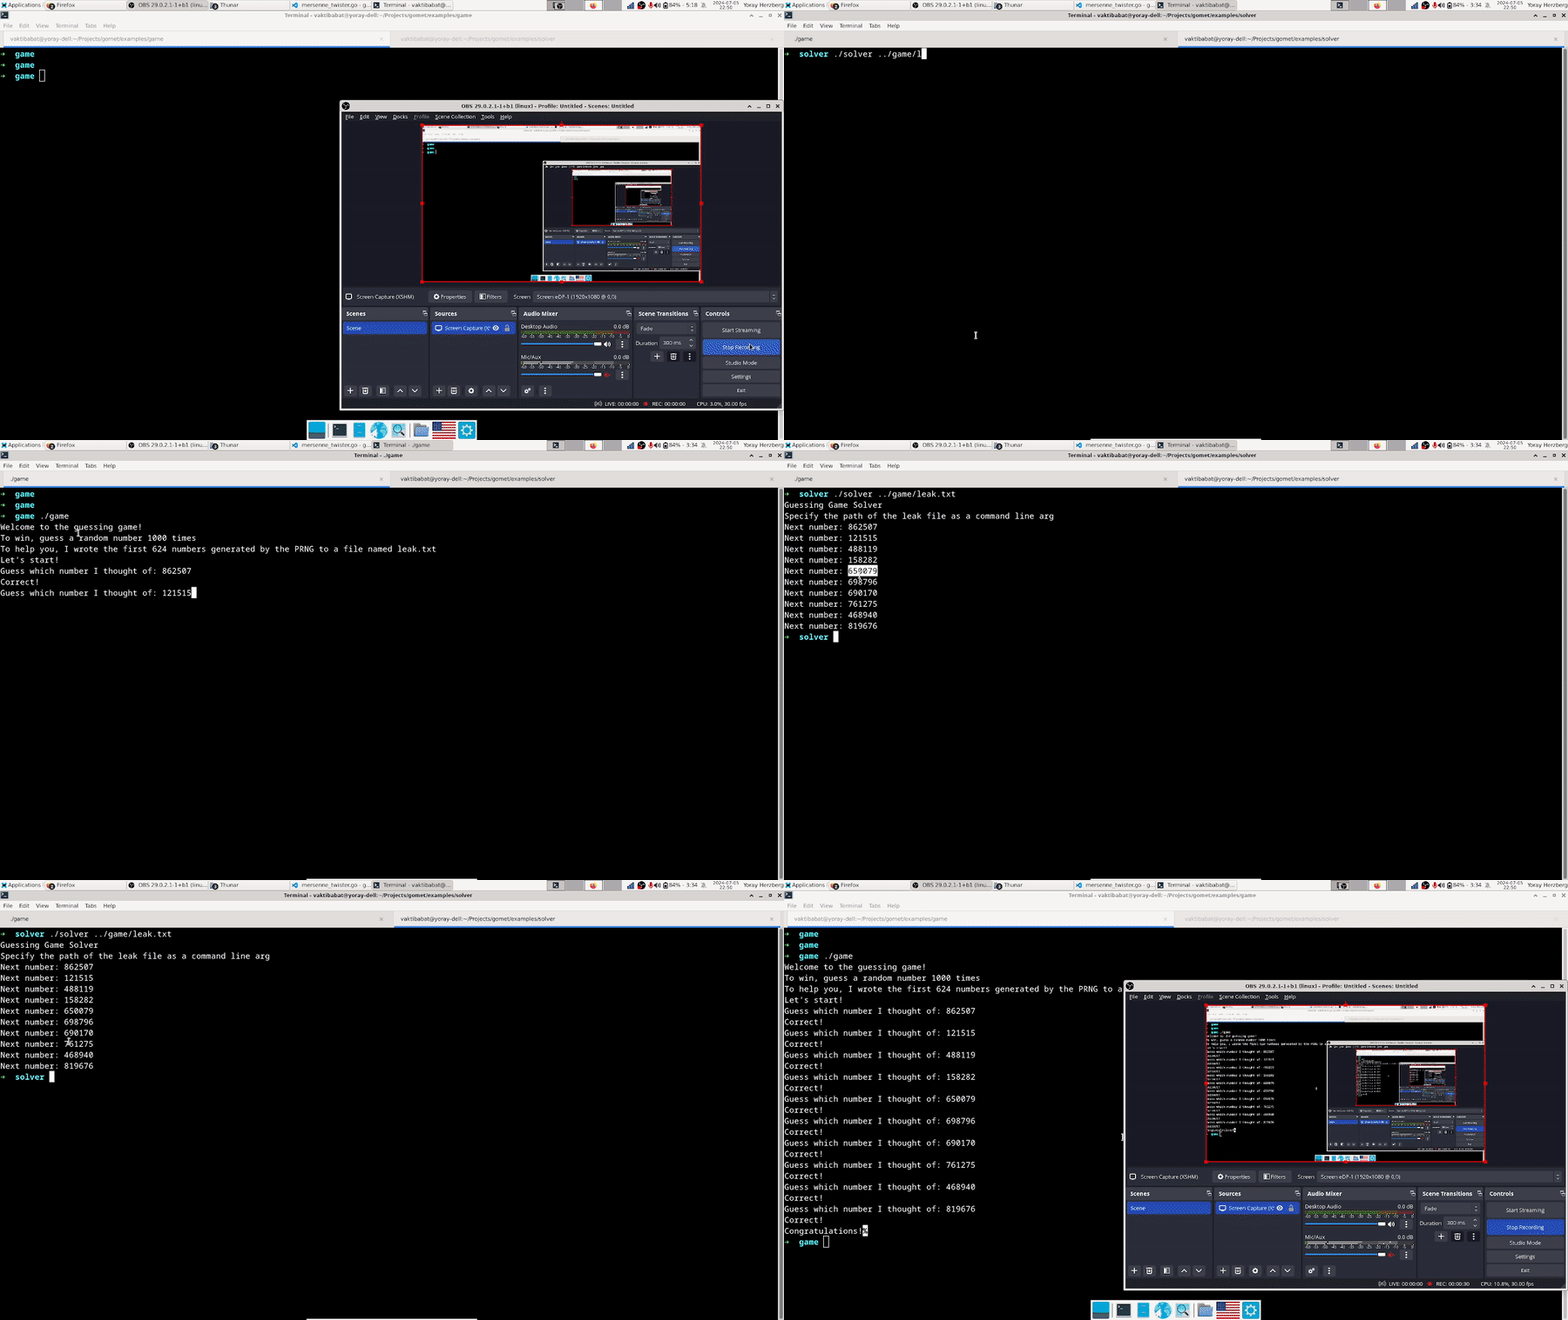
Great! We managed to beat the game using just a leak from the PRNG
Conclusion
In this post, we saw why we shouldn’t use a non Cryptographically Secure PRNG for anything security-related: both their future and past outputs can be completely predicted using a not-very-high number of generated numbers! I hope you learned as much from reading this post as I did from writing it: I always looked at PRNGs as a black box, and seeing how they work from the inside is really cool! Also, it’s pretty amazing how easily they can be cracked; Before writing this, I considered attacks like the one shown here highly theoretical, and it’s amazing how practical all this stuff is. One question that may come to mind after reading this post is “Is there any secure way to use the Mersenne Twister”? A possible answer is to apply some hash function to the output of the PRNG. It’s very hard to invert the hash function to get the original output of the PRNG (esp. when you generate 64-bit numbers, which would require a very very large rainbow table), so we can’t apply the inverse tempering transformation as easily. The code for this post can be found here.
Thanks for reading! Yoray ❤️


