Secure Chat 2.0 (Elliptic Curves, Protobufs, and MACs)
Intro
Several months ago, I wrote a post about developing a secure chat in Rust using RSA and AES-CBC. Writing that post taught me a lot (like in this post, all of the crypto algorithms were implemented from scratch), but there were 2 major problems with the final result:
- It was very hard to maintain. All the serialization/deserialization was done by hand over TCP streams, which meant that adding new features, like I wanted to do in this post, was nearly impossible
- There were multiple security issues in the chat. For example, messages were’nt MAC’d, meaning that attackers could modify messages sent over the network without the receiver knowing (MACs are explained later in this post). This version of the chat probably also has some security issues, but I’ve fixed the major ones from the previous post Another reason I’ve improved upon the previous project is that since then, I’ve learned some Elliptic-Curve Crypto, so I wanted to apply it somewhere. Prerequisites: Although this is a sequel, you don’t have to read the previous post before this one, since everything is written from the ground up. However, if you want to see the improvements to the code and the protocols, I highly reccommend reading it. Basic familiarity with Finite Fields and Groups is assumed. Additionally, if you haven’t read the previous post, you should be familiar with the difference between symmetric and assymmetric crypto, and the concept of certificates and CAs. Note that this post came out quite long :) I debated whether or not to split it into multiple, smaller posts, but in the end settled on doing one mega-post. If you prefer to, you can read it like a series of posts (each markdown # is a new post) The full code for the project is available here.
Protobufs
What’s Protobuf?
Despite “Elliptic Curves” being the change listed first in the title, the one I started working on first, and which proved to be very important, is using Protobufs. In the original post, as I mentioned in the intro, I implemented all the serializing & deserializing of messages from scratch. This made maintaining the code very difficult, so we need another solution. I didn’t want to use JSON for two reasons:
- There’s no built-in support for working with binary data (which is very common in crypto), so we’d have to resort to messy solutions like encoding all binary data as hex-strings
- There’s no predefined schema that parts of the code have to agree on for communication, which means that instead the schema is seperated all over comments in the code Instead, I used a different serialization format called Protocol Buffers (or Protobuf for short). Protobuf is a binary serialization format (unlike JSON), and was released by Google in 2008. It is language-agnostic (e.g. a Rust app that uses protobufs can talk with a Python app that uses protobufs), and has one major advantage over JSON: to serialize/deserialize with protobuf, you have to define a schema that defines how your messages look like (i.e. what fields they contain, and their types). For example, to serialize/deserialize a person object, we define the following message type in our schema:
1
2
3
4
message Person {
	string name = 1;
	uint32 age = 2;
}
The object has two fields: a name, which is a string, and an age, which is a uint32 (i.e. 32-bit unsigned int). The numbers after the = are field numbers, which are used by the protobuf implementation to identify fields in the binary serialization of the data.
Protobufs + Rust
Now that we know what protobufs are, let’s see how to use them in Rust. We’ll do this using two crates:
- protobuf, which is an implementation for the protobuf spec in Rust, and lets us serialize & deserialize data
- protobuf_codegen, which compiles our protobuf schema to Rust code. Since this is all done at compile time, little to no overhead is involved when using protobufs For the part of getting this all set up, I found a very useful project on GitHub that shows how to use everything together. The gist of it is that we define our schema somewhere, for example in a file
example.protounder directoryprotos, and then compile it as follows in thebuild.rsusingprotobuf_codegen:
1
2
3
4
5
6
7
fn main() {
    protobuf_codegen::Codegen::new()
        .cargo_out_dir("protos")
        .include("src")
        .input("src/protos/example.proto")
        .run_from_script();
}
The above code creates a new Codegen struct, defines its output directory to be under protos, specifies that all inputs should reside in the src directory, adds the example.proto schema as input, and then compiles it using protoc, which is the protobuf compiler. Afterwards, to use our protobuf schema from Rust code, we use the include! macro to include the generated Rust code as a module, and then import it:
1
2
include!(concat!(env!("OUT_DIR"), "/protos/mod.rs"));
use example::{Person};
Then, to serialize a Person object, we use:
1
2
3
4
5
6
7
// Create a new Person struct
let mut msg = Person::new();
msg.name = "John Doe".to_string();
msg.age = 1337;
// Serialize to bytes
let msg_bytes = msg.write_to_bytes().unwrap();
println!("{:?}", msg_bytes);
Which prints:
1
[10, 8, 74, 111, 104, 110, 32, 68, 111, 101, 16, 185, 10]
Nice! This is our Person object, serialized. The astute among you (or those who have read too many ASCII tables :)) will notice the string “John Doe” inside the bytes (74 is ‘J’, 111 is ‘o’, etc.). To decode the bytes back to a Rust struct, we use parse_from_bytes:
1
2
3
4
let msg_deser = Person::parse_from_bytes(&msg_bytes).unwrap();

println!("Name: {}", msg_deser.name);
println!("Age: {}", msg_deser.age);
This code prints:
1
2
Name: John Doe
Age: 1337
Which is what we would expect.
Protobufs Over The Network
In the chat, we’re going to transmit protobufs over the network, so it makes sense to write a short API that handles all the boilerplate of:
- Serializing a message, and sending it over the network
- Receiving a message of a certain type over the network, and deserializing it to get a Rust object
To do this, we’re going to first create a new generic trait called MessageStream, which is an abstraction to send and receive protobuf messages over a TcpStream:
1
2
3
4
5
6
7
8
/// This trait allows us to send and receive untyped messages over a stream
/// We implement it for TcpStream
pub trait MessageStream<T: ProtobufMessage> {
	// Receive a message of type T from the stream
	fn receive_msg(&mut self) -> Result<T, io::Error>;
	// Send a message of type T over the stream
	fn send_msg(&mut self, msg: T) -> Result<usize, io::Error>;
}
The term “untyped messages” will be explained later. The generic parameter T is the type of message to be sent/received. The ProtobufMessage trait (in the protobuf crate it’s named Message, but I renamed it) is implemented by all protobuf messages; for example the Person message from earlier. In order to send messages, we serialize the message to bytes, and send the number of bytes before so that the receiving end knows where the message ends:
1
2
3
4
5
6
7
8
9
10
11
12
impl<T: ProtobufMessage> MessageStream<T> for TcpStream {
	fn send_msg(&mut self, msg: T) -> Result<usize, io::Error> {
		// The first 8 bytes of the message are its size (in big-endian)
		// and the rest of the bytes are the proto itself
		let mut wire_bytes = msg.compute_size().to_be_bytes().to_vec();
		let mut msg_bytes = msg.write_to_bytes()?;
		// These are the bytes we send over the wire
		wire_bytes.append(&mut msg_bytes);

		self.write(&wire_bytes)
	}
}
Then, in the receiving side, we start by reading the length of the message, which is the first 8 bytes (because of the way send_msg is implemented) from the stream, read that many bytes into a buffer, and then deserialize said buffer to a T:
1
2
3
4
5
6
7
8
9
10
11
12
13
14
15
impl<T: ProtobufMessage> MessageStream<T> for TcpStream {
	...
	fn receive_msg(&mut self) -> Result<T, io::Error> {
		// Parse the size
		let mut size_bytes = [0u8; 8];
		self.read_exact(&mut size_bytes)?;
		// Read `size` bytes from the stream
		let mut payload_bytes = vec![0u8; u64::from_be_bytes(size_bytes).try_into().unwrap()];
		self.read_exact(&mut payload_bytes)?;
		// Parse the payload and return it
		let msg = T::parse_from_bytes(&payload_bytes)?;

		Ok(msg)
	}
}
Since T is a ProtobufMessage, it implements parse_from_bytes, and therefore we can parse payload_bytes with it. That’s all well and good, and this API will serve us well enough for most of the project, but what if we don’t know what type of message to expect? To solve this problem, we’ll implement another API that handles typed messages: messages in which the type of the message is specified as a byte, and is sent over the wire. For this API, we start by defining a struct called TypedMessage:
1
2
3
4
5
// A message of a certain type
pub struct TypedMessage {
	msg_type: u8,
	payload: Vec<u8>,
}
The payload field contains the serialized protobuf. Like in the previous API, we’ll implement two functions: send_typed_msg and receive_typed_msg:
1
2
3
4
5
6
7
8
9
10
11
12
13
/// Simialr to `MessageStream`. The main difference is that this trait
/// sends **typed** messages, i.e. the type of the message is transmitted over the wire
/// and the receiver can perform specific actions according to the type of the message received
pub trait TypedMessageReader {
    // Receive a message
    fn receive_typed_msg(&mut self) -> Result<TypedMessage, io::Error>;
}

pub trait TypedMessageSender<T: ProtobufMessage> {
    // Send a message of type T over the stream. We also require
    // a u8 that indicates the type of the message
    fn send_typed_msg(&mut self, msg: T, msg_type: u8) -> Result<usize, io::Error>;
}
To implement these, all we have to do is send, in addition to the length of the message, its type, before the payload:
1
2
3
4
5
6
7
8
9
10
11
12
13
impl<T: ProtobufMessage> TypedMessageSender<T> for TcpStream {
    fn send_typed_msg(&mut self, msg: T, msg_type: u8) -> Result<usize, io::Error> {
        // The first 8 bytes of the message are its size (in big-endian)
        // , after that we have one byte indicating the type, and the rest of the bytes are the proto itself
        let mut wire_bytes = msg.compute_size().to_be_bytes().to_vec();
        let mut msg_bytes = msg.write_to_bytes()?;
        // These are the bytes we send over the wire
        wire_bytes.push(msg_type);
        wire_bytes.append(&mut msg_bytes);

        self.write(&wire_bytes)
    }
}
Receiving a typed message is very similar:
1
2
3
4
5
6
7
8
9
10
11
12
13
14
15
16
17
18
impl TypedMessageReader for TcpStream {
    fn receive_typed_msg(&mut self) -> Result<TypedMessage, io::Error> {
        // Parse the size
        let mut size_bytes = [0u8; 8];
        self.read_exact(&mut size_bytes)?;
        // Parse the msg type
        let mut type_bytes = [0u8; 1];
        self.read_exact(&mut type_bytes)?;
        // Read `size` bytes from the stream
        let mut payload_bytes = vec![0u8; u64::from_be_bytes(size_bytes).try_into().unwrap()];
        self.read_exact(&mut payload_bytes)?;

        Ok(TypedMessage {
            msg_type: type_bytes[0],
            payload: payload_bytes,
        })
    }
}
That’s it! We now have two APIs that will make our lives much easier. Implementing these APIs saved me a lot of work, since they abstracted away the mechanism for sending & receiving messages, so I didn’t have this to think about the underlying implementation every time I wrote/changed a protocol. Overall, my experience with protobufs has been very positive for this project, and I’ll definitely be using them for other projects as well. Having all the message types be in a schema, instead of specified in comments all over the code, makes the code much tidier, and also makes adding new message types a breeze :)
Elliptic Curves
Elliptic Curves 101
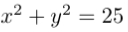
In the last post, we’ve used RSA for two purposes: encryption/decryption and signing/verification. In practice, however, RSA is rarely used for these goals (perhaps only on legacy systems). An alternative cryptosystem based on Elliptic Curves (EC for short) provides the same level of security, but with a smaller key size, thereby reducing storage needs, and more importantly for our purposes the amount of data that needs to be transmitted over the network. Recall that geometric objects, such as circles or ellipses, can be described using algebraic equations. For example, the following equation describes a circle (centered at the origin) with radius 5: a 2D point (x, y) is on said circle, if and only if it satisfies the below condition.
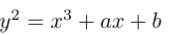
The relationship between geometric shapes and the algebraic equations that describe them is studied in a branch of math called Algebraic Geometry. Another one of the objects studied in Algebraic Geometry is called an Elliptic Curve, which are curves described by the following equation, where ‘a’ and ‘b’ are parameters, and -16(4a^3 + 27b^2) is not equal to zero:
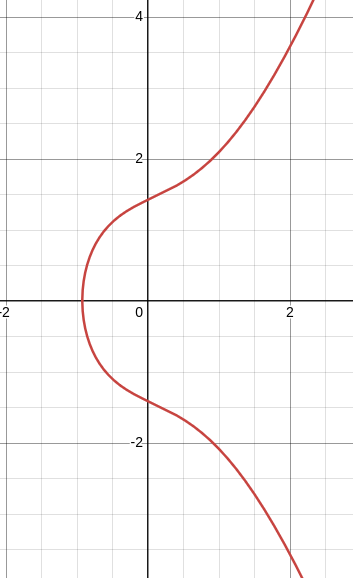
For example, if we set ‘a’ to 1.337 and ‘b’ to 2, we get the below curve:
Elliptic Curves are used in many branches of math; for example, they were a central part of the proof of Fermat’s Last Theorem.
EC Point Addition
So now we have this strange curve, but what can we do with it? In crypto, ECs are used to define a group whose elements are the points on the curve. The group operation is called point addition: given two points A and B on the curve, applying the group operation yields a new point A + B that is also on the curve.
The Simple Case
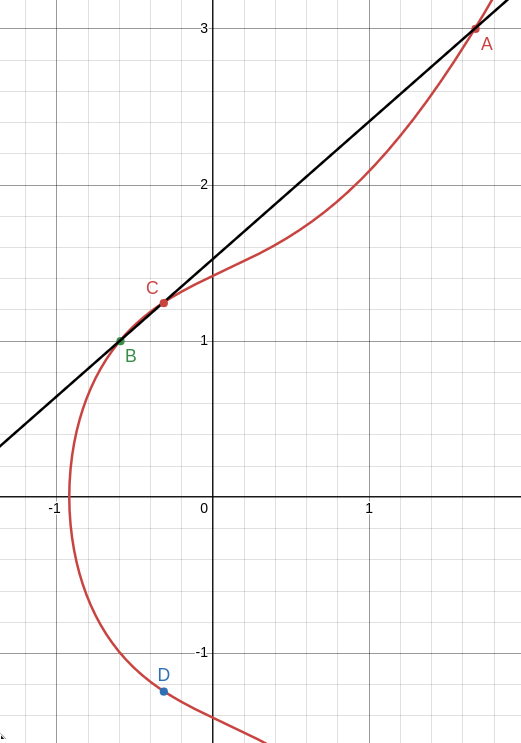
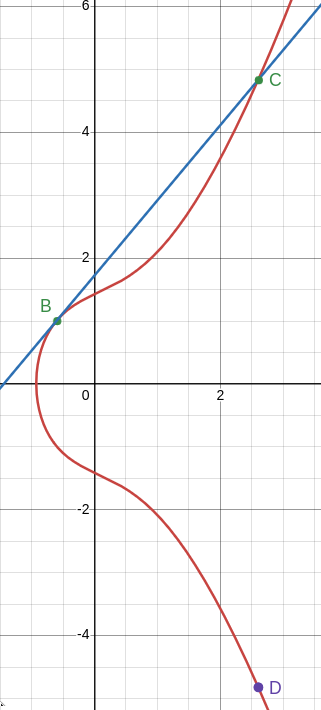
Generally, we define addition as follows: take two points on the curve, A and B. Draw the unique line that connects A and B. Typically, this line will intersect the curve at some point C. We then define A + B to be -C, which is the reflection of C along the x-axis. An example for adding the two points A: (1.68124, 3) and B: (-0.59243, 1) on the previous curve to yield a new point A + B = D is shown below:
Doubling a Point
That’s all well and good, but there are still some edge cases we need to figure out. For once, what if A = B, and so there’s no unique line that connects A and B? In this case, we instead use the tangent line to the curve at the point A = B, and other than that use the same procedure of finding the interesection with the curve and reflecting along the x-axis. An example of this is shown below, where we add the same point B from earlier to itself to yield a point D = 2B = B + B. This operation is also called point doubling, and is central to EC Crypto:
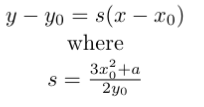
The equation for the tangent line can be found using Implicit Differentiation. I won’t go through the exact derivation here, since it’s quite technical, and not very interesting. For the implementation, all we need to know is that algebreically, the tangent is to the curve at the point (x0, y0) is defined as below:
The Point at Infinity
Yet another problem: how can we add a point A to its negative -A (i.e. A’s reflection along the x-axis)? In this case, the line connecting the two points is vertical, and so it doesn’t intersect the curve at any other point, rendering our previous definition useless. In this case, we say that A + (-A) is defined as the point at infinity O, which is an imaginary point that any line interesects with eventually. The point at infinity lies on every elliptic curve, and is the identity element of the group: for every point A, A + O = O + A = A (this is implied by how A + (-A) = O for all points A on the curve). So far, we’ve talked about curves over the real numbers: the coordinates of points that lie on these curves are real numbers. In crypto, however, we only deal with curves over finite fields, namely the additive group of integers modulo p Z_p, where p is a prime. All the previous definitions still apply, but we move them to the realm of finite fields: for instance, when computing the negative of a point A(x, y), which as you’ll recall is defined by (x, -y), the second coordinate -y is now the additive inverse of y modulo p.
Implementing ECs in Rust
Now, let’s get to implementing ECs in Rust. We start with defining a struct Curve that contains the EC’s parameters (a and b), and the modulus p of the finite field over which we are working:
1
2
3
4
5
6
7
8
/// An elliptic curve of the form y^2 = x^3 + ax + b
/// We only consider curves over `Z_p`, where p is a prime (i.e. the additive group of integers modulo p)
#[derive(PartialEq, Clone, Debug)]
pub struct Curve {
    a: BigUint,
    b: BigUint,
    p: BigUint,
}
Next, to use points, we define an enum Point. Recall that a point either has coordinates, or is the point at infinity:
1
2
3
4
5
6
/// A general point; Can either have coordinates, or be the 'point at infinity' (O)
#[derive(Debug, PartialEq, Clone)]
pub enum Point {
	Coords(BigUint, BigUint),
	O,
}
We also define a point associated with a curve, which will make our life a bit simpler down the line:
1
2
3
4
5
6
/// A point (x, y) that lies on an EC
#[derive(Debug, PartialEq, Clone)]
pub struct CurvePoint {
    point: Point,
    curve: Curve,
}
Given a curve, we want to have the option to generate new points on the curve. We do this with a function gen_point (associated with the Curve struct), which takes in optional coordinates, and returns a CurvePoint:
1
2
3
4
5
6
7
8
9
10
11
12
13
14
15
16
17
18
19
20
21
    /// Return a new point w/coordinates (x, y) on the curve
    /// x and y are reduced modulo p
    /// If one of the coordinates is None, the point at infinity is returned
    pub fn gen_point(&self, coords: Option<(&BigUint, &BigUint)>) -> CurvePoint {
        if let Some((x, y)) = coords {
            // Reduce the coordinates modulo p
            let x_red = x % &self.p;
            let y_red = y % &self.p;

            CurvePoint {
                point: Point::Coords(x_red, y_red),
                curve: self.clone(),
            }
        } else {
            CurvePoint {
                point: Point::O,
                curve: self.clone(),
            }
        }
    }
Note how we reduce the coordinates of the point mod p, since the curve is defined over Z_p. In case the coordinates aren’t specified, we simply return the point at infinity.
Point Addition in Rust
Now for the hard part: point addition. For this I used the algorithm from “An Introduction to Mathematical Cryptography” by Hoffstein et al:
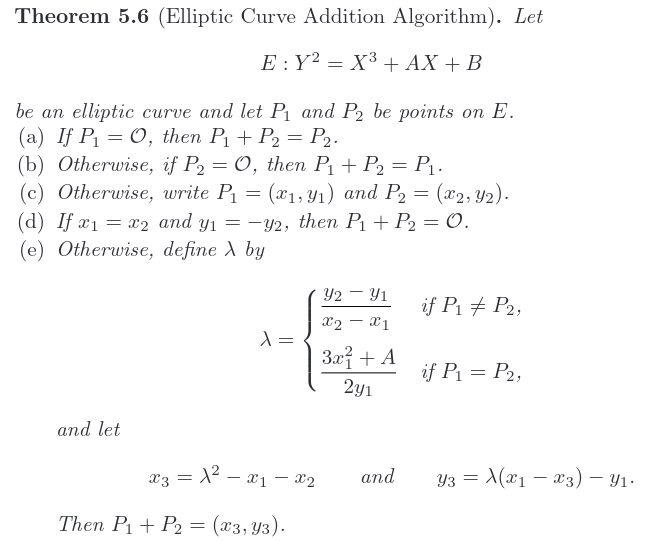
Let’s walk through this:
- (a) and (b) are the cases where one of the points is the point at infinity, which is the identity, and so the result is the other point (which may also be the identity).
- Case (d) is the case in which the one of the points is the additive inverse of the other, and so the result is the identity
- In case (e), we define either the line connecting P_1 and P_2, or the line tangent to the curve at P_1 = P_2, depending on whether P_1 != P_2 or P_1 = P_2, respectively. We finally find the point of intersection with the curve, and reflect it along the x-axis to yield the result (x_3, y_3) (these two steps are combined in one step). Let’s get to implementing this! We’ll use the
Addtrait, which is an alias to the+operation in Rust. Implementing this trait forCurvePoint(we implement this forCurvePointand not forPointsince we also need to know what curve we’re adding over; this is why we combined them both into a single struct) requires implementing a single functionadd:
1
2
3
4
5
6
7
impl Add for CurvePoint {
    type Output = Result<CurvePoint, ECError>;

    fn add(self, rhs: Self) -> Self::Output {
	    ...
    }
}
We return a Result since adding two points from two different curves is an error; we define this in a new enum ECError:
1
2
3
4
5
#[derive(Debug)]
pub enum ECError {
    /// Performing operations on points from two different curves is an error
    DifferentCurves,
}
Let’s check for this inside the add function:
1
2
3
if self.curve != rhs.curve {
    Err(ECError::DifferentCurves)
}
In the other case, where the curves are equal, we’ll match over the two points. We’ll start with handling the simple case where one of the points is the identity (cases (a) and (b) from the algorithm). We’re also extracting the curve into a helper variable:
1
2
3
4
5
6
7
8
9
10
 else {
    let curve = self.curve;

    match (self.point, rhs.point) {
    // If either of the points is the point at infinity,
    // return the other, since the point at infinity is the identity element for point addition
    (Point::O, q) => Ok(CurvePoint { point: q, curve }),
    (p, Point::O) => Ok(CurvePoint { point: p, curve }),
    ...
}
Next, if both points have coordinates, we denote the coordinates with (x1, y1) and (x2, y2), respectively, as in the algorithm. In case the points are the additive inverse of each other (i.e. each other’s reflection along the x-axis), we return the point at infinity
1
2
3
4
5
6
7
8
9
10
11
12
(Point::Coords(x1, y1), Point::Coords(x2, y2)) => {
    // If P and Q are the inverse of each other (i.e. the reflection along the X axis)
    if x1 == x2 && y1 == (&curve.p - &y2) {
        Ok(CurvePoint {
            point: Point::O,
            curve,
        })
    } else {
	...
	}
	...
}
Note how we check whether y1 is equal to y2 in modulo p. It follows from the implementation of gen_point that all the coordinates are mod p, so there’s no need to reduce them again (i.e. checking for (y1 % &curve.p) == (&curve.p - (&y2 % &curve.p))). Finally, in case the points aren’t inverses of each other, we compute the slope for the line connecting P and Q (or the tangent line to P = Q in case they’re equal):
1
2
3
4
5
6
7
8
9
10
11
12
13
14
15
else {
    // Compute the slope of the line defined by P and Q
    let lambda = if (&x1, &y1) != (&x2, &y2) {
	    let denom = (&x2 + (&curve.p - &x1)).modinv(&curve.p).unwrap();
	    let nom = (y2 + (&curve.p - &y1)) % &curve.p;

	    (nom * denom) % &curve.p
    } else {
    // If they're the same point, lambda is different
	    let denom = (BigUint::from(2u64) * &y1).modinv(&curve.p).unwrap();
	    let nom = (BigUint::from(3u64) * &x1 * &x1 + &curve.a) % &curve.p;

	    (nom * denom) % &curve.p
	}
};
It looks a bit complicated because of all the moduli, but in the case the points aren’t equal, for example, the denominator is defined as 1 / (x2 - x1). The &curve.p - &x1 computes the additive inverse of x1 modulo p, and the modinv computes the multiplicative inverse modulo p of x2 - x1. Finally, now that we have the slope, we compute the intersection with the curve, reflect along the x-axis, and return the result:
1
2
3
4
5
6
7
8
9
10
// The coordinates of the result
let x3 = (&lambda * &lambda + (&curve.p - &x1) + (&curve.p - &x2)) % &curve.p;
let y3 = ((lambda * (&x1 + (&curve.p - &x3))) % &curve.p
    + (&curve.p - &y1))
    % &curve.p;

Ok(CurvePoint {
	point: Point::Coords(x3, y3),
	curve,
})
Multiplication by a Scalar
Great! Now we can add points, but we still aren’t done. With curves over integers, there’s an operation called multiplication by a scalar that forms the basis for many EC crypto algorithms: the multiplication kP of a point P by an integer scalar k is defined as adding P to itself k times. Doing this naively is very inefficient, so instead we’re going to use an algorithm called the double-and-add algorithm (very similar to the square-and-multiply algorithm used for an efficient implementation of modexp). Here’s the gist of the algorithm:
- Suppose we want to compute kA, where k is in Z_p and A is a point in a curve over Z_p
- We first compute the binary representation of k (each b_i is either a 0 or a 1):

- Observe that if we write kA, and plug in the above binary representation of k, we get:

- Since each b_i is either a 0 or a 1, we can compute the binary representation of k, track the result, and add b_i (2 ^ i A) each time b_i is 1 Here’s the code for this (I implemented the algorithm using the pseudocode from wikipedia):
1
2
3
4
5
6
7
8
9
10
11
12
13
14
15
16
17
18
19
20
21
22
23
24
impl CurvePoint {
    // Mulitply the point by a scalar k. Multiplication by a scalar
    // is defined by adding the point to itself k times. We do this using the double-and-add algorithm
    // This is done acc. to the pseudocode on Wikipedia; see https://en.wikipedia.org/wiki/Elliptic_curve_point_multiplication
    pub fn dot(&self, k: &BigUint) -> CurvePoint {
        // The bits of k, from LSB to MSB
        let bits: Vec<bool> = (0..k.bits()).map(|pos| k.bit(pos)).collect();
        let mut res = CurvePoint {
            point: Point::O,
            curve: self.curve.clone(),
        };
        let mut temp = self.clone();

        for bit in bits {
            if bit {
                res = (res + temp.clone()).unwrap();
            }

            temp = (temp.clone() + temp).unwrap();
        }

        res
    }
}
The res starts as being the point at infinity, and is added to each time we have a bit in k is set. At iteration i, temp is defined as 2^i A, and so we’re adding b_i 2^i A to temp at each iteration of the loop (when b_i = 0 we don’t add anything), as in the sum from earlier. How much work does this algorithm save us? Instead of needing to perform k EC additions, we only need to perform log k (the number of bits in the binary representation of k). This is a massive improvement!
Standard Curves
Some Elliptic Curves are stronger than others, so in ECC we typically work over standard curves (unlike RSA, where you mostly generate your own modulus). The parameters (a, b, and p) of these Standard Curves are chosen specifically to make them more secure than others. To allow usage of some common standard curves, we’ll implement a new module std_curves.rs that contains two common curves: NIST P-256 and Secp256k1 (the curve used by Bitcoin). To do this, we’ll use use the once_cell crate to initialize these standard curves (since we have to call Curve::new). For example, here’s the NIST P-256 curve:
1
2
3
4
5
6
7
8
9
10
11
12
13
// NIST P-256 Curve parameters
const NIST_P_256_P: &str = "ffffffff00000001000000000000000000000000ffffffffffffffffffffffff";
const NIST_P_256_A: &str = "ffffffff00000001000000000000000000000000fffffffffffffffffffffffc";
const NIST_P_256_B: &str = "5ac635d8aa3a93e7b3ebbd55769886bc651d06b0cc53b0f63bce3c3e27d2604b";

/// NIST P-256 Curve
pub static NIST_P_256: Lazy<Curve> = Lazy::new(|| {
    let p = BigUint::from_str_radix(NIST_P_256_P, 16).unwrap();
    let a = BigUint::from_str_radix(NIST_P_256_A, 16).unwrap();
    let b = BigUint::from_str_radix(NIST_P_256_B, 16).unwrap();

    Curve::new(a, b, p)
});
For a comprehensive list of standard curves and their parameters, I strongly reccommend the Standard Curve Database by the Czech Centre for Research on Cryptography and Security.
Elliptic Curve Cryptography (ECC)
Now that we’re familiar with fundemental EC operations, let’s see what we can do with them crypto-wise. We’re going to learn about two very useful algorithms, both of which are used in the chat.
Elliptic Curve Diffie-Hellman (ECDH)
The first algorithm provides a way to establish a shared secret over an insecure channel. Like its name suggests, it is based on the classic Diffie-Hellman Key Exchange algorithm, introduced in 1976 by mathematicians Whitfield Diffie and Martin Hellman.
Classic Diffie-Hellman (DH)
Classic Diffie-Hellman is pretty simple: Alice and Bob start off by agreeing upon a finite field Z_p, where p is a prime, and a generator g != 1 in Z_p, with a common choice being g = 2. Next, have Alice and Bob pick private keys a and b, respectively. Both a and b are random elements in Z_p. The protocol then proceeds as follows:
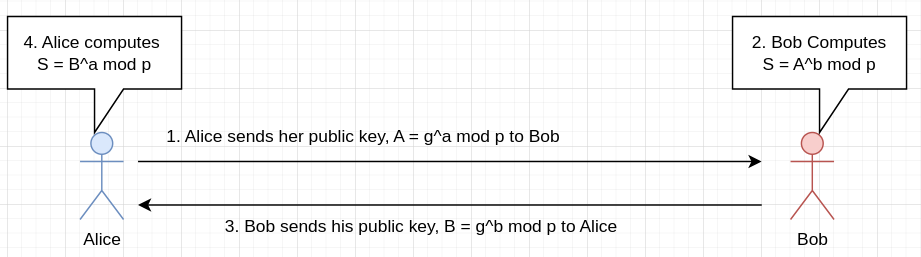
That’s it! To see why Alice and Bob compute the same shared secret S, observe the following algebraic trick:

I find it fascinating how such a simple trick can be used to create such a useful algorithm :) Diffie-Hellman is based upon a classic problem called the Discrete-Logarithm Problem (DLP). The DLP is stated as follows: “Given a finite field Z_p, where p is a prime, a generator g, and a number in the field of the form b = g^a mod p, find a”. So far, a polytime solution for the DLP has not been found, which makes it a trapdoor function - the modexp is easy to perform, but the inverse operation (DLP) is hard. If an attacker could solve DLP, they could recover Alice and Bob’s private keys from their pubkeys, and compute the shared secret. If we assume the attacker to be passive, currently there are no known attacks to recover the shared secret (at least to my knowledge). But in our chat, the attacker is assumed to be active: they also have the capability to modify messages. In this case, there exists a very simple attack against the protocol shown above (also called unauthenticated DH):
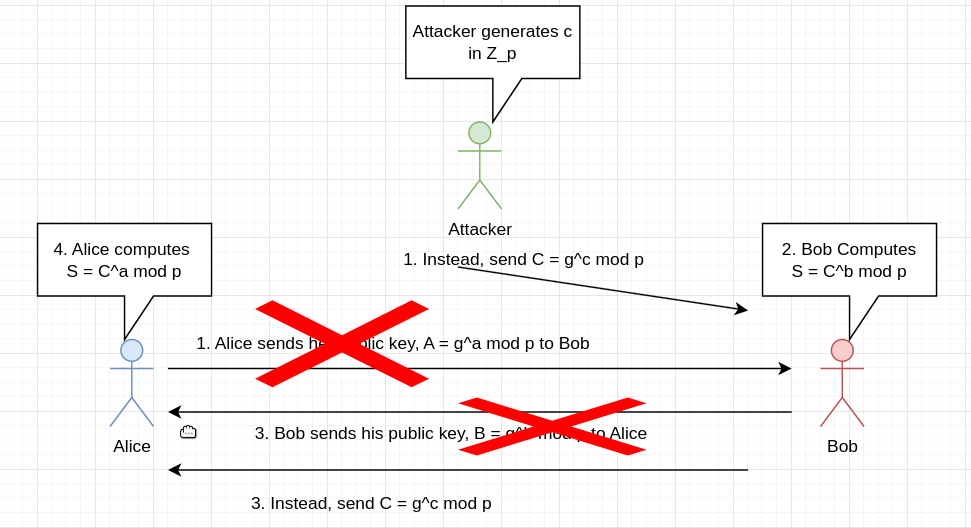
Since the attacker can read messages, they also know Alice and Bob’s pubkey. Thus, they can get the shared secret that Alice and Bob compute as follows:
- To get Alice’s secret, compute A ^ c mod p = g^{ac} mod p
- To get Bob’s secret, compute B ^ c mod p = g^{bc} mod p
An attacker can then decrypt all of the messages. The fundemental problem here is that Alice and Bob have no idea who they’re talking to on the other side. They have no idea whether your messages are being modified or not. To solve this problem, we will have to establish some notion of identity, which we will do using certificates (see the previous post). The certificates are signed using ECDSA (Elliptic Curve Digital Signature Algorithm), which is the algorithm we’ll talk about after ECDH.
Elliptic-Curve Diffie Hellman
Elliptic-Curve Diffie Hellman is very similar to classic DH, but it uses EC instead of numbers. Alice and Bob start off by agreeing upon a curve C, and a generator point inside that curve G. Then, Alice and Bob generates private keys a and b, which are integers in the range of 1 to n, where n is the order of G (the smallest integer such that nG = O, where O is the point at infinity). Afterwards, the protocol proceeds as follows:
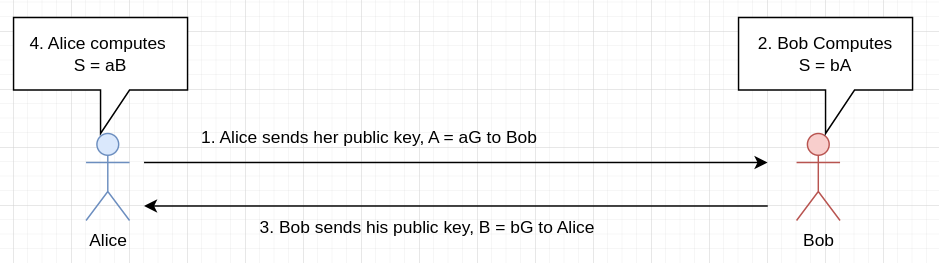
Note the similarity to classic DH; The trick here is even simpler: aB = abG = baG = bA. The same attack on unauthenticated DH also exists here. It is very similar (instead of a number, the attacker sends a point), so I won’t repeat it here. ECDH is based on a similar problem to the DLP called ECDLP, stated as follows: Given a curve C, a generator G, and a point A = aG, find a. In the chat, we’re going to use ECDLP to establish a shared secret, which we then use as an AES key. Before we do that, however, we need to construct the infrastructure for certificates, which is based on the next algorithm.
Elliptic-Curve Digital Signature Algorithm
Another thing that can be done using ECC is digital signatures. For example, one of the most notable applications of ECC, Bitcoin, only supports digital signatures using ECDSA. In order to sign a message m, we perform the following steps:
- Compute the hash
hofm, and reduce it modulon, wherenis the order of the generator G in the curve. We now have 1 <= h < n - Pick a random number
kbetween 1 and n - 1 (inclusive) - Compute R = kG
- Set
rto be the x-coordinate of R - Compute s = (h + rd) / k in mod n (division is inverse multiplication), where d is Alice’s private key
- Return (r, s) as the signature
Then, to verify the signature (r, s) for message m, the verifier does the following:
- Compute w = 1 / s. Because of the way s is defined, we have w = k / (h + rd)
- Compute u = wh mod n = hk / (h + rd) mod n
- Compute v = wr mod n = rk / (h + rd) mod n
- Compute Q = uG + vP, where P is Alice’s pubkey. This is equal to:
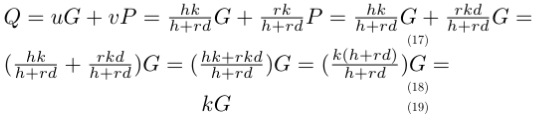
- Accept the signature iff the x-coordinate of Q is equal to r
Note that k has to be random. Otherwise, attackers can forge signatures without the private key d (see this Wikipedia article). A well-known product that had this vulnerability is the PlayStation 3: this attack allowed people to forge signatures for homebrew programs and run them on the console.
Implemention in Rust
First off, we create a new struct Keypair:
1
2
3
4
5
6
7
8
9
10
11
12
13
14
15
/// A keypair, containing a private key and a public key, along with some parameters
/// such as what curve is used, and the generator point
pub struct Keypair {
    // The private key d; This is the scalar by which we multiply the base point
    d: BigUint,
    // The public key Q = d * G, where G is the generator point
    pub_key: CurvePoint,
    // The curve used
    curve: Curve,
    // The generator point
    gen: (BigUint, BigUint),
    // The order of the curve. This is optional, since it's only required in case the user
    // wants to use ECDSA
    order: Option<BigUint>,
}
As well as the keypair itself (d and pub_key), it also contains metadata, such as the curve used ang the generator point. To generate a new keypair, we first generate a private key d, and then compute pub_key = gen.dot(d):
1
2
3
4
5
6
7
8
9
10
11
12
13
14
15
16
17
18
19
20
21
22
23
24
25
26
27
28
impl Keypair {
    /// Create a new Keypair, that lies on curve `curve` w/Generator `g`
    /// We also require the order `n` of the curve as a parameter, since this value is needed
    /// for ECDSA
    /// We require the user to specify the order of the curve explicitly,
    /// even though we could just derive it from the curve itself,
    /// since the order is pre-computed for some standardized curves (see the `std_curves.rs` module)
    pub fn new(curve: &Curve, g: &(BigUint, BigUint), order: Option<&BigUint>) -> Keypair {
        // Pick a private key d, which is a random number between 0 and p - 1, where p
        // is the modulus of the curve (i.e. the order of the field over which the curve is defined)
        let mut rng = thread_rng();
        let d = rng.gen_biguint_below(&curve.p());
        // Generate the public key Q, which is defined as d * G
        // First, convert g into a CurvePoint (point that lies on the curve we get as the argument)
        let g_point = curve.gen_point(Some((&g.0, &g.1)));
        let pub_key = g_point.clone().dot(&d);
        // That's it; Return a new Keypair now

        Keypair {
            d,
            pub_key,
            curve: curve.clone(),
            gen: g.clone(),
            order: order.cloned(),
        }
    }
    ...
}
The implementation of ECDH is super simple (two lines) - all we need is the pubkey of the other peer:
1
2
3
4
5
6
7
8
9
10
11
12
impl Keypair {
/// Derive a shared secret using ECDH (EC Diffie-Hellman); As input, this method takes in the other peer's
    /// public key, which is a CurvePoint
    /// We return the shared point (`d_A * d_B * G`), from which other methods can derive a secret
    /// (e.g. by hashing the two coordinates)
    pub fn ecdh_shared_secret(&self, peer_point: CurvePoint) -> (BigUint, BigUint) {
        let shared_point = peer_point.dot(&self.d);

        shared_point.point().coords().unwrap()
    }
    ...
}
The coords method returns the coordinates of a point. The implementation is not all that intreseting, so I didn’t include it in the post. ECDSA requires a bit more work, but it’s also not terribly long. To sign:
1
2
3
4
5
6
7
8
9
10
11
12
13
14
15
16
17
18
19
20
21
22
23
24
25
26
27
28
29
impl Keypair {
    /// Sign a message m using ECDSA (EC Digital Signature Algorithm)
    /// This function receives, as input, the the bytes of the message to be signed
    /// and outputs the signature, which is of the form (r, s)
    /// Can also fail in case the user hadn't specified the order of the curve
    pub fn sign(&self, m: &[u8]) -> Result<(BigUint, BigUint), KeypairError> {
        if let Some(n) = &self.order {
            let mut rng = thread_rng();
            // We interpret the hash of the message as a number between 1 and n - 1
            // where n is the order of the curve
            let m_hash = (1u64 + BigUint::from_str_radix(&digest(m), 16).unwrap()) % n;
            // Pick a random number k between 1 and n - 1
            let k = rng.gen_biguint_range(&1u64.into(), n);
            // Compute R = kG
            let (gen_x, gen_y) = &self.gen;
            let base_point = self.curve.gen_point(Some((gen_x, gen_y)));
            let secret_point = base_point.dot(&k);
            // Set r = x_R mod n, and compute s = (h + rd) / k in modulo n
            // x_R is the x-coordinate of point R
            let r = secret_point.point().coords().unwrap().0 % n;
            let s = ((m_hash + &r * &self.d) * k.modinv(n).unwrap()) % n;

            return Ok((r, s));
        }

        Err(KeypairError::SignatureWithoutOrder)
    }
    ...
}
The comments are the exact steps from the previous section. The digest function is provided by the sha256 crate. It returns a string, so we have to convert it to an integer using from_str_radix. Here’s the code for verification:
1
2
3
4
5
6
7
8
9
10
11
12
13
14
15
16
17
18
19
20
21
22
23
24
25
26
27
28
29
30
31
32
impl Keypair {
    /// Verifies a signature (r, s) for a message m, given the signer's public key, which is
    /// (presumably) used to sign m
    pub fn verify(
        &self,
        m: &[u8],
        sig: (BigUint, BigUint),
        peer_point: &CurvePoint,
    ) -> Result<bool, KeypairError> {
        if let Some(n) = &self.order {
            let (r, s) = sig;
            // This is equal to `k / (m_hash + rd)` in modulo n
            let w = s.modinv(n).unwrap();
            let m_hash = (1u64 + BigUint::from_str_radix(&digest(m), 16).unwrap()) % n;
            // Compute u and v, which are equal to `w * m_hash`, and `w * r`, respectively
            let u = (&w * m_hash) % n;
            let v = (&w * &r) % n;
            // Compute `Q = u * G + v * P`
            let (gen_x, gen_y) = &self.gen;
            let base_point = self.curve.gen_point(Some((gen_x, gen_y)));
            let capital_q = (base_point.dot(&u) + peer_point.dot(&v)).unwrap();
            // Accept iff the X-coordinate of Q is equal to r
            let q_x = capital_q.point().coords().unwrap().0;

            return Ok(q_x == r);
        }

        Err(KeypairError::SignatureWithoutOrder)
    }

	...
}
Note that we have the underlying crypto algorithms, we can start building the chat itself!
The Chat’s Protocol
As in the last post, our goal with the protocol is to allow both parties to establish a shared symmetric key, and then have them encrypt & decrypt messages to each other using AES. In the previous post, we did this by first having them verify each other’s identity using certificates, and then having the server encrypt an AES symmetric key using the client’s RSA pubkey. In the new version, the cetificate part is going to be similar, except we sign using ECDSA instead of RSA. To establish the shared secret, we’re going to use ECDH. Below is the simplified flow of the protocol used in the chat:
- Alice shows her cert to Bob. The cert contains Alice’s pubkey, her name, and her organization
- Bob verifies the signature on the cert against the CA’s pubkey. If the signature is invalid, the handshake is aborted
- Bob shows his cert to Alice
- Alice verifies the signature on the cert against the CA’s pubkey. If the signature is invalid, the handshake is aborted
- Alice computes the shared secret using ECDH. Note that no more messages need to be exchanged, since the cert already contains the pubkey
- Bob does the same
- Now both sides have a shared secret. They hash the x-coordinate of the resulting point to get an AES key Once thing not explained here is how Alice and Bob get the CA’s pubkey. In a real system, e.g. TLS, Alice and Bob will have stored the CA’s pubkey on their device (like a browser does with pubkeys of common CAs). In the chat, however, I did not want to hardcode the key/have the user need to set it as an environment variable, so I just had the CA send it over the network upon request. Note that this is vulnerable to a MITM attack, since an attacker can replace the CA’s pubkey with their own pubkey, and therefore forge whatever certificates they want to. Before carrying out the handshake, both sides request a cert from the CA.
The Implementation
The Certificate Authority
We’ll begin with the communications between users and the CA. The CA needs to support two operations: a request for its pubkey (to which it replies with the pubkey), and a request to sign a certificate (to which it replies with the signature if the operator of the TTP wants to sign it, and an error otherwise). As mentioned before, we’re going to handle all network communications using the protobuf API we wrote at the beginning. Since we don’t know what type of message we’re going to receive, we’ll use the Typed Message API, for which we define the following message codes:
1
2
3
pub const TTP_PUBKEY_MSG: u8 = 0u8;
pub const TTP_SIG_REQ_MSG: u8 = 1u8;
pub const TTP_BYE_MSG: u8 = 2u8;
The TTP bye message is sent by a client to the TTP to indicate that it wants to disconnect. Now, let’s write the protobufs we’ll need for the TTP. The first one is a request for the TTP’s pubkey. This is the simplest one, since it’s just empty:
1
2
3
4
5
6
7
// Ask the TTP for its pubkey, which can be used to verify certs
// In the real world (most notably TLS), devices just store the pubkeys
// of CAs locally, but I didn't want to hardcode the TTP's keypair
// in the TTP module
message GetTtpPubkey {

}
The TTP responds with its pubkey, in a message named CurveParameters:
1
2
3
4
5
6
7
8
9
10
11
12
13
14
// The parameters of an EC of the form y^2 = x^3 + ax + b over Z_p, where p is a prime.
// This message also contains the order n of the curve (i.e. # points on the curve)
// along w/the coordinates (x, y) of the generator G
// We also piggyback the client's public key coordinates on this message
message CurveParameters {
  bytes a = 1;
  bytes b = 2;
  bytes p = 3;
  bytes x = 4;
  bytes y = 5;
  bytes order = 6;
  bytes pub_x = 7;
  bytes pub_y = 8;
}
This message contains all the parameters for a curve, along with the pubkey’s coordinates. Now for the signature request. As mentioned before, the user sends their certificate (composed of their pubkey, name, and organization):
1
2
3
4
5
6
7
// Ask the TTP to sign your public key (the info in CurveParameters)
// along with some identifying information, such as Name and Organization
message TtpGetSignature {
  CurveParameters pub_key = 1;
  string name = 2;
  string org = 3;
}
We specify the pubkey inside a CurveParameters message (protobuf messages can be nested). The server responds to this message with a TtpSignResponse message, which contains a boolean value indicating whether the CA has agreed to sign the cert, and if so, the signature (r, s):
1
2
3
4
5
6
7
8
9
// The response of the TTP WRT a request to get a cert
// The TTP can either accept it (in which case this message also contains the signature)
// or not
message TtpSignResponse {
  bool signed = 1;
  // ECDSA Signature
  optional bytes r = 2;
  optional bytes s = 3;
}
Now, let’s get to the Rust code. The main function for the TTP is shown below.
1
2
3
4
5
6
7
8
9
10
11
12
13
14
15
fn main() {
    println!("Listening on port 8888...");
    let listener = TcpListener::bind("127.0.0.1:8888").unwrap();
    let keypair = Keypair::new(
        &std_curves::SECP_256_K1,
        &std_curves::SECP_256_K1_G,
        Some(&std_curves::SECP_256_K1_N),
    );

    for stream in listener.incoming() {
        let mut stream = stream.unwrap();

        handle_stream(&mut stream, &keypair).expect("Error occurred while handling client");
    }
}
The function generates a keypair on the Secp256k1 curve, and then calls handle_stream for each incoming client. The SECP_256_K1_G and SECP_256_K1_N constants are also defined in the std_curves module, and contain the generator point (standard curves also have standard generator points) and the order of the generator point for Secp256k1, respectively. The handle_stream function is primarily a match on the type of messages received:
1
2
3
4
5
6
7
8
9
10
11
12
13
14
15
16
17
18
19
20
21
22
23
24
25
26
27
28
29
30
fn handle_stream(stream: &mut TcpStream, keypair: &Keypair) -> Result<(), io::Error> {
    loop {
        // Read the protobuf from the client
        let typed_msg = stream
            .receive_typed_msg()
            .expect("Failed to receive message from client");

        match typed_msg.msg_type() {
            // The client requested our public key
            TTP_PUBKEY_MSG => {
                let _ = GetTtpPubkey::parse_from_bytes(&typed_msg.payload()).unwrap();

                handle_get_pubkey_req(stream, keypair).expect("Failed to send pubkey to client");
            }
            // The client requested us to sign a cert
            TTP_SIG_REQ_MSG => {
                let get_sig_req = TtpGetSignature::parse_from_bytes(&typed_msg.payload()).unwrap();

                handle_get_sig_req(stream, keypair, get_sig_req).unwrap();
            }
            TTP_BYE_MSG => break,
            // Unknown message type
            _ => {
                println!("Unknown message type {}", typed_msg.msg_type());
            }
        }
    }

    Ok(())
}
Here’s the handler for the GetTtpPubkey message:
1
2
3
4
5
6
fn handle_get_pubkey_req(stream: &mut TcpStream, keypair: &Keypair) -> Result<usize, io::Error> {
    // Construct the CurveParameters message, which contains our pubkey
    let curve_params = CurveParameters::from(keypair);
    // Send the pubkey to the client over the stream
    stream.send_msg(curve_params)
}
We convert our pubkey to a CurveParamters using from (see the implementation below), and then send it using the API.
1
2
3
4
5
6
7
8
9
10
11
12
13
14
15
16
17
18
impl From<&Keypair> for CurveParameters {
    fn from(value: &Keypair) -> Self {
        let mut curve_params = CurveParameters::new();
        let curve = value.curve();
        curve_params.p = curve.p().to_bytes_be();
        curve_params.a = curve.a().to_bytes_be();
        curve_params.b = curve.b().to_bytes_be();
        curve_params.order = value.order().unwrap().to_bytes_be();
        let (gen_x, gen_y) = value.gen();
        curve_params.x = gen_x.to_bytes_be();
        curve_params.y = gen_y.to_bytes_be();
        let (pub_x, pub_y) = value.pub_key().point().coords().unwrap();
        curve_params.pub_x = pub_x.to_bytes_be();
        curve_params.pub_y = pub_y.to_bytes_be();

        curve_params
    }
}
Then, to sign a certificate, we do the following:
1
2
3
4
5
6
7
8
9
10
11
12
13
14
15
16
17
18
19
20
21
22
23
24
25
26
27
28
29
30
31
32
33
34
35
36
37
38
39
40
41
42
43
44
45
46
47
48
49
50
51
52
53
54
55
56
57
58
59
60
61
62
63
64
65
66
// Handle a request to sign a certificate
fn handle_get_sig_req(
    stream: &mut TcpStream,
    keypair: &Keypair,
    req: TtpGetSignature,
) -> Result<usize, io::Error> {
    // The name and organization of the signee
    let (name, org) = (&req.name, &req.org);

    print!(
        r#"Got a request to sign a certificate for the following person:
----------------------
Name: {}
Organization: {}
----------------------
Do you want to sign the certificate? (y/n):
"#,
        name, org
    );

    let should_sign;

    let mut input = String::new();

    loop {
        print!("Enter 'y' or 'n': ");
        stdout().flush().unwrap();

        stdin().read_line(&mut input).expect("Failed to read line");
        input = input.trim().to_lowercase();

        if input == "y" {
            should_sign = true;
            break;
        } else if input == "n" {
            should_sign = false;
            break;
        } else {
            println!("Invalid input. Please enter 'y' or 'n'.");
            input.clear();
        }
    }

    if should_sign {
        // Construct the certificate, which is the data we sign
        // We can just do this by converting the request to bytes
        // since it contains, by design, all the data we need
        let cert = req.write_to_bytes().unwrap();
        // Sign the cert
        let (r, s) = keypair.sign(&cert).unwrap();
        // Construct a response, and send it to the client
        let mut sign_response = TtpSignResponse::new();
        sign_response.signed = true;
        sign_response.r = Some(r.to_bytes_be());
        sign_response.s = Some(s.to_bytes_be());

        return stream.send_msg(sign_response);
    }

    let mut sign_response = TtpSignResponse::new();
    sign_response.signed = false;
    sign_response.r = None;
    sign_response.s = None;

    stream.send_msg(sign_response)
}
We start by extracting the name and organization written on the cert, and then asking the TTP operator whether they want to sign it. If so, we sign it using the keypair, construct a TtpSignResponse and fill it with r and s, and then send it to the client using the API. Otherwise, we respond to the client with a message saying that the cert has not been signed. Note that we don’t even need to deserialize the cert; we just sign the bytes of the TtpGetSignature protobuf, which is what the client and server present to each other during the handshake as well.
The Handshake
Now that we have the TTP ready, we can start writing the client and the server. The server function is called server_ec, and receives two parameters: a reference to a ChatArguments struct and a mutable reference to a Peer struct:
1
2
3
4
pub fn server_ec(
    args: &ChatArguments,
    peer: &mut Peer,
) -> Result<(BigUint, BigUint), HandshakeError>
It returns either the shared secret (which is a point on the client and server’s curve), or a HandshakeError, which is an enum we’ll add new types of errors to as we’ll go. The ChatArguments struct contains the parameters needed by the server and client (e.g. what port the CA runs on), and is filled out by the interactive CLI frontend for the chat. Its definition is shown below:
1
2
3
4
5
6
7
8
9
10
11
12
13
14
15
16
/// The arguments the chat frontend needs to provide to use
/// server and client functions
pub struct ChatArguments {
    // The port of the server
    pub port: u16,
    // The address of the server
    pub address: String,
    // The TTP's port
    pub ttp_port: u16,
    // The TTP's address
    pub ttp_address: String,
    // User's name
    pub name: String,
    // User's organization
    pub org: String,
}
The Peer struct contains information about the connection, such as the AES cipher the peers talk over, and the TcpStream the peers talk over:
1
2
3
4
5
6
/// The connection with the peer
pub struct Peer {
    stream: Option<TcpStream>,
    pub cipher: Option<AesCtr>,
    pub hmac: Option<HMAC>,
}
The AesCtr struct implements AES in CTR mode, and the HMAC struct allows us to authenticate messages. We’ll go over their implementation later. Similarily, the client is written in a function called client_ec that has the same signature:
1
2
3
4
pub fn client_ec(
    state: &ChatArguments,
    peer: &mut Peer,
) -> Result<(BigUint, BigUint), HandshakeError>
The server starts off by generating a keypair, and then fills it into a struct called IdentityInfo:
1
2
3
4
5
6
7
8
9
let curve = &std_curves::NIST_P_256;
// Generate a keypair
let keypair = Keypair::new(
    curve,
    &std_curves::NIST_P_256_G,
    Some(&std_curves::NIST_P_256_N),
);
// Generate our identity so we can sign a cert
let identity = IdentityInfo::new(&keypair, &args.name, &args.org);
The IdentityInfo struct packs all the information needed to get a certificate into one struct, and is defined as follows:
1
2
3
4
5
6
7
8
9
10
/// This information identifies each user, and is required for the TTP
/// to grant one a cert
pub struct IdentityInfo<'a> {
    /// Keypair of the grantee
    keypair: &'a Keypair,
    /// Name of the grantee (e.g. John Doe)
    name: String,
    /// Oranization of the grantee (e.g. Example Organization Inc.)
    org: String,
}
The server then proceeds by connecting to the TTP, asking it for its pubkey, and disconnecting from it:
1
2
3
4
5
6
let mut ttp_stream = TcpStream::connect(format!("{}:{}", args.ttp_address, args.ttp_port)).unwrap();
// Ask the TTP for its pubkey
let (ttp_curve_keypair, ttp_pubkey) = get_ttp_pubinfo(&mut ttp_stream);
// Bye bye TTP
let bye_msg = TtpBye::new();
ttp_stream.send_typed_msg(bye_msg, TTP_BYE_MSG).unwrap();
The get_ttp_pubinfo function sends a GetTtpPubkey message to the TTP, generates a keypair on the TTP’s curve, extracts the TTP’s pubkey, and returns them both:
1
2
3
4
5
6
7
8
9
10
11
12
13
14
15
16
17
18
19
20
21
22
23
24
25
26
27
28
29
30
31
32
33
34
35
/// Given a stream to the TTP, (1) generate a keypair on the TTP's curve
/// and (2) return the TTP's pubkey as a CurvePoint
pub fn get_ttp_pubinfo(ttp_stream: &mut TcpStream) -> (Keypair, CurvePoint) {
    // Ask the TTP for its pubkey
    let get_pubkey_req = GetTtpPubkey::new();

    ttp_stream
        .send_typed_msg(get_pubkey_req, TTP_PUBKEY_MSG)
        .unwrap();

    let ttp_pubkey_msg = MessageStream::<CurveParameters>::receive_msg(ttp_stream).unwrap();

    let (a, b, p) = (
        BigUint::from_bytes_be(&ttp_pubkey_msg.a),
        BigUint::from_bytes_be(&ttp_pubkey_msg.b),
        BigUint::from_bytes_be(&ttp_pubkey_msg.p),
    );
    let ttp_curve = Curve::new(a, b, p);
    let (x, y) = (
        BigUint::from_bytes_be(&ttp_pubkey_msg.x),
        BigUint::from_bytes_be(&ttp_pubkey_msg.y),
    );
    let order = BigUint::from_bytes_be(&ttp_pubkey_msg.order);
    // Generate our keypair on the **TTP**'s curve, which may be different than the curve used
    // to talk to the client
    let ttp_curve_keypair = Keypair::new(&ttp_curve, &(x, y), Some(&order));
    // The TTP's pubkey
    let ttp_pubkey_coords = (
        BigUint::from_bytes_be(&ttp_pubkey_msg.pub_x),
        BigUint::from_bytes_be(&ttp_pubkey_msg.pub_y),
    );
    let ttp_pubkey = ttp_curve.gen_point(Some((&ttp_pubkey_coords.0, &ttp_pubkey_coords.1)));

    (ttp_curve_keypair, ttp_pubkey)
}
The only reason we generate a keypair on the CA’s curve as well is to allow us to call the signature & verification functions we defined earlier on the Keypair struct. After getting the CA’s pubkey, we the CA to sign our certificate:
1
2
// Ask the TTP for a cert
let (ttp_sign_req, ttp_sig) = identity.ask_ttp_cert(&mut ttp_stream);
The ask_ttp_cert method is defined on the IdentityInfo struct:
1
2
3
4
5
6
7
8
9
10
11
12
13
14
15
16
17
18
19
20
21
22
23
24
25
26
impl<'a> IdentityInfo<'a> {
	...

    /// Ask the TTP for a certificate, given our pubkey (the one on the **server's curve** and not the TTP's curve)
    /// and a stream to the TTP
    /// The TTP's curve is only used to validate the TTP's signatures
    /// This function also returns the certificiate which is the actual data being signed
    pub fn ask_ttp_cert(self, ttp_stream: &mut TcpStream) -> (TtpGetSignature, TtpSignResponse) {
        // Request the TTP to sign our cert
        let ttp_get_signature = TtpGetSignature::new();
        let mut ttp_sign_req = ttp_get_signature;
        let curve_params = CurveParameters::from(self.keypair);
        ttp_sign_req.pub_key = MessageField::some(curve_params);
        ttp_sign_req.name = self.name;
        ttp_sign_req.org = self.org;

        ttp_stream
            .send_typed_msg(ttp_sign_req.clone(), TTP_SIG_REQ_MSG)
            .unwrap();
        // Read the response we got
        (
            ttp_sign_req,
            MessageStream::<TtpSignResponse>::receive_msg(ttp_stream).unwrap(),
        )
    }
}
As you’ll recall, the TTP signs the bytes of the TtpGetSignature request, so we return the request itself as well as the CA’s response, allowing the server to show its certificate to the client later. After asking the CA to sign us a cert, we need to check whether our cert has indeed been signed (in contrast to the previous post, where the CA has always signed certs regardless of their contents):
1
2
3
4
5
// This is in server_ec
if !ttp_sig.signed {
    eprintln!("The CA hasn't signed our cert.");
    return Err(HandshakeError::CertNotSigned);
}
The CertNotSigned is the first type of error we’ll add to HandshakeError. It indicates that the CA hasn’t signed our certificate. On the client side of things, we do the same thing:
1
2
3
4
5
6
7
8
9
10
11
12
13
14
15
16
17
18
19
20
21
22
23
24
// In client_ec
let curve = &std_curves::NIST_P_256;
// Generate a keypair
let keypair = Keypair::new(
    curve,
    &std_curves::NIST_P_256_G,
    Some(&std_curves::NIST_P_256_N),
);
// Generate our identity
let identity = IdentityInfo::new(&keypair, &state.name, &state.org);
let mut ttp_stream = TcpStream::connect(format!("{}:{}", state.ttp_address, state.ttp_port)).unwrap();
let (ttp_curve_keypair, ttp_pubkey) = get_ttp_pubinfo(&mut ttp_stream);
// Request the TTP to sign our cert
let (ttp_sign_req, ttp_sig) = identity.ask_ttp_cert(&mut ttp_stream);

// Bye bye TTP
let bye_msg = TtpBye::new();
ttp_stream.send_typed_msg(bye_msg, TTP_BYE_MSG).unwrap();

// If the TTP hasn't signed our cert, we can't continue the handshake
if !ttp_sig.signed {
    eprintln!("CA hasn't agreed to sign our cert.");
    return Err(HandshakeError::CertNotSigned);}
}
At this point, both the client and the server have valid certs. The server listens for a connection from the client:
1
2
3
4
5
6
7
8
9
10
11
// In server_ec
// Start the server
println!("Listening on port {}...", args.port);
let listener = TcpListener::bind(format!("{}:{}", args.address, args.port)).unwrap();

if let Some(stream) = listener.incoming().next() {
    let mut stream = stream.unwrap();
    ...
} else {
    Err(HandshakeError::ServerConnection)
}
The ServerConnection error simply indicates that an error occurred while we were trying to get the TcpStream for the next client. The client connects to the server:
1
2
3
// In client_ec
// Connect to server
let mut stream = TcpStream::connect(format!("{}:{}", state.address, state.port)).unwrap();
Recall that we can’t do an ECDH yet; neither peer knows who they’re talking to on the other side of the connection. To solve this, the client starts by showing its signed certificate to the server using the function show_peer_cert:
1
2
3
// In client_ec
// Show it our cert
show_peer_cert(&mut stream, ttp_sign_req, ttp_sig);
The show_peer_cert function receives as arguments the stream with the other peer, the ttp_sign_req (our certificate, returned by ask_ttp_cert), and the signature (ttp_sig, returned by ask_ttp_cert). It is defined as follows:
1
2
3
4
5
6
7
8
9
/// Send the other side our cert, given a reference to the cert data, and the TTP's signature
pub fn show_peer_cert(stream: &mut TcpStream, cert: TtpGetSignature, ttp_sig: TtpSignResponse) {
    let mut cert_show_msg = ShowCertificate::new();
    cert_show_msg.cert = MessageField::some(cert);
    cert_show_msg.r = ttp_sig.r.unwrap();
    cert_show_msg.s = ttp_sig.s.unwrap();

    stream.send_msg(cert_show_msg).unwrap();
}
This function constructs a ShowCertificate proto, which is defined as below. It contains our certificate, and the CA’s signature. The function then sends the ShowCertificate to the other peer.
1
2
3
4
5
6
7
8
// Show the other peer our certificate
message ShowCertificate {
  // The cert
  TtpGetSignature cert = 1;
  // The TTP's signature
  bytes r = 2;
  bytes s = 3;
}
On the server side of things, we receive the client’s ShowCertificate:
1
2
3
// in server_ec
// Wait for client's cert
let client_cert = MessageStream::<ShowCertificate>::receive_msg(&mut stream).unwrap();
The server then validates the signature on the client’s certificate using the TTP’s pubkey:
1
2
3
// in server_ec
// Verify the signature on the certificate using the TTP's pubkey
let is_client_valid = client_cert.validate_peer_cert(&ttp_curve_keypair, &ttp_pubkey);
The validate_peer_cert function extracts the certificate and signature from the ShowCertificate proto, and validates them against the CA’s pubkey using the ECDSA verify function we’ve implemented earlier for Keypair:
1
2
3
4
5
6
7
8
9
10
11
12
13
14
15
impl ShowCertificate {
	/// Validate the client's cert. Also requires our keypair on the TTP's curve
	/// and the TTP's pubkey (since the cert is validated against the TTP's pubkey)
	pub fn validate_peer_cert(&self, ttp_curve_keypair: &Keypair, ttp_pubkey: &CurvePoint) -> bool {
	    let client_cert_bytes = self.cert.write_to_bytes().unwrap();
	    let sig = (
	        BigUint::from_bytes_be(&self.r),
	        BigUint::from_bytes_be(&self.s),
	    );

	    ttp_curve_keypair
	        .verify(&client_cert_bytes, sig, ttp_pubkey)
	        .unwrap()
	}
}
Finally, the server tells the client whether the client’s cert is valid, so that in case it is not both sides can abort the handshake:
1
send_val_status(&mut stream, is_client_valid).unwrap();
This function (send_val_status) sends a ValidationResponse proto:
1
2
3
4
5
6
7
// The client sends this to the server (and vice versa)
// to indicate whether the certificate of the other side is valid or not
// if the cert is not valid, both sides call off the handshake,
// since they can't be sure who they're talking to on the other side
message ValidationResponse {
  bool is_valid = 1;
}
This proto has a single field: is_valid which is set to true if the cert is valid, and false if not. The send_val_status function is defined below:
1
2
3
4
5
6
7
/// Tell the other side whether their cert is valid
pub fn send_val_status(stream: &mut TcpStream, val_status: bool) -> Result<usize, std::io::Error> {
    let mut msg = ValidationResponse::new();
    msg.is_valid = val_status;

    stream.send_msg(msg)
}
As you can see, it simply constructs the protobuf, and sends it using our API. The client receives this message, and returns in case the server says the client’s cert is not valid:
1
2
3
4
5
6
7
8
// In client_ec
// Check whether the server has validated our identity
let is_identity_valid = MessageStream::<ValidationResponse>::receive_msg(&mut stream).unwrap();

if !is_identity_valid.is_valid {
	eprintln!("Server says that our identity is invalid.");
	return Err(HandshakeError::PeerRejects);
}
The PeerRejects error indicates that the other peer has rejected our certificate. Now that the server is sure the client’s certificate is valid, we also ask the server’s user whether the user who presented the certificate is indeed the user they wanted to talk with:
1
2
3
4
// In server_ec
// Ask the user whether they want to continue the handshake,
// based on the (now validated by the CA) identity of the client
let should_continue = ask_user_peer(&client_cert);
The ask_user_peer function prints a certificate, and prompts for a ‘y’ or a ‘n’:
1
2
3
4
5
6
7
8
9
10
11
12
13
14
15
16
17
18
19
20
21
22
23
24
25
26
27
28
29
30
31
32
33
34
35
36
37
/// Print the other side's identity from their cert
pub fn print_cert_identity(show_cert: &ShowCertificate) {
    println!(
        "---\nName: {}\nOrganization: {}\n---",
        show_cert.cert.name, show_cert.cert.org
    );
}

/// Ask the user whether they want to talk with the other peer
pub fn ask_user_peer(show_cert: &ShowCertificate) -> bool {
    println!("The other peer presents itself as follows: ");
    print_cert_identity(show_cert);
    println!("Is this who you want to talk to? (y/n): ");
    let should_continue;
    let mut input = String::new();

    loop {
        print!("Enter 'y' or 'n': ");
        stdout().flush().unwrap();

        stdin().read_line(&mut input).expect("Failed to read line");
        input = input.trim().to_lowercase();

        if input == "y" {
            should_continue = true;
            break;
        } else if input == "n" {
            should_continue = false;
            break;
        } else {
            println!("Invalid input. Please enter 'y' or 'n'.");
            input.clear();
        }
    }

    should_continue
}
The server now sends an AbortHandshake proto to the client (very similar to a ValidationResponse proto):
1
2
3
4
5
6
// Before continuing the handshake, the user is asked
// whether they want to continue the handshake
// in case not, both sides abort the handshake
message AbortHandshake {
  bool is_abort = 1;
}
This is done using the send_abort_msg function:
1
2
// In server_ec
send_abort_msg(&mut stream, !should_continue).unwrap();
Defined as follows:
1
2
3
4
5
6
7
8
// Tell the other peer whether the user wants to continue the handshake
// or abort it
pub fn send_abort_msg(stream: &mut TcpStream, is_abort: bool) -> Result<usize, io::Error> {
    let mut msg = AbortHandshake::new();
    msg.is_abort = is_abort;

    stream.send_msg(msg)
}
The client receives this message, and if the server wants to abort the connection, both sides shut the stream down:
1
2
3
4
5
6
7
8
9
10
11
12
13
14
15
// In server_ec
if !should_continue {
	stream.shutdown(std::net::Shutdown::Both).unwrap();
	return Err(HandshakeError::AbortConnection);
}

// In client_ec
// Check whether the server wants to abort the handshake
let abort_handshake = MessageStream::<AbortHandshake>::receive_msg(&mut stream).unwrap();

if abort_handshake.is_abort {
	eprintln!("The other peer wants to abort the handshake.");
	stream.shutdown(std::net::Shutdown::Both).unwrap();
	return Err(HandshakeError::PeerAborts);
}
The AbortConnection error means that the user wants to abort the connection, and the PeerAborts error means that the other peer wants to abort the connection. Likewise, everything that happened until now also happens the other way around (server sends its cert to the client, client validates it, etc.):
1
2
3
4
5
6
7
8
9
10
11
12
13
14
15
16
17
18
19
20
21
22
23
24
// In client_ec
// Validate the server's cert
let server_cert = MessageStream::<ShowCertificate>::receive_msg(&mut stream).unwrap();

// Verify the signature on the certificate using the TTP's pubkey
let is_server_valid = server_cert.validate_peer_cert(&ttp_curve_keypair, &ttp_pubkey);
send_val_status(&mut stream, is_server_valid).unwrap();

if !is_server_valid {
	eprintln!("The server's certificate is not valid. Aborting handshake...");
	stream.shutdown(std::net::Shutdown::Both).unwrap();
	return Err(HandshakeError::BadPeerCert);
}

// Ask the user whether they want to continue the handshake, based on the (validated by the CA) identity
// of the server
let should_continue = ask_user_peer(&server_cert);
// Tell the server whether the user wants to abort the message
send_abort_msg(&mut stream, !should_continue).unwrap();

if !should_continue {
	stream.shutdown(std::net::Shutdown::Both).unwrap();
	return Err(HandshakeError::AbortConnection);
}
And on the server side:
1
2
3
4
5
6
7
8
9
10
11
12
13
14
15
16
17
18
19
20
21
// Send our certificate for the client to validate
show_peer_cert(&mut stream, ttp_sign_req.clone(), ttp_sig.clone());

let is_identity_valid =
MessageStream::<ValidationResponse>::receive_msg(&mut stream).unwrap();

if !is_identity_valid.is_valid {
	eprintln!("Client says that our identity is invalid.");
	stream.shutdown(std::net::Shutdown::Both).unwrap();

	return Err(HandshakeError::PeerRejects);
}

let client_aborts = MessageStream::<AbortHandshake>::receive_msg(&mut stream).unwrap();

if client_aborts.is_abort {
	eprintln!("The client wants to abort the handshake.");
	stream.shutdown(std::net::Shutdown::Both).unwrap();

	return Err(HandshakeError::PeerAborts);
}
Now, the client and the server are both sure of each other’s identity, so we can perform an ECDH. Remember that, by definition, the certificate of a user contains their public key, so we don’t need to transmit any more messages over the network! On the server side:
1
2
3
4
peer.stream = Some(stream);
// At this point, since both sides have each other's certs (and hence each other's pubkeys)
// we can perform an ECDH and establish a shared secret
Ok(client_cert.est_shared_secret(&keypair))
The est_shared_secret function is defined on the ShowCertificate struct (which contains a cert and the CA’s signature on the cert), and is essentially a wrapper around the ecdh_shared_secret function we’ve implemented earlier on Keypair:
1
2
3
4
5
6
7
8
9
10
11
12
13
14
15
16
impl ShowCertificate {
    /// Establish the shared secret using the other side's cert (self) and our keypair
    pub fn est_shared_secret(self, keypair: &Keypair) -> (BigUint, BigUint) {
        let client_pubkey_info = self.cert.unwrap().pub_key.unwrap();
        let (client_pub_x, client_pub_y) = (
            BigUint::from_bytes_be(&client_pubkey_info.pub_x),
            BigUint::from_bytes_be(&client_pubkey_info.pub_y),
        );
        let curve = keypair.curve();
        let server_pubkey = curve.gen_point(Some((&client_pub_x, &client_pub_y)));

        keypair.ecdh_shared_secret(server_pubkey)
    }

	...
}
The client does the same thing:
1
2
3
4
5
6
7
// At this point, since both sides have each other's certs (and hence each other's pubkeys)
// we can perform an ECDH and establish a shared secret
let shared_secret = server_cert.est_shared_secret(&keypair);

peer.stream = Some(stream);

Ok(shared_secret)
And this is it! Now both sides have a shared secret, which is a point on the curve over which their keypairs are defined. The APIs we defined along the project made this much easier.
Symmetric Crypto
Now that the two peers have a shared symmetric key, we need to write the code that encrypts & decrypts messages. In the last post, we’ve used AES-CBC as a symmetric cipher, but today we’re going to use another AES mode: CounTeR mode. Also, unlike last time, we’re also going to authenticate messages using a MAC (Message Authentication Code), more specifically a SHA-256-HMAC. Doing so prevents attackers from conducting attacks that rely on submitting arbitrary ciphertexts.
AES-CTR
The core idea of CTR mode is to turn a block cipher into a stream cipher. It does this as follows (diagram taken from wikipedia):
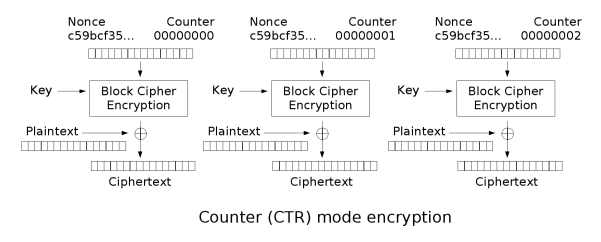
For now, ignore the nonce. To encrypt the first block, we encrypt a block full of 0’s, and then XOR the ciphertext with the first block of plaintext to yield the first ciphertext block. To encrypt the second block, we encrypt a block that is all 0’s except for the last byte which is a 1, and XOR the ciphertext with the second block of plaintext, and so on. In CTR mode, decryption as the same as encryption - this is due to XOR being its own inverse (i.e. x ^ y ^ y = x). More formally, given a block of ciphertext C_i, by definition we have C_i = P_i ^ AES(i, key), and therefore P_i = C_i ^ AES(i, key). Counter mode, as presented above, has a very deadly flaw: encryption is deterministic. Encrypting the same plaintext two different times will result in the same ciphertext, allowing an attacker to detect patterns in the traffic. In order to prevent this problem, we add a nonce into the mix. When encrypting a ciphertext, we also use a random nonce. The counter then starts counting from the nonce, instead of from 0. The nonce is transmitted over the network along with the message’s ciphertext so that the other peer will know how to decrypt it. We represent AES-CTR with a struct:
1
2
3
4
#[derive(Clone)]
pub struct AesCtr {
    cipher: Aes256,
}
The Aes256 struct is provided by the aes crate; implementing AES is beyond the scope of this post. To initialize a new AesCtr given a key, we do the following:
1
2
3
4
5
6
7
8
9
10
11
impl AesCtr {
    // Create a new AES-CTR cipher
    pub fn new(key: &[u8]) -> AesCtr {
        let key_arr = GenericArray::from_slice(key);
        let cipher = Aes256::new(key_arr);

        AesCtr { cipher }
    }

	...
}
Then, encryption receives a message and a nonce as an argument, and does the following:
1
2
3
4
5
6
7
8
9
10
11
12
13
14
15
16
17
18
19
20
21
22
23
24
25
26
27
28
29
30
impl AesCtr {
	pub fn encrypt(&self, msg: &[u8], nonce: usize) -> Vec<u8> {
        // AES-CTR encrypts using a running counter, where we XOR each byte of the msg
        // with a byte from a running keystream

        let num_blocks = msg.len().div_ceil(AES_BLOCK_SIZE);
        let mut msg_bytes = msg.chunks(AES_BLOCK_SIZE);
        let mut ciphertext = vec![];

        for i in nonce..nonce+num_blocks {
            // Pad it to the block size
            let mut i_slice = vec![0u8; AES_BLOCK_SIZE - 8];
            i_slice.extend(&i.to_be_bytes());
            let i_slice: [u8; AES_BLOCK_SIZE] = i_slice.try_into().unwrap();
            let mut key_block = GenericArray::from(i_slice);
            self.cipher.encrypt_block(&mut key_block);
            // # Of bytes to encrypt in this block
            let msg_block = msg_bytes.next().unwrap();
            let to_encrypt = msg_block.len().min(AES_BLOCK_SIZE);

            for j in 0..to_encrypt {
                ciphertext.push(key_block.get(j).unwrap() ^ msg_block.get(j).unwrap());
            }
        }

        ciphertext
    }

	...
}
We first compute the number of blocks, and split the message into blocks. We then count from nonce to nonce + num_blocks, and at each iteration encrypt a block containg i’s (padded) byte representation. This ciphertext is then XORed with the corresponding plaintext block. As mentioned before, decryption is the same as encryption:
1
2
3
4
5
6
7
8
impl AesCtr {
    ...

    pub fn decrypt(&self, msg: &[u8], nonce: usize) -> Vec<u8> {
        // Encryption is the same as decryption in CTR mode
        self.encrypt(msg, nonce)
    }
}
HMAC (Hash-based Message Authentication Code)
Right now, our two peers have validated the identity of each other (using ECDSA), established a shared secret (using ECDH), and can encrypt & decypt messages using AES-CTR. So why aren’t we done yet? Remember that we’re dealing with active attackers, that can modify messages as well as passively listen in on them. Right now, there’s nothing stopping an attacker from modifying one of the encrypted messages sent over the network. For example, suppose that the server encrypts the message “A” (single uppercase ‘A’). Recall that the ciphertext is constructed as follows (for simplicity, assume that the nonce is 0x1234):
- Encrypt a block that contains the nonce, padded to the block size. If the block size is 32 bit, we encrypt the block 0x00001234: C0 = AES(0x00001234, key)
- Take the first byte in C0, and call it
x - The ciphertext is
x ^ 'A' = x ^ 0x41What happens an attacker sees this message, and XORs it with 0x1? This will result in the modified ciphertextx ^ 0x41 ^ 0x1. When the client decrypts this ciphertext (recall that encryption is identical to decryption in CTR mode), they will getx ^ 0x41 ^ 0x1 ^ x = (x ^ x) ^ (0x41 ^ 0x1) = 0 ^ (0x41 ^ 0x41) = 0x41 ^ 0x1 = 0x40 = '@'instead of the original ‘A’. This property is called mallebility, and can have very severe consequences. To solve this, we will use a crypto concept called MAC (Message Authentication Code). MACs are used to ensure the integrity of a message (i.e. they guarantee that the message was not modified along the way). MACs exist in the form of a tag sent along with the message. When Alice wants to send a message m to Bob, she computes the MAC of m using a shared key she and Bob hold. When the message eventually arrives to Bob, he verifies the MAC using the shared key, and, if the MAC is valid, knows that the message has not been changed. You can only compute a MAC if you have the key; computing a MAC without having the key is called MAC forgery. There are 3 common ways to do MACs: - Encrypt-then-MAC: first encrypt the message, and compute a MAC on the ciphertext
- MAC-then-encrypt: compute a MAC on the plaintext message, and encrypt the plaintext, along with the MAC
- MAC-and-encrypt: compute a MAC on the plaintext, but only encrypt the plaintext and not the MAC (unlike MAC-then-encrypt) The pros and cons of each approach is beyond the scope of this post; if you’re interested, I reccommend reading this StackExchange question. There are also multiple ways to compute the MAC itself, but in this post we’re only going to use of the most common ones, called HMAC, which is performed as follows:
- Compute outer padding:
outer_pad = key ^ block of [0x5c] - Compute inner padding:
inner_pad = key ^ block of [0x36] - The MAC is
hash(outer_pad || hash(inner_pad || m))As you can see, HMAC uses a hash function. In the chat, we’re going to use SHA256. HMAC with SHA256 is called HMAC-SHA256. We will implement this using a structHMAC:
1
2
3
4
#[derive(Clone)]
pub struct HMAC {
    key: Vec<u8>,
}
To compute a MAC, we follow the steps in the above algorithm:
1
2
3
4
5
6
7
8
9
10
11
12
13
14
15
16
impl HMAC {
    /// Derive the MAC for message msg; Returns the bytes of the MAC
    pub fn mac(&self, msg: &[u8]) -> Vec<u8> {
        // The inner & outer hashes are the key XORed with 0x5c and 0x36, respectively
        let mut outer_pad: Vec<u8> = self.key.iter().map(|x| x ^ HMAC_OUTER_PAD).collect();
        let mut inner_pad: Vec<u8> = self.key.iter().map(|x| x ^ HMAC_INNER_PAD).collect();
        // Compute sha256(inner_pad || msg)
        inner_pad.append(&mut msg.to_vec());
        let mut inner_hash = hex::decode(sha256::digest(inner_pad)).unwrap();
        // Compute sha256(outer_pad || inner_hash)
        outer_pad.append(&mut inner_hash);

        hex::decode(sha256::digest(outer_pad)).unwrap()
    }
    ...
}
This is a bit longer than the pseudocode, since we can’t concatenate the vectors with one operation (like in Python), so we have to use append. The hex::decode function converts the output of the SHA256 from a hex string format (e.g. a1a2a3a4) to a vector of bytes. To verify a MAC, we compute the MAC for the message, and compare it with the provided MAC:
1
2
3
4
/// Verify the MAC for a message
pub fn verify(&self, msg: &[u8], tag: &[u8]) -> bool {
    self.mac(msg) == tag.to_vec()
}
The Chat CLI
This part is not super interesting, so I’ll keep it short and focus on the important parts. To parse commands, I defined an enum of command types (shown below), tokenized commands, and then parsed it as a specific command based on the first token.
1
2
3
4
5
6
7
8
9
10
11
12
13
14
pub enum CommandType {
    Set,
    Connect,
    Listen,
    Send,
    Help,
    Exit,
    Unk,
}

pub struct Command {
    op: CommandType,
    args: Vec<String>,
}
For example, set port 5555 is a command with type Set and arguments vec!["port", "5555"]. Here’s a short description of each command:
- Set changes the
Stateof the chat, essentially a struct that contains the parameters relevant to the client and server code (e.g. the server’s address) - Connect connects to a server based on the state of the chat
- Listen starts a server based on the state of the chat
- Send sends a message once we have an encrypted connection
- Help shows the help message
- Exit exits out of the chat
- Unk is a no-op, and is used when parsing invalid commands The
Stateis defined as follows:
1
2
3
4
5
6
7
8
9
10
11
// The current state of the chat - e.g. what is the TTP's IP and Address, what algorithm should be used etc.
#[derive(Clone)]
pub struct State {
    server_addr: Option<Ipv4Addr>,
    server_port: Option<u16>,
    ttp_addr: Option<Ipv4Addr>,
    ttp_port: Option<u16>,
    algo: Algorithm,
    name: Option<String>,
    org: Option<String>,
}
The Algorithm member is reserved, in case I’ll add any more algorithms such as RSA in the future. Below is the code that handles the connect command:
1
2
3
4
5
6
7
8
9
10
11
12
13
14
15
16
17
18
19
20
21
22
23
fn connect(state: &State, peer: &mut Peer) -> Result<(), HandshakeError> {
    if !check_state_full(state) {
        return Err(HandshakeError::UnfilledParams);
    }

    match state.algo {
        Algorithm::EllipticCurve => {
            let args = ChatArguments::from(state);
            let shared_secret = client_ec::client_ec(&args, peer)?.0;
            let key =
                BigUint::from_str_radix(&sha256::digest(shared_secret.to_bytes_be()), 16).unwrap();
            let cipher = AesCtr::new(&key.to_bytes_be());
            let hmac = HMAC::new(&key.to_bytes_be());
            peer.cipher = Some(cipher);
            peer.hmac = Some(hmac);
        }
        Algorithm::RSA => {
            //println!("Unimplemented server for RSA.");
        }
    }

    Ok(())
}
We first check whether the state of the chat is full, and the user has filled in all necessary parameters (e.g. we can’t connect to a server if we don’t know its port), and then match according to the algorithm. We convert the State to ChatArguments, and then call the client_ec function, which as you’ll recall returns the shared secret established with the server, which is a (BigUint, BigUint) (a point on an EC). We take the first coordinate, and hash it using SHA256 to create a key, used for initializing an AES-CTR cipher and an HMAC struct. The code for handling listen is quite similar, except it calls server_ec instead of client_ec:
1
2
3
4
5
6
7
8
9
10
11
12
13
14
15
16
17
18
19
20
21
22
23
24
25
26
fn listen(state: &State, peer: &mut Peer) -> Result<(), HandshakeError> {
    // Make sure that the state has all the values we need
    if !check_state_full(state) {
        return Err(HandshakeError::UnfilledParams);
    }

    match state.algo {
        Algorithm::EllipticCurve => {
            let args = ChatArguments::from(state);
            // Use the hash of the x-coordinate of the shared secret returned by ECDH
            // as an AES-CTR key
            let shared_secret = server_ec::server_ec(&args, peer)?.0;
            let key =
                BigUint::from_str_radix(&sha256::digest(shared_secret.to_bytes_be()), 16).unwrap();
            let cipher = AesCtr::new(&key.to_bytes_be());
            let hmac = HMAC::new(&key.to_bytes_be());
            peer.cipher = Some(cipher);
            peer.hmac = Some(hmac);
        }
        Algorithm::RSA => {
            //println!("Unimplemented server for RSA.");
        }
    }

    Ok(())
}
The final command we’ll look at the implementation for is send:
1
2
3
4
5
6
7
8
fn send(args: Vec<String>, peer: &mut Peer) {
    let msg = args
        .iter()
        .map(|x| x.to_owned() + " ")
        .collect::<Vec<String>>()
        .concat();
    peer.send_encrypted(msg.as_bytes()).unwrap();
}
Since the spaces aren’t included in the tokenization, we add them in between tokens. We then called send_encrypted, which is a method impemented on a Peer:
1
2
3
4
5
6
7
8
9
10
11
12
13
14
15
16
17
18
19
20
impl Peer {
    ...

    pub fn send_encrypted(&mut self, msg: &[u8]) -> Result<usize, io::Error> {
        // Send the CTR mode nonce (the initial value of the counter)
        // using a constant nonce is bad, since it causes the same plaintext
        // to result in the same ciphertext
        let mut rng = thread_rng();
        let nonce = rng.gen::<usize>();
        // Encrypt the message
        let ciphertext = self.cipher.as_mut().unwrap().encrypt(msg, nonce);
        let mut msg = ChatMessage::new();
        msg.nonce = nonce.to_be_bytes().to_vec();
        // Compute a MAC on the ciphertext (i.e. encrypt-then-mac)
        msg.mac = self.hmac.as_ref().unwrap().mac(&ciphertext);
        msg.ciphertext = ciphertext;

        self.stream.as_mut().unwrap().send_msg(msg)
    }
}
This method creates a random nonce, encrypts the message using the cipher and under the nonce, and then creates a ChatMessage, which is a proto defined as follows:
1
2
3
4
5
6
7
8
9
10
11
// An encrypted chat message
message ChatMessage {
	// AES-CTR random nonce that this message
	// is encrypted under
	bytes nonce = 1;
	// The MAC (message authentication code) for this message
	// The underlying algorithm we use is HMAC-SHA-256
	bytes mac = 2;
	// The ciphertext
	bytes ciphertext = 3;
}
The ChatMessage includes the nonce under which the message is encrypted, the MAC (which is computed for the ciphertext; i.e. encrypt-then-MAC), and the ciphertext itself. The send_encrypted method fills all these parameters, and then sends the message using the API. Finally, to receive messages, we start a new thread with the following code:
1
2
3
4
5
6
7
8
9
10
11
12
13
14
15
16
fn recv_thread(stream: &mut TcpStream, cipher: &AesCtr, hmac: &HMAC) {
    loop {
        let msg = MessageStream::<ChatMessage>::receive_msg(&mut *stream).unwrap();
        let ciphertext = msg.ciphertext;
        let mac = msg.mac;
        let nonce = usize::from_be_bytes(msg.nonce.try_into().unwrap());
        // Before decrypting, verify the MAC to protect against attacks
        if hmac.verify(&ciphertext, &mac) {
            let plaintext = cipher.decrypt(&ciphertext, nonce);

            println!("recv< {}", String::from_utf8(plaintext).unwrap());
        } else {
            eprintln!("Invalid MAC detected. Your connection is (probably) under an MITM attack.");
        }
    }
}
We receive the message using the API, verify the MAC using the HMAC on the Peer, and if the MAC is valid, decrypt the message using the cipher, and print the result. Now we’re really done :)
Demo
Now for the fun part! The demo can be found below, or in higher resolution on YouTube :)

Note how because we’re using a random nonce, even when the same message “attack at dawn” is sent twice, it looks completely different over the network, so an attacker can’t tell that it’s the same message.
Summary
This is the longest post I’ve wrote (so far :)). I’ve learned a lot from writing this (both the code and the post), and in general I believe that improving upon previous work is a very good way to learn new things. Here’s a short summary of what we did:
- Learn about Protobufs
- Implement a protobuf API over the network in Rust
- Learn about Elliptic Curves, and implement them in Rust
- Implement 2 very useful ECC algorithms in Rust: ECDH and ECDSA
- Implement an authenticated handshake to establish a shared secret using the aforementioned algorithms
- Impelement AES-CTR
- Implement HMAC
- Wrap it all up in a CLI Thanks for reading! As mentioned in the Intro, The full code for the project is available here.