Digit Recognition With Rust and WASM - Part 2
Intro
A few posts ago, we’ve implemented a neural network in Rust that classifies digits from scratch (i.e. no ML-related dependencies), and got some pretty good results! However, the model stayed in the memory of the training program, and that was that.
Today, we’re going to train a model using the program from the previous post (with some adjustments), and deploy said model using WebAssembly (WASM) to create a WebApp that recognizes digits! Note: this post is heavily based on the previous post (after all, it’s a sequel :)), so if you haven’t read that already, I reccommend you read it first.
WebAssembly
For decades, the only effective way to run code on the web was JS, whose performance is in many cases insufficient for complex, compute-heavy applications, such as graphics simulation or running ML models. WebAssembly (announced in 2015) aims to introduce a new, more performant way to execute code on the web.
It consists primarily of a stack-based VM that can execute assembly-like instructions (hence the name: WebAssembly). Programs written in other, native languages (e.g. C/C++ or Rust), can compile to this format, and then run on the VM in the browser-side. This is important: the model we’ll write today will run only on the client-side! Another important property of WASM is that the WASM VM can communicate with JS code, and vice versa.
If you’re interested in reading more about WASM, check out its official site :)
Training The Model
Since the previous post, I’ve added some improvements to the code: for example, Xavier Initialization, which is a smarter way to initialize model weights, and an option to export model weights to a JSON file. I’ve used the following options to train the model used in this post:
- Training on the MNIST dataset, which has 60,000 train images, and 10,000 test images
- The following network architecture:
[784, 500, 300, 100, 10]. In other words, we take in 28x28=784 values, which represent the pixels of an image, pass them through 3 hidden layers of sizes 500, 300, and 100, respectively, and finally return a probability for each of the 10 digits - Learning rate of 0.003
- Batch size of 64
- 10 Epochs
- ReLU activation
- Xavier initialization This corresponds to the following CLI options when running the program from last post:
1
./rust_neuralnet --train-path ..path to training set --validation-path ..path to validation set --network-structure 784 500 300 100 10 --learning-rate 0.003 --batch-size 64 --num-epochs 10 --activation-function re-lu --initialization xavier --weight-path my_weights.json
After running this, we get the model’s weights in the file my_weights.json (we’ll go through the exact format later). Note that this time, since the digits drawn by the user are only black and white (i.e. only 0 and 255), we apply the following pre-processing script to the dataset. The script converts every pixel whose value is below 255/2=127 to a completely black pixel, and every other pixel to a completely white pixel:
1
2
3
4
5
6
7
8
9
10
11
12
13
14
15
16
17
18
19
20
21
22
23
24
25
26
27
28
29
import sys

if len(sys.argv) != 2:
    print("Usage: {} <dataset path>".format(sys.argv[0]))
    sys.exit(1)

path = sys.argv[1]

new_path = sys.argv[1][:-4] + "_new.csv"
new_file = open(new_path, "w")

with open(path) as f:
    for i, line in enumerate(f):
        # First row is a header
        if i == 0:
            new_file.write(line)
            continue

        numbers = [int(x) for x in line.split(",")]
        label = numbers[0]
        pixels = numbers[1:]
        new_pixels = [255 if x >=127 else 0 for x in pixels]
        # Construct the new row
        new_row = str(label)
        for pixel in new_pixels:
            new_row += "," + str(pixel)

        new_file.write(new_row + "\n")
Rust+WASM Hello World
Before deploying the model, it’ll be helpful to get a simple WASM “Hello World” project running. The toy app is adapted from this great tutorial by Mozilla on using Rust with WASM; I’ve just summarized the steps we need. We start by installing wasm-pack using cargo install wasm-pack. This tool will compile the Rust code to WASM for us.
Then, we create a new cargo project, which is a library named hello-wasm. In lib.rs, we put the following code:
1
2
3
4
5
6
use wasm_bindgen::prelude::*;

#[wasm_bindgen]
pub fn square(x: usize) -> usize {
	return x * x;
}
The wasm_bindgen attribute is quite complex (see its docs), and has many uses and configuration options, but here we only use it to tell the compiler that we want to export the square function (i.e. JS code should be able to call it).
Since we’re using the wasm_bindgen crate, we’ll add it to the project with cargo add wasm_bindgen. We’ll also set the type of the crate to cdylib; this helps cargo pass flags to the compiler so that it will correctly compile to WASM:
1
2
[lib]
crate-type = ["cdylib"]
Next, we’ll make a short webapp that uses the square function we defined. We’ll do this by compiling the Rust code to a module npm can use, which is done by running wasm-pack build --target bundler. This compiles the Rust code to WASM code, and generates some JS glue code through which JS code can call the (exported) functions defined in the WASM binary.
We’ll create a site directory, cd to it, and then install the package we just compiled using npm i ../pkg. We also install webpack with npm i -D webpack@5 webpack-cli@5 webpack-dev-server@4 copy-webpack-plugin@11. The webpack config looks as follows:
1
2
3
4
5
6
7
8
9
10
11
12
13
14
15
16
17
18
19
const CopyPlugin = require("copy-webpack-plugin");
const path = require("path");

module.exports = {
  entry: "./index.js",
  output: {
    path: path.resolve(__dirname, "dist"),
    filename: "index.js",
  },
  mode: "development",
  experiments: {
    asyncWebAssembly: true,
  },
  plugins: [
    new CopyPlugin({
      patterns: [{ from: "index.html" }],
    }),
  ],
};
Specifically note the following part:
1
2
3
  experiments: {
    asyncWebAssembly: true,
  },
Our index.js imports the square function from the WASM module we compiled, which is called hello-wasm, and calls it:
1
2
3
import * as wasm from "hello-wasm";

alert(`9 squared is ${wasm.square(9)}`);
The index.html file simply loads index.js:
1
2
3
4
5
6
7
8
<!doctype html>
<html lang="en-US">
  <head>
  </head>
  <body>
    <script src="./index.js"></script>
  </body>
</html>
We’ll also change the package.json file to add build and serve scripts:
1
2
3
4
5
6
7
8
9
10
11
12
13
14
15
{
  "scripts": {
        "build": "webpack --config webpack.config.js",
        "serve": "webpack serve --config webpack.config.js --open"
  },
  "dependencies": {
    "hello-wasm": "file:../pkg"
  },
  "devDependencies": {
    "copy-webpack-plugin": "^11.0.0",
    "webpack": "^5.94.0",
    "webpack-cli": "^5.1.4",
    "webpack-dev-server": "^4.15.2"
  }
}
Let’s serve the app with npm run serve and make sure that everything works as expected:
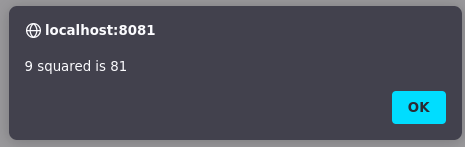
Nice! We successfully ran our first WASM module. To make it easier to deploy the real WASM app, let’s create a Dockerfile that contains all our steps:
1
2
3
4
5
6
7
8
9
10
11
12
13
14
15
16
17
18
19
20
21
22
23
24
25
26
27
28
29
30
31
32
33
FROM ubuntu:24.10
# Update default packages
RUN apt-get update
SHELL ["/bin/bash", "-c"]
# Get curl
RUN apt-get install -y \
    build-essential \
    curl
# Update new packages
RUN apt-get update
# Get Rust
RUN curl https://sh.rustup.rs -sSf | bash -s -- -y
ENV PATH="/root/.cargo/bin:${PATH}"
RUN source $HOME/.cargo/env
# Get npm
RUN apt-get install -y npm
RUN npm install -g npm@latest
# Install wasm-pack
RUN cargo install wasm-pack
# Create app dir
RUN mkdir -p app
# Copy files
COPY . /app
WORKDIR /app
RUN cargo add wasm-bindgen
RUN wasm-pack build --target bundler
# Serve
WORKDIR /app/site
# Install webpack & package deps
RUN npm i ../pkg
RUN npm i -D webpack@5 webpack-cli@5 webpack-dev-server@4 copy-webpack-plugin@11
EXPOSE 8080
ENTRYPOINT [ "npm", "run", "serve" ]
Deploying The Model With WASM
The app we’ll make is designed as follows:
- The user draws a digit into an HTML5 canvas
- The model trained in the “Training The Model” section is run on the digit drawn by the user
- The model’s output (i.e. what digit the user has drawn) is reported back to the user when the user presses a button We’ll go through the steps in order:
Drawing
We’ll start by writing the HTML (stored in
index.html), which is pretty simple:
1
2
3
4
5
6
7
8
9
10
11
12
13
14
15
16
17
18
<!doctype html>
<html lang="en-US">
  <head>
    <meta charset="utf-8" />
    <style>
	 /*...Thanks ChatGPT...*/
    </style>
    <title>Rust+WASM Digit Recogntion</title>
    <h1>Rust+WASM Digit Recognition</h1>
    <h2>Draw a digit in the below canvas!</h2>
  </head>
  <body>
    <canvas id="scaledCanvas" style="display: none" width="28" height="28"></canvas>
    <canvas id="drawingCanvas" width="336" height="336"></canvas>
    <button id="predictBtn">Predict</button>
    <script src="./index.js"></script>
  </body>
</html>
We create two canvases:
scaledCanvas, which is invisible, has the same width and height as the input the model expects. We’ll use it later when we feed the model imagesdrawingCanvasis the canvas the user actually draws on
To perform the drawing, we use the fabric library. To use it, we’ll add this line to the dockerfile:
1
RUN npm i fabric
The index.js imports fabric and loads the canvases:
1
2
3
4
import * as fabric from 'fabric';

const canvas = document.getElementById("drawingCanvas");
const scaledCanvas = document.getElementById("scaledCanvas");
Fills the drawing canvas with white:
1
2
3
4
const ctx = canvas.getContext("2d");

ctx.fillStyle = "#ffffff";
ctx.fillRect(0, 0, canvas.width, canvas.height);
And sets up the fabric drawing brush:
1
2
3
4
5
6
7
var newCanvas = new fabric.Canvas("drawingCanvas");
newCanvas.isDrawingMode = true;
newCanvas.freeDrawingBrush = new fabric["PencilBrush"](newCanvas);
newCanvas.freeDrawingBrush.width = 20;
newCanvas.freeDrawingBrush.color = "#000000";
newCanvas.backgroundColor = "#ffffff";
newCanvas.renderAll();
This is pretty self-explanatory; we draw with PencilBrush, which, as its name suggests, is a pencil brush. The brush width is 20, and we draw black-on-white (the model expects white-on-black images, so we’ll need to account for this when running inferences; we could’ve simply drawn white-on-black, but I think black-on-white is more aesthetically pleasing :)). Part 1 completed!
Running The Model
This is the most interesting section of the post. Recall that our model’s weights are stored as a JSON file my_weights.json. If so, to run the model on the images from the canvas, we need to do two things:
- Load the model into the WASM Runtime
- Preprocess the drawing on the canvas, and convert it into a format the model can understand
- Implement the forward pass of the model in WASM For step 1, we use the following function:
1
2
3
4
async function getModel() {
	const response = await fetch("/assets/my_weights.json");
	return await response.json();
}
The function reads the weights of the model from the path/assets/my_weights.json, and converts it to an object. The getModel function is called from the JS:
1
const model = await getModel();
For this to work, we create an assets directory under the site directory, and move the my_weights.json. Notice that we need to slightly alter the webpack config to copy the weights file to the server:
1
2
3
4
5
plugins: [
	new CopyPlugin({
				patterns: [{ from: "index.html" }, { from: "assets/my_weights.json", to: "assets/my_weights.json" }],
	})
],
And to allow the fetch call (and every other site) to read the JS file:
1
2
3
devServer: {
	headers: { "Access-Control-Allow-Origin": "*" }
}
Nice! We now have a JSON object representing the model. For now, this is only a JS object; later we’ll need to convert this to a struct Rust can use. Before we can run inferences with the model, we need to pre-process the drawing canvas data, and convert it to a format the Rust code will understand: recall from earlier that the drawing canvas has width 336 and height 336. To scale it down to 28x28, we use the scaledCanvas from earlier:
1
2
3
4
5
6
const ctxScaled = scaledCanvas.getContext("2d");
ctxScaled.save();
ctxScaled.clearRect(0, 0, ctxScaled.canvas.height, ctxScaled.canvas.width);
ctxScaled.scale(28.0 / ctx.canvas.width, 28.0 / ctx.canvas.height);
ctxScaled.drawImage(document.getElementById("drawingCanvas"), 0, 0);
ctxScaled.restore();
This clears the scaledCanvas, draws the data currently on the drawingCanvas onto it, and finally restores the scaledCanvas back to its original state. The drawImage function automatically handles the resizing for us! This is all wrapped in the modelPredict function:
1
2
3
4
5
6
7
8
9
10
async function modelPredict() {
	const ctxScaled = scaledCanvas.getContext("2d");
	ctxScaled.save();
	ctxScaled.clearRect(0, 0, ctxScaled.canvas.height, ctxScaled.canvas.width);
	ctxScaled.scale(28.0 / ctx.canvas.width, 28.0 / ctx.canvas.height);
	ctxScaled.drawImage(document.getElementById("drawingCanvas"), 0, 0);
	ctxScaled.restore();

	return wasm.predict(ctxScaled.getImageData(0, 0, 28, 28).data, model);
}
The wasm.predict method is defined in Rust. It takes in the image data, and the JS model object. The WASM module is imported as follows (this time the Rust project is named nn-wasm):
1
import * as wasm from "nn-wasm";
Note that the ctxScaled.getImageData doesn’t return us the pixels of the image; it returns a vector of length 28x28x4 (4 for RGBA). Each consecutive 4 elements represent the R, G, B, and A values of the corresponding pixel respectively. We handle this in the Rust code as follows:
1
2
3
4
5
6
7
8
9
10
11
12
13
14
// Initially we get the data as an (28, 28, 4) RGBA tensor, so we need to convert it to greyscale
fn get_pixels(data: &[u8]) -> [f64; IMG_WIDTH * IMG_HEIGHT] {
    let mut tensor = [0f64; IMG_WIDTH * IMG_HEIGHT];

    for i in 0..IMG_WIDTH*IMG_HEIGHT {
        let r = data[i * RGBA];

        // The canvas is black and weight, so we only care about the value of one of the RGB components, which is
        // either 0 or 255
        tensor[i] = if r >= THRESHOLD {MAX_PIXEL_VAL} else {0f64};
    }

    tensor
}
Where the relevant constants are defined as follows:
1
2
3
4
5
const IMG_WIDTH: usize = 28;
const IMG_HEIGHT: usize = 28;
const RGBA: usize = 4;
const THRESHOLD: u8 = 127;
const MAX_PIXEL_VAL: f64 = 255f64;
Now, let’s build the predict function piece-by-piece. First of all, it takes in the image data, and the JS object of the model. In Rust, we use the JsValue from the wasm_bindgen crate to represent this object. The function returns the model’s predictions, which is a vector of floats (the i’th float represents the probability of the input image being digit i). Therefore, we define the function’s signature as follows:
1
2
3
4
#[wasm_bindgen]
pub async fn predict(data: &[u8], model_js: JsValue) -> Vec<f64> {

}
We start with converting the model_js parameter to Rust struct. The JSON for the model’s weights, and hence model_js, is defined in the following format (the count stops at 3 since we only have 4 layers; recall that the network’s architecture is 784x500x300x100x10):
1
2
3
4
5
6
7
8
9
{
"W0": [Weights for the first layer],
"b0": [Biases for the first layer],
"W1": [Weights for the second layer],
"b1": [Biases for the second layer],
...,
"W3": [Weights for the final layer],
"b3": [Biases for the final layer]
}
We define a struct NeuralNetJs:
1
2
3
4
5
6
7
8
9
10
11
#[derive(Serialize, Deserialize)]
pub struct NeuralNetJs {
	pub W0: Vec<f64>,
	pub b0: Vec<f64>,
	pub W1: Vec<f64>,
	pub b1: Vec<f64>,
	pub W2: Vec<f64>,
	pub b2: Vec<f64>,
	pub W3: Vec<f64>,
	pub b3: Vec<f64>,
}
Now that we have this struct, we can deserialize model_js (which is a JsValue) into a NeuralNetJs using serde:
1
let model_js: NeuralNetJs = serde_wasm_bindgen::from_value(model_js).unwrap();
The from_value function is provided by the crates serde_wasm_bindgen and serde.
Nice! Now we have a NeuralNetJs structure containing the weights of our model as vectors of f64s. We could stop here, and implement matrix multiplication manually, but there’s no reason to; instead, we’ll use the ndarray crate and define a new struct NeuralNet:
1
2
3
4
5
use ndarray::{Array1, Array2};

pub struct NeuralNet {
	pub layers: Vec<(Array2<f64>, Array1<f64>)>,
}
To convert a NeuralNetJs into a NeuralNet, we use the following function:
1
2
3
4
5
6
7
8
9
10
11
12
13
14
15
impl From<NeuralNetJs> for NeuralNet {
    fn from(value: NeuralNetJs) -> Self {
        let w0 = Array2::from_shape_vec((INPUT_SIZE, LAYER_1), value.W0).unwrap();
        let b0 = Array1::from_vec(value.b0);
        let w1 = Array2::from_shape_vec((LAYER_1, LAYER_2), value.W1).unwrap();
        let b1 = Array1::from_vec(value.b1);
        let w2 = Array2::from_shape_vec((LAYER_2, LAYER_3), value.W2).unwrap();
        let b2 = Array1::from_vec(value.b2);
        let w3 = Array2::from_shape_vec((LAYER_3, NUM_DIGITS), value.W3).unwrap();
        let b3 = Array1::from_vec(value.b3);
        let layers = vec![(w0, b0), (w1, b1), (w2, b2), (w3, b3)];

        return NeuralNet { layers }
    }
}
Where the constants are the layer sizes:
1
2
3
4
5
const NUM_DIGITS: usize = 10;
const LAYER_1: usize = 500;
const LAYER_2: usize = 300;
const LAYER_3: usize = 100;
const INPUT_SIZE: usize = 784;
There’s not much to say about this conversion; It takes the fields from NeuralNetJs, converts them to matrices (for the weights) and vectors (for the biases), and creates a new vector of (weight, bias) tuples.
Now, we implement a new function forward on NeuralNet, which takes in a matrix and returns the output of the network:
1
2
3
4
5
6
7
8
9
10
11
12
13
14
15
16
impl NeuralNet {
    pub fn forward(&self, x: Array2<f64>) -> Array2<f64> {
        let mut out = x;

        for (i, (weight, bias)) in self.layers.iter().enumerate() {
            if i != NUM_LAYERS {
                // Apply ReLU
                out = (out.dot(weight) + bias).map(|z| z.max(0f64));
            } else {
                out = out.dot(weight) + bias;
            }
        }

        out
    }
}
But we’re getting ahead of ourselves here; We don’t even have a matrix yet! All we have is the data, which is a slice of u8 (i.e. &[u8]). Let’s convert it to the image pixels using the get_pixels function defined earlier, and convert it to white-on-black instead of black-on-white:
1
let inp_data: Vec<f64> = get_pixels(data).into_iter().map(|x| 1f64 - (x / MAX_PIXEL_VAL)).collect();
And now let’s use the inp_data vector to create a new matrix of shape (1, 784):
1
let model_input = Array2::from_shape_vec((1, IMG_WIDTH*IMG_HEIGHT), inp_data).unwrap();
Finally, we run the forward pass of the network on this matrix, and return its softmax:
1
2
3
let preds = model.forward(model_input);

softmax(preds.flatten().to_vec())
The softmax function is defined as follows:
1
2
3
4
5
6
7
8
9
10
11
12
/// Softmax function - Convert scores into a probability distribution
fn softmax(scores: Vec<f64>) -> Vec<f64> {
	let max = scores.iter().max_by(|x, y| x.total_cmp(y)).unwrap();
	// We use a numerical trick where we shift the elements by the max, because otherwise
	// We would have to compute the exp of very large values which wraps to NaN
	let shift_scores: Vec<f64> = scores.iter().map(|x| x - max).collect();
	let sum: f64 = shift_scores.iter().map(|x| x.exp()).sum();

	(0..scores.len())
	.map(|x| shift_scores[x].exp() / sum)
	.collect()
}
Note how it isn’t marked as wasm_bindgen, since there’s no reason for the JS code to have access to it: It’s only used as a helper function inside the Rust code.
And that’s it! Here’s the complete code for predict:
1
2
3
4
5
6
7
8
9
10
#[wasm_bindgen]
pub async fn predict(data: &[u8], model_js: JsValue) -> Vec<f64> {
    let model_js: NeuralNetJs = serde_wasm_bindgen::from_value(model_js).unwrap();
    let inp_data: Vec<f64> = get_pixels(data).into_iter().map(|x| 1f64 - (x / 255f64)).collect();
    let model = NeuralNet::from(model_js);
    let model_input = Array2::from_shape_vec((1, IMG_WIDTH*IMG_HEIGHT), inp_data).unwrap();
    let preds = model.forward(model_input);

    softmax(preds.flatten().to_vec())
}
Reporting The Output
This step is the easiest one; All we need to do is run the model, and alert which digit got the highest probability:
1
2
3
4
document.getElementById("predictBtn").onclick = async () => {
	let preds = await modelPredict();
	alert(`Predicted digit: ${preds.indexOf(Math.max(...preds))}`);
}
Demo
We’ve completed the app! Let’s run a quick demo:
As you can see, the model is sometimes wrong, but it mostly works :) Note that if the digits are not centered, the model doesn’t work well; to prevent this, we could’ve trained the model on an augmented dataset (e.g. shifting the images on the dataset).
Summary
In these two posts, we’ve deployed a digit recognition model completely from scratch (at least with regards to ML-related dependencies)! The end result is very fun :) This project taught me a lot about ML and Rust, and I’m very proud of it :) The code for this project can be found here.