WebSockets - The Beginner's Guide
Prelude
In the start of the year, I started keeping myself a list of technologies I don’t understand and want to learn about. The first candidate I immediately thought about was WebSockets. I kept seeing them popping up in websites and CTFs, but they always looked like gibberish to me, and I just moved on without looking at the WebSocket functionality. This blog post summarizes what I learned about WebSockets in hope that other people like me that used to avoid them will understand them better.
The Why
A good way to start learning a new technology is to look at its documentation. For web related stuff, my favorite resource is the MDN (Mozilla Developer Network). Quoting this page: “The WebSocket API is an advanced technology that makes it possible to open a two-way interactive communication session between the user’s browser and a server. With this API, you can send messages to a server and receive event-driven responses without having to poll the server for a reply.” There are two bits that jump out here:
- “Two-way interactive connection” means that the server and the client (In this case the client’s browser) can both send messages at any time
- Event-driven, along with polling, forms the two most common ways to handle events. You can think of them like waiting for a friend of yours to knock on the door. Polling means that you check the door every few minutes to see if your friend arrived, and event-driven in this case means that your friend rings the bell, and when the bell is rung you open the door. This is the reason WebSockets were created: Think of a chat application. If the app only uses HTTP, every time you wanted to check if you received a new message, you would have to refresh the page. But because WebSockets are event-driven, if the app uses them you’ll immediately see any new messages you receive.
The How (Client-Side)
So far this is all nice and well, but how do we actually use WebSockets? The answer to this is split into two parts: How WebSocket are used in the client side (JavaScript), and how WebSocket servers work.
- In the client side part, we’ll see how WebSockets are generally used in JavaScript
- In the server side part, we’ll write a WebSocket server in Rust to implement what we’ve learned. It won’t implement all of the protocol, but it will implement the core parts. Let’s start with the client side. To use WebSockets in JavaScript, the
WebSocketclass is used:my_websocket = WebSocket(url, protocols);The constructor for this class receives two arguments: Aurlto which to connect, and an optional list ofprotocols. Theprotocolsare sub-protocols to WebSockets, and you might want your server to handle different sub-protocols differently, for example one protocolgameposfor communicating your position in a game, and another protocolchatfor the in-game chat. In order to send a WebSocket message, thesendmethod is used:my_websocket.send("Hello World!");Then, to receive messages from the server, websockets have anonmessageevent handler in JavaScript:1 2 3
my_websocket.onmessage = (event) => { console.log(`Received a message from the server: ${event.data}`) }Finally the connection is closed using
my_websocket.close()The How (Server-Side)
First of all, WebSocket architectures often use the HTTP server like a reverse proxy (see the following figure), so we want to listen on some TCP port:
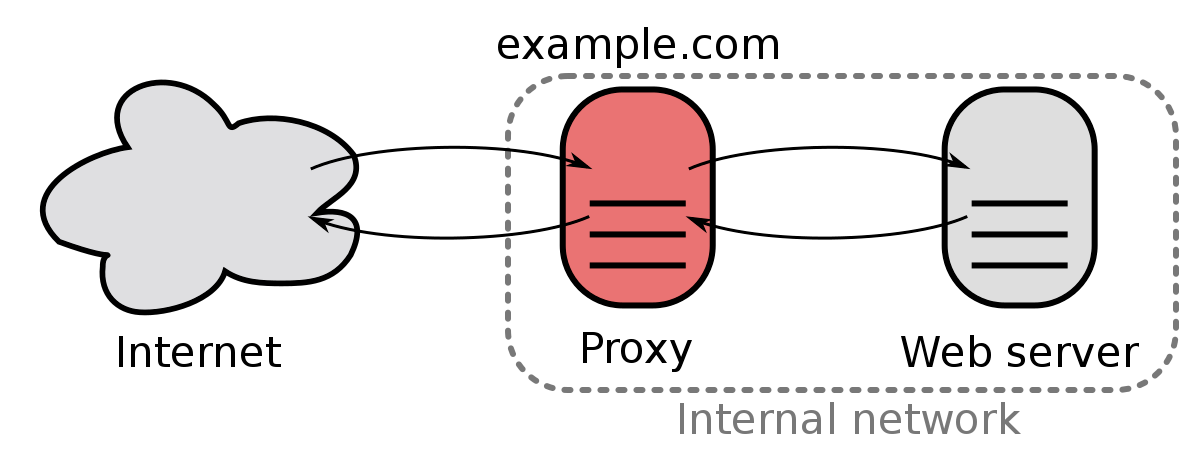 A reverse proxy architecutre
In Rust, listening on a TCP port is done as follows:
1
2
3
4
5
6
7
8
9
10
11
12
13
14
let listener = TcpListener::bind("127.0.0.1:8000").unwrap();
println!("Listening on 127.0.0.1:8000");

// For every incoming connection
for stream in listener.incoming() {
	let stream = stream.unwrap();

	println!("Connection established with {}", stream.peer_addr().unwrap());
	// We'll write this function later
	handle_client(stream);
}

// Stop listening
drop(listener)
Now we need to actually implement the protocol. A good way to find out more about a protocol is by reading its spec. You can find the WebSocket spec here: https://datatracker.ietf.org/doc/html/rfc6455. WebSockets are often (although not always) used in an HTTP environment, and to start communicating over WebSockets, the client and the server need to agree that they want to switch protocols and under what terms. This is called a handshake. To start the WebSocket handshake, the client sends the following HTTP request to the server:
1
2
3
4
5
6
7
        GET /chat HTTP/1.1
        Host: server.example.com
        Upgrade: websocket
        Connection: Upgrade
        Sec-WebSocket-Key: dGhlIHNhbXBsZSBub25jZQ==
        Origin: http://example.com
        Sec-WebSocket-Version: 13
The server then responds with:
1
2
3
4
        HTTP/1.1 101 Switching Protocols
        Upgrade: websocket
        Connection: Upgrade
        Sec-WebSocket-Accept: s3pPLMBiTxaQ9kYGzzhZRbK+xOo=
There are a few things to unpack here. In the client’s request:
Upgrade: websokcetindicates that the client wants to switch protocolsConnection: Upgrademeans the same thingSec-WebSocket-Keyis a random key that the client sends to the server so that the connection between them would be secure. We’ll see how this is done in a momentSec-WebSocket-Versionis the WebSocket version Let’s do a quick check in our server code for these headers:
1
2
3
4
5
6
7
8
9
10
11
12
13
14
15
16
17
18
19
20
21
22
23
24
25
26
27
28
29
30
31
32
33
34
35
36
37
38
39
40
41
42
43
44
45
46
47
48
49
50
fn handle_client(mut stream: TcpStream) {
let mut data = [0 as u8; 1024];

// Stream can change (for example client can write multiple times) so this is done in a while loop
while match stream.read(&mut data) {
	Ok(len) => {
// Is this a GET request (HTTP handshake)
// 0x47 = 'G'
// 0x45 = 'E'
// 0x54 = 'T'
		if data[0] == 0x47 && data[1] == 0x45 && data[2] == 0x54 {
// Currently the data is an array that contains the ascii values, so now that we know that it is an HTTP request
// convert it into a string
		let data = String::from_utf8(data.to_vec()).unwrap();
// Get the individual headers
		let mut headers: Vec<_> = data.lines().take_while(|x| !x.is_empty()).collect();
// Remove the first line (GET /path)
		headers.remove(0);
// Put in a HashMap for a small performance boost and to be more clear
		let mut headers_hashmap: HashMap<&str, &str> = HashMap::new();

// Go over headers and put in the HashMap
		for header in headers {
			let split_header: Vec<_> = header.trim().split(": ").collect();

			headers_hashmap.insert(split_header[0], split_header[1]);
		}

		if headers_hashmap.get("Upgrade").unwrap() != &"websocket"
		|| !headers_hashmap.get("Connection").unwrap().contains("Upgrade")
		|| headers_hashmap.get("Sec-WebSocket-Version").unwrap() != &"13" {
			println!("Invalid Headers");
			let _ = stream.shutdown(Shutdown::Both);
			return;
		}
	}

true

},

Err(e) => {

println!("err: {:?}", e);

false

}

} {}
Then, the Sec-WebSocket-Accept header that the server responds with is computed as follows: computed_sec_websocket_accept = Base64Encode(SHA1(the_key_that_the_client_sent + "258EAFA5-E914-47DA-95CA-C5AB0DC85B11")) The random UUID is a magic value and doesn’t have any special meaning. Let’s add the response of the handshake to our code:
1
2
3
4
5
6
7
8
9
10
11
12
13
14
15
16
17
18
19
20
let mut hasher = Sha1::new();

hasher.update(
(headers_hashmap.get("Sec-WebSocket-Key").unwrap().to_owned().to_owned() + "258EAFA5-E914-47DA-95CA-C5AB0DC85B11").as_bytes()
);

let hasher_res = hasher.finalize();

let response = "HTTP/1.1 101 Switching Protocols".to_owned()
+ CRLF
+ "Connection: Upgrade"
+ CRLF
+ "Upgrade: websocket"
+ CRLF
+ "Sec-WebSocket-Accept: "
+ &general_purpose::STANDARD.encode(hasher_res)
+ CRLF
+ CRLF;

stream.write_all(response.as_bytes()).unwrap();
If the handshake is successful, the client and the server can exchange messages according to the following format: 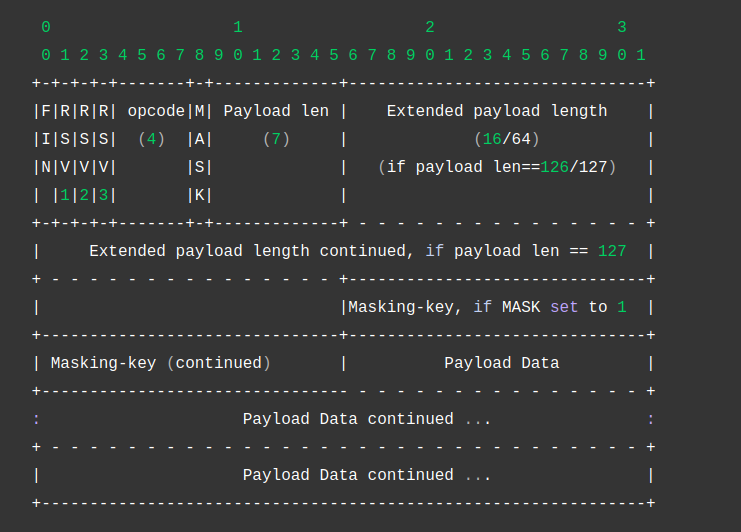 The WebSocket message format This means that:
- The first byte of a message is a bit-field that breaks down as follows: The first bit indicates whether the full message has been sent, the next three bits are used for extensions (which we won’t covert today), and the final three bits are the opcode (for example text frame, binary frame, etc.).
- The second byte is also bit-field: The first bit indicates whether the payload is masked. In case it is, the next four bytes are the masking key. The next seven bits indicate the length of the payload. Seven bytes can only represent numbers up to 128, so in order to represent payload with length greater than 128, the following is done: If the seven bits are 126, the next two bytes indicate the payload length. If the seven bits are 127, the next eight bytes indicate the payload length.
- All of the following bytes except for the key are the payload The message is decoded as follows: $D_i = E_i \oplus M_{i \% 4}$ Where $D$ is the decoded message, $E$ is the encoded message, and $M$ is the mask. Let’s add this to our code:
1
2
3
4
5
6
7
8
9
10
11
12
13
14
15
16
17
18
19
20
21
22
23
24
25
26
27
28
29
30
31
32
33
34
35
36
37
38
39
40
41
// Message is a WebSocket. We're not doing error checking here to not make the code more complex
let payload_length = data[1] & 0b01111111;
let mut decoded_payload: Vec<u8> = vec![];

if payload_length < 126 {
	let mask = &data[2..6];

	for i in 0..payload_length {
		decoded_payload.push(data[6 + i as usize] ^ mask[i as usize % 4]);
	}
}
else if payload_length == 126 {
// Next two bytes are the real payload length
	let payload_length = ((data[2] as u32) << 8) + data[3] as u32;
	let mask = &data[4..8];

	for i in 0..payload_length {
		decoded_payload.push(data[8 + i as usize] ^ mask[i as usize % 4]);
	}
}
else if payload_length == 127 {
// Next eight bytes are the real payload length
	let payload_length = ((data[2] as u64) << 56) +
	((data[3] as u64) << 48) +
	((data[4] as u64) << 40) +
	((data[5] as u64) << 32) +
	((data[6] as u64) << 24) +
	((data[7] as u64) << 16) +
	((data[8] as u64) << 8) +
	data[9] as u64;

	let mask = &data[10..14];

	for i in 0..payload_length {
		decoded_payload.push(data[14 + i as usize] ^ mask[i as usize % 4]);
	}
}

let decoded_payload = String::from_utf8(decoded_payload).unwrap();

println!("Received the message {}", decoded_payload);
That’s about it for this post! As always, thank you for reading❤️ Until next time :) Yoray
P.S. You can find the code for this project in a GitHub repo I created for this project